Welcome to the world of Kubernetes installation on CentOS 7, where we unravel the secrets of seamlessly setting up this powerful container orchestration system. Get ready to embark on a journey that will empower you to efficiently manage and scale your applications with ease.
Kubernetes Installation Requirements
To install Kubernetes on CentOS 7, you need to ensure that your system meets the necessary requirements.
Firstly, make sure that you have a CentOS 7 operating system installed on your machine. Kubernetes is compatible with CentOS, so you’re good to go.
Next, ensure that you have administrative access to your system. This is necessary to install and configure the necessary components. You can use the “sudo” command to execute administrative tasks.
Additionally, make sure that your system has a stable internet connection. This is important as you will need to download and install packages from software repositories.
You should also have a basic understanding of Linux and command-line interfaces. This will help you navigate through the installation process.
Lastly, check if you have Docker installed on your system. Kubernetes relies on Docker to create and manage containers. If Docker is not installed, you can easily install it using the package manager “yum”.
By ensuring that your system meets these requirements, you will be ready to proceed with the installation of Kubernetes on CentOS 7.
Configuring Kubernetes Repository and Docker
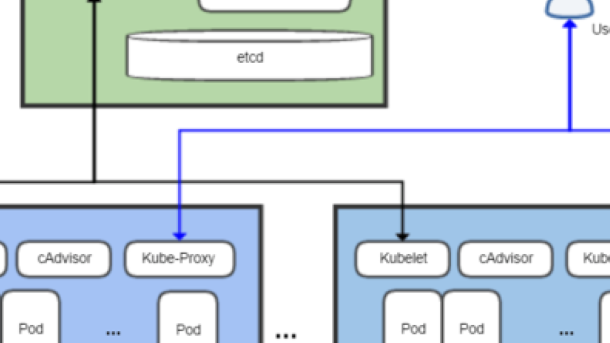
![]()
To configure the Kubernetes repository and Docker on CentOS 7, follow these steps:
1. Update the package manager by running the command: sudo yum update
2. Install the necessary packages for Docker by running: sudo yum install docker
3. Start the Docker service: sudo systemctl start docker
4. Enable Docker to start on boot: sudo systemctl enable docker
5. Add the Kubernetes repository by creating a file named kubernetes.repo in the /etc/yum.repos.d/ directory.
6. Open the file with a text editor and add the following content:
[kubernetes]
name=Kubernetes
baseurl=https://packages.cloud.google.com/yum/repos/kubernetes-el7-x86_64
enabled=1
gpgcheck=1
repo_gpgcheck=1
gpgkey=https://packages.cloud.google.com/yum/doc/yum-key.gpg
https://packages.cloud.google.com/yum/doc/rpm-package-key.gpg
7. Save the file and exit the text editor.
8. Install the necessary packages for Kubernetes by running: sudo yum install -y kubelet kubeadm kubectl
9. Start the kubelet service: sudo systemctl start kubelet
10. Enable kubelet to start on boot: sudo systemctl enable kubelet
11. Configure Docker to use the Kubernetes CRI runtime by creating a file named docker.conf in the /etc/systemd/system/docker.service.d/ directory.
12. Open the file with a text editor and add the following content:
[Service]
Environment=”KUBELET_EXTRA_ARGS=–container-runtime=remote –container-runtime-endpoint=unix:///var/run/crio/crio.sock –runtime-request-timeout=5m”
13. Save the file and exit the text editor.
14. Restart the Docker service: sudo systemctl daemon-reload followed by sudo systemctl restart docker
Installing Kubernetes Components
To install Kubernetes components on CentOS 7, you will need to follow these steps:
1. Update your system: Before installing any software, it is important to update your system using the command yum update. This will ensure that you have the latest packages and security patches.
2. Install Docker: Kubernetes relies on Docker for containerization. Install Docker using the command yum install docker. Start the Docker service and enable it to start on boot with the commands systemctl start docker and systemctl enable docker respectively.
3. Disable SELinux: Kubernetes may have issues with SELinux, so it is recommended to disable it. Edit the SELinux configuration file located at /etc/selinux/config and set the SELINUX value to disabled. Reboot your system for the changes to take effect.
4. Install Kubernetes: Add the Kubernetes repository to your system by creating a file named kubernetes.repo in the /etc/yum.repos.d/ directory. Paste the repository configuration into the file and save it. Then, install Kubernetes components using the command yum install -y kubelet kubeadm kubectl.
5. Configure Kubernetes: Initialize the Kubernetes control plane using the command kubeadm init. Follow the instructions provided to set up your cluster. Once the initialization is complete, copy the command provided to join worker nodes to the cluster.
6. Set up the network: Install a network add-on for Kubernetes, such as Calico or Flannel, to enable communication between pods. Follow the instructions provided by the chosen network add-on to install and configure it.
7. Join worker nodes: On each worker node, run the command copied from the control plane initialization to join it to the cluster. This will allow the nodes to participate in the Kubernetes cluster.
8. Verify the installation: Use the command kubectl get nodes to verify that all nodes in the cluster are up and running. You should see a list of all the nodes in your cluster.
Setting Hostnames and Disabling SELinux
To set hostnames and disable SELinux on CentOS 7 for Kubernetes installation, follow these steps:
1. Open a command-line interface on your CentOS 7 machine.
2. Use the `cat` command to view and edit the hosts file: `cat /etc/hosts`. This file maps hostnames to IP addresses. Add an entry for each node in your cluster, including the IP address and hostname.
3. Next, disable SELinux by editing the configuration file. Open the SELinux configuration file using a text editor: `sudo vi /etc/selinux/config`.
4. Locate the line that says `SELINUX=enforcing` and change it to `SELINUX=disabled`. Save and exit the file.
5. Reboot your machine to apply the changes: `sudo reboot`.
6. After the machine reboots, log back in and verify that SELinux is disabled by running the command: `sestatus`. The output should show `SELinux status: disabled`.
Setting hostnames and disabling SELinux is an important step in ensuring the smooth installation and operation of Kubernetes on your CentOS 7 machine. By properly configuring the hosts file and disabling SELinux, you can avoid any potential conflicts or security restrictions that may arise.
Configuring Firewall and iptables
Firewall and iptables help to secure your system by controlling network traffic and filtering out unauthorized access.
To configure the firewall, you can use the iptables command-line tool. This tool allows you to define rules for incoming and outgoing network traffic, specifying which ports and protocols are allowed or blocked.
First, you need to install the iptables software using the Yum package manager. Open a terminal and run the command:
sudo yum install iptables
Once installed, you can start configuring the firewall by creating rules using the iptables command. For example, to allow incoming traffic on port 80 (HTTP), use the following command:
sudo iptables -A INPUT -p tcp –dport 80 -j ACCEPT
To block traffic on a specific port, you can use the following command:
sudo iptables -A INPUT -p tcp –dport 22 -j DROP
After defining your rules, you can save them to make them persistent across reboots.
sudo service iptables save
It’s important to regularly review and update your firewall rules to ensure the security of your Kubernetes installation.
By properly configuring the firewall and iptables, you can protect your Kubernetes cluster from unauthorized access and ensure the smooth operation of your applications.
Disabling SWAP and Troubleshooting
To disable SWAP on a CentOS 7 system during Kubernetes installation, follow these steps:
1. Open the terminal or command-line interface on your CentOS 7 machine.
2. Log in as the superuser or use the sudo command to run the following commands.
3. Check the current swap usage by running the command: swapon -s. This will display any active swap partitions.
4. Disable all swap partitions by running the command: swapoff -a. This will deactivate the swap space.
5. Remove any swap entries from the /etc/fstab file. Use a text editor to open the file and delete any lines that reference swap partitions.
6. Save the changes and exit the text editor.
7. Verify that SWAP is successfully disabled by running the command: swapon -s. There should be no output if SWAP is disabled.
Troubleshooting:
– If you encounter any issues during the installation process, check the following:
– Ensure that your CentOS 7 machine meets the minimum system requirements for Kubernetes installation.
– Verify that you have the necessary software repositories enabled. You can use the yum repolist command to check.
– Check your network configuration, including DNS settings and firewall rules, to ensure proper connectivity.
– If you are using a virtual machine or virtual private server, make sure that the hypervisor or host system supports the required virtualization features.
– Review the logs and error messages for any specific error codes or messages that can help identify the problem.
Creating and Managing a Kubernetes Cluster
Next, update your system using the “yum” package manager. This will ensure that your operating system is up to date and ready for Kubernetes installation.
Once your system is updated, you can proceed with installing Docker, which is a prerequisite for Kubernetes. Docker allows you to run and manage containers, which are essential for Kubernetes cluster deployment.
After Docker is installed, you can move on to installing Kubernetes itself. This can be done by adding the Kubernetes software repository to your system and then using the package manager to install the necessary components.
Once Kubernetes is installed, you will need to configure your hosts file to ensure that the cluster can communicate properly. This involves adding the IP addresses and hostnames of all the nodes in the cluster.
Finally, you can start and manage your Kubernetes cluster using the “kubectl” command-line tool. This tool allows you to interact with the cluster, deploy applications, and monitor their performance.
Setting Up the Pod Network
To set up the Pod Network in Kubernetes on CentOS 7, follow these steps:
1. Install the necessary software: Begin by installing Docker and Kubernetes using the Yum package manager. These tools are crucial for creating and managing your cluster.
2. Configure the hosts file: Edit the hosts file on each node in your cluster to ensure they can communicate with each other. Add the IP addresses and hostnames for each node to the file.
3. Enable port forwarding: Configure port forwarding to allow communication between the nodes in your cluster. This will ensure that the pods can communicate with each other seamlessly.
4. Set up the network: Configure the network settings for your cluster. You can choose from various network plugins, such as Calico or Flannel, depending on your requirements.
5. Configure the cluster: Use the Kubernetes command-line interface (kubectl) to configure your cluster. This includes setting up the master node, joining worker nodes, and configuring the networking options.
6. Test the setup: Verify that your cluster is working correctly by running a simple test application. This will help you ensure that the pods are communicating as expected.
Checking Cluster Status and Adding Worker Nodes
To check the status of your Kubernetes cluster and add worker nodes, follow these steps:
1. SSH into your master node using the command: ssh [username]@[master-node-ip].
2. Once logged in, run the command kubectl get nodes to check the current status of your cluster. This will list all the nodes in your cluster, including the master and worker nodes.
3. If the cluster is not yet initialized, you can initialize it by running the command kubeadm init on the master node. This will set up the necessary components for your cluster.
4. After the initialization is complete, you will see a command output that includes a kubeadm join command. Copy this command as you will need it to add worker nodes to the cluster.
5. On the worker nodes, SSH into each node and run the kubeadm join command that you copied from the master node. This will join the worker node to the cluster.
6. Once the worker nodes have joined the cluster, go back to the master node and run kubectl get nodes again. You should now see the worker nodes listed as part of your cluster.
7. To verify that the worker nodes are functioning correctly, you can deploy a test pod using the command kubectl run test-pod –image=nginx. This will create a pod running the nginx image on one of the worker nodes.
8. Finally, run kubectl get pods -o wide to see the status and location of the test pod. If it is running on one of the worker nodes, then your cluster is successfully configured.