Cloud Technology

Complete CloudFormation Tutorial

In this comprehensive guide, we will delve into the world of CloudFormation and explore how to harness its power to automate and streamline your AWS infrastructure deployment process.

Introduction to AWS CloudFormation

AWS CloudFormation is a powerful tool provided by Amazon Web Services for automating the deployment of infrastructure resources. It allows you to define your infrastructure in a template, using either JSON or YAML syntax. These templates can include resources such as Amazon EC2 instances, S3 buckets, databases, and more.

By using CloudFormation, you can easily manage and update your infrastructure, as well as create reproducible environments. It also helps in version control, as you can track changes made to your templates over time.

To get started with CloudFormation, you’ll need to have a basic understanding of JSON or YAML, as well as familiarity with the AWS services you want to use in your templates. You can create templates using a text editor or a specialized tool, and then deploy them using the AWS Management Console or the command-line interface.

Understanding CloudFormation Templates

Resource Description
Resources Defines the AWS resources that you want to create or manage.
Parameters Allows you to input custom values when creating or updating the stack.
Mappings Allows you to create a mapping between keys and corresponding values.
Outputs Specifies the output values that you want to view once the stack is created.
Conditions Defines conditions that control whether certain resources are created or not.

AWS CloudFormation Concepts and Attributes

AWS CloudFormation is a powerful tool that allows you to define and provision your infrastructure as code. This means you can easily create and manage resources such as Amazon Elastic Compute Cloud (EC2) instances, Amazon S3 buckets, databases, and more, using a simple template.

Concepts to understand in CloudFormation include templates, stacks, resources, parameters, and outputs. Templates are JSON or YAML files that describe the resources you want to create. Stacks are collections of resources that are created and managed together. Resources are the individual components of your infrastructure, such as EC2 instances or S3 buckets.

Attributes are characteristics of resources that can be defined in your CloudFormation template. For example, you can specify the size of an EC2 instance or the name of an S3 bucket using attributes.

Creating a CloudFormation Stack

To create a CloudFormation stack, start by writing a template in either JSON or YAML format. This template defines all the AWS resources you want to include in your stack, such as EC2 instances or S3 buckets. Make sure to include parameters in your template to allow for customization when creating the stack.

Once your template is ready, you can use the AWS Management Console, CLI, or SDK to create the stack. If you prefer the command-line interface, use the “aws cloudformation create-stack” command and specify the template file and any parameters required.

After initiating the creation process, AWS will start provisioning the resources defined in your template. You can monitor the progress of the stack creation through the AWS Management Console or CLI. Once the stack creation is complete, you will have your resources up and running in the cloud.

Managing Stack Resources

When managing **stack resources** in CloudFormation, it is important to carefully allocate and utilize resources efficiently. By properly configuring your **Amazon Web Services** resources, you can optimize performance and cost-effectiveness.

Utilize **parameters** to customize your stack based on specific requirements. These allow you to input values at runtime, making your stack more flexible and dynamic. Make sure to define parameters in your CloudFormation template to easily adjust settings as needed.

Consider using **version control** to track changes in your CloudFormation templates. This allows you to revert to previous versions if needed and keep a record of modifications. Version control also promotes collaboration and ensures consistency across your stack resources.

Regularly monitor your stack resources to identify any issues or inefficiencies. Use tools like **Amazon CloudWatch** to track metrics and set up alarms for any abnormalities. This proactive approach can help prevent downtime and optimize performance.

When managing stack resources, it is crucial to prioritize security. Implement **access-control lists** and **firewalls** to restrict access to your resources and protect sensitive data. Regularly review and update security measures to mitigate potential risks.

CloudFormation Access Control

To control access, you can create IAM policies that specify which users or roles have permission to perform specific actions on CloudFormation stacks. These policies can be attached to users, groups, or roles within your AWS account.

Additionally, you can use AWS Identity and Access Management (IAM) roles to grant temporary access to resources within CloudFormation. This allows you to delegate access to users or services without sharing long-term credentials.

By carefully managing access control in CloudFormation, you can ensure that only authorized users can make changes to your infrastructure. This helps to maintain security and compliance within your AWS environment.

Demonstration: Lamp Stack on EC2

In this Demonstration, we will walk through setting up a Lamp Stack on EC2 using CloudFormation. This tutorial will guide you through the process step by step, making it easy to follow along and implement in your own projects.

First, you will need to access your AWS account and navigate to the CloudFormation service. From there, you can create a new stack and select the template that includes the Lamp Stack configuration.

Next, you will need to specify any parameters required for the stack, such as instance type or key pairs. Once everything is set up, you can launch the stack and wait for it to complete provisioning.

After the stack is successfully created, you can access your Lamp Stack on EC2 and start using it for your projects. This tutorial provides a hands-on approach to setting up a Lamp Stack, making it a valuable resource for those looking to expand their Linux training.

Next Steps and Conclusion

In conclusion, after completing this **CloudFormation** tutorial, you should now have a solid understanding of how to create and manage resources on **Amazon Web Services** using infrastructure as code. The next steps would be to continue practicing by creating more complex templates, exploring different resource types, and leveraging **Amazon S3** for storing your templates and assets.

Consider delving deeper into **JavaScript** and **MySQL** to enhance your templates with dynamic content and database connectivity. You may also want to experiment with integrating your CloudFormation stacks with other AWS services like **Amazon EC2** and **WordPress** for a more comprehensive infrastructure setup.

Remember to always validate your templates and parameters, use a reliable text editor for editing your code, and follow best practices for security and efficiency. Stay informed about the latest updates and features in CloudFormation to optimize your infrastructure deployment process.

Docker Basics Tutorial

Welcome to the world of Docker, where containers revolutionize the way we develop, deploy, and scale applications. In this tutorial, we will embark on a journey to grasp the fundamental concepts and essential skills needed to leverage the power of Docker. So, fasten your seatbelts and get ready to embark on a containerization adventure like no other!

Introduction to Docker and Containers

Docker Basics Tutorial

Docker is a popular containerization tool that allows you to package an application and its dependencies into a standardized unit called a container. Containers are lightweight and portable, making them a great choice for deploying applications across different environments.

Containers use OS-level virtualization to isolate applications from the underlying operating system, allowing them to run consistently across different systems. Docker leverages Linux namespaces, cgroups, and chroot to create a secure and efficient environment for running applications.

One of the key advantages of using Docker is its ability to create reproducible and scalable environments. With Docker, you can package your application along with its dependencies, libraries, and configuration into a single container. This container can then be easily deployed and run on any system that has Docker installed. This eliminates the need for manual installation and configuration, making it easier to manage and scale your applications.

Docker also provides a command-line interface (CLI) that allows you to interact with and manage your containers. You can create, start, stop, and delete containers using simple commands. Docker also offers a rich set of features, such as networking, storage, and security, which can be configured using the CLI.

In addition to the CLI, Docker also provides a graphical user interface (GUI) and a web-based management interface called Docker Hub. Docker Hub is a cloud-based service that allows you to store, share, and distribute your Docker images. It also provides a marketplace where you can find pre-built Docker images for popular applications and services.

Overall, Docker is a powerful tool that simplifies the deployment and management of applications. It provides a standardized and reproducible environment, making it easier to collaborate and share your work. By learning Docker, you will gain valuable skills that are in high demand in the industry.

So, if you’re interested in Linux training and want to learn more about containerization and Docker, this tutorial is a great place to start. We will cover the basics of Docker, including how to install it, create and manage containers, and deploy your applications. Let’s get started!

Building and Sharing Containerized Apps

Docker logo

To get started with Docker, you’ll need to install it on your operating system. Docker provides command-line interfaces for different platforms, making it easy to manage containers through the command line. Once installed, you can pull pre-built container images from Docker Hub or build your own using a Dockerfile, which contains instructions to create the container.

When building a container, it’s important to follow best practices. Start with a minimal base image to reduce the container’s size and vulnerability. Use environment variables to configure the container, making it more portable and adaptable. Keep the container focused on a single application or process to improve security and performance.

Sharing containerized apps is straightforward with Docker. You can push your built images to Docker Hub or a private registry, allowing others to easily download and run your applications. Docker images can be tagged and versioned, making it easy to track changes and deploy updates.

By using containers, you can ensure that your applications run consistently across different environments, from development to production. Containers provide a sandboxed environment, isolating your application and its dependencies from the underlying system. This makes it easier to manage dependencies and avoids conflicts with other applications or libraries.

Understanding Docker Images

Docker images are the building blocks of a Docker container. They are lightweight, standalone, and executable packages that contain everything needed to run a piece of software, including the code, runtime, libraries, environment variables, and system tools.

Docker images are based on the concept of OS-level virtualization, which allows multiple isolated instances, called containers, to run on a single host operating system. This is achieved through the use of Linux namespaces and cgroups, which provide process isolation and resource management.

Each Docker image is built from a base image, which is a read-only template that includes a minimal operating system, such as Alpine Linux or Ubuntu, and a set of pre-installed software packages. Additional layers can be added on top of the base image to customize it according to the specific requirements of the application.

Docker images are created using a Dockerfile, which is a text file that contains a set of instructions for building the image. These instructions can include commands to install dependencies, copy source code, set environment variables, and configure the container runtime.

Once an image is built, it can be stored in a registry, such as Docker Hub, for easy distribution and sharing. Docker images can also be pulled from a registry to run as containers on any machine that has Docker installed.

When a Docker image is run as a container, a writable layer is added on top of the read-only layers of the image. This allows any changes made to the container, such as installing additional software or modifying configuration files, to be persisted and shared across multiple instances of the same image.

Docker images are designed to be portable and scalable, making them a popular choice for deploying applications in cloud computing environments. They provide a lightweight alternative to traditional virtual machines, as they do not require a separate operating system or hypervisor.

Getting Started with Docker

Docker is a powerful software that allows you to run applications in isolated containers. If you’re new to Docker, here are a few steps to help you get started.

First, you’ll need to install Docker on your Linux system. Docker provides an easy-to-use installation package that you can download from their website. Once installed, you can verify the installation by running the “docker –version” command in your terminal.

Next, familiarize yourself with the Docker command-line interface (CLI). This is how you interact with Docker and manage your containers. The CLI provides a set of commands that you can use to build, run, and manage containers. Take some time to explore the available commands and their options.

To run an application in a Docker container, you’ll need a Dockerfile. This file contains instructions on how to build your container image. It specifies the base image, any dependencies, and the commands to run when the container starts. You can create a Dockerfile using a text editor, and then use the “docker build” command to build your image.

Once you have your image, you can run it as a container using the “docker run” command. This will start a new container based on your image and run the specified commands. You can also use options to control things like networking, storage, and resource allocation.

If you need to access files or directories from your host system inside the container, you can use volume mounts. This allows you to share files between the host and the container, making it easy to work with your application’s source code or data.

Managing containers is also important. You can use the “docker ps” command to list all running containers, and the “docker stop” command to stop a running container. You can also use the “docker rm” command to remove a container that is no longer needed.

Finally, it’s a good practice to regularly clean up unused images and containers to free up disk space. You can use the “docker image prune” and “docker container prune” commands to remove unused images and containers respectively.

These are just the basics of getting started with Docker. As you continue to explore Docker, you’ll discover more advanced features and techniques that can help you streamline your development and deployment processes.

Deploying Webapps with Docker

Docker is a powerful software tool that allows developers to easily deploy web applications. It simplifies the process by packaging the application and its dependencies into a container, which can then be run on any Linux system. This eliminates the need for manual configuration and ensures consistency across different environments.

To get started with Docker, you’ll need to have a basic understanding of Linux and its command line interface. If you’re new to Linux, it may be beneficial to take some Linux training courses to familiarize yourself with the operating system.

Once you have the necessary knowledge, you can begin using Docker to deploy your web applications. The first step is to create a Dockerfile, which is a text file that contains instructions for building your application’s container. This file specifies the base image, installs any necessary software packages, and sets up the environment variables.

After creating the Dockerfile, you can use the Docker command line interface to build the container. This process involves downloading the necessary files and dependencies, and can take some time depending on the size of your application. Once the container is built, you can start it using the “docker run” command.

Once your application is running in a Docker container, you can access it through your web browser. Docker provides networking capabilities that allow you to expose ports and map them to your local machine. This allows you to access your application as if it were running directly on your computer.

Docker also provides tools for managing your containers, such as starting, stopping, and restarting them. You can also monitor the performance of your containers and view logs to help troubleshoot any issues that may arise.

Creating Multi-container Environments

Step Description
Step 1 Install Docker on your machine
Step 2 Create a Dockerfile for each container
Step 3 Build Docker images for each container using the Dockerfile
Step 4 Create a Docker network
Step 5 Run the containers on the Docker network
Step 6 Test the connectivity between the containers
Step 7 Scale the containers as needed

Exploring Cloud Native Applications

Welcome to the realm of cloud native applications, where innovation and scalability converge to reshape the future of digital landscapes. In this article, we embark on a journey to uncover the intricacies and possibilities of these cutting-edge software solutions, illuminating the path towards a more agile and efficient technological era.

Overview of cloud-native applications

Cloud-shaped diagram with arrows representing the flow of cloud-native applications.

Cloud-native applications are a key component of modern computing. They are designed to take full advantage of cloud computing architecture and enable businesses to achieve greater scalability, flexibility, and efficiency.

At its core, cloud-native applications are built to run on and leverage the capabilities of cloud platforms. This means that they are inherently scalable, allowing businesses to easily accommodate changes in demand without the need for significant infrastructure investments.

One of the key characteristics of cloud-native applications is their ability to be distributed and run across multiple machines in a computer cluster or network. This allows for improved fault tolerance and reliability, as well as better load balancing and resource management.

Cloud-native applications are also designed to be modular and loosely coupled, which means that individual components can be developed, deployed, and scaled independently. This enables faster innovation and continuous delivery, as well as better management of the application’s lifecycle.

To build and deploy cloud-native applications, businesses often adopt DevOps practices and leverage automation tools. This helps streamline the development and deployment process, reduce errors, and improve overall efficiency.

Cloud-native applications also make use of APIs and communication protocols to interact with other applications and services, both within and outside of the cloud environment. This enables seamless integration with existing systems and the ability to easily consume and provide services.

In terms of security, cloud-native applications prioritize the protection of data and resources. They make use of various security measures, such as authentication, encryption, and access controls, to ensure that sensitive information remains secure.

Building cloud-native applications

One key aspect of building cloud-native applications is the use of **containerization**. Containers provide a lightweight and portable way to package and distribute applications, making it easier to deploy and manage them across different environments. Containerization also enables **OS-level virtualization**, allowing applications to run in isolated environments without interfering with each other.

Another important concept in cloud-native development is **microservices**. Instead of building monolithic applications, cloud-native developers break down their applications into smaller, modular services that can be developed, deployed, and scaled independently. This approach promotes **loose coupling** and **modularity**, making it easier to update and maintain the different components of the application.

To ensure that cloud-native applications can handle high traffic and provide a seamless user experience, **scalability** and **fault tolerance** are crucial. Cloud-native applications are designed to automatically scale up or down based on demand, and they are built with **load balancing** and **redundancy** in mind to ensure high availability and minimize downtime.

**Automation** is another fundamental principle of cloud-native development. By automating processes such as deployment, testing, and monitoring, developers can achieve **continuous delivery** and improve the overall speed and efficiency of their application development lifecycle. This is where **DevOps** practices come into play, combining development and operations to streamline the software delivery process.

In addition to these technical considerations, building cloud-native applications also requires a shift in mindset and organizational culture. It involves embracing **self-service** and empowering development teams to take ownership of their applications and infrastructure. This promotes **business agility** and allows organizations to quickly respond to changing market needs and customer demands.

Serverless architecture explained

Diagram illustrating serverless architecture

Serverless architecture is a buzzword in the world of cloud-native computing, and it’s important to understand what it means and how it can benefit your organization.

At its core, serverless architecture eliminates the need for you to provision and manage servers. Instead, you can focus on writing and deploying code that runs in response to events or triggers. This means that you can build and scale applications without worrying about the underlying infrastructure.

One of the key benefits of serverless architecture is its ability to provide a highly scalable and elastic environment. With serverless, you can automatically scale your application based on demand, ensuring that you have enough resources to handle peak loads without overprovisioning and wasting resources during quieter periods.

Another advantage of serverless architecture is its ability to improve business agility. By abstracting away the underlying infrastructure, serverless allows developers to focus solely on writing code and delivering value to the business. This can speed up the development process and enable organizations to respond quickly to changing market conditions.

In a serverless architecture, individual functions or services are deployed and run in response to specific events or triggers. These functions can be written in the programming language of your choice and can be easily integrated with other services and APIs. This loose coupling and modularity make it easier to develop, test, and deploy new features and updates to your application.

Serverless architecture also offers inherent benefits in terms of cost savings. With serverless, you only pay for the actual compute time and resources that your code consumes, rather than paying for idle servers or overprovisioning. This can lead to significant cost savings, especially for applications with unpredictable or variable workloads.

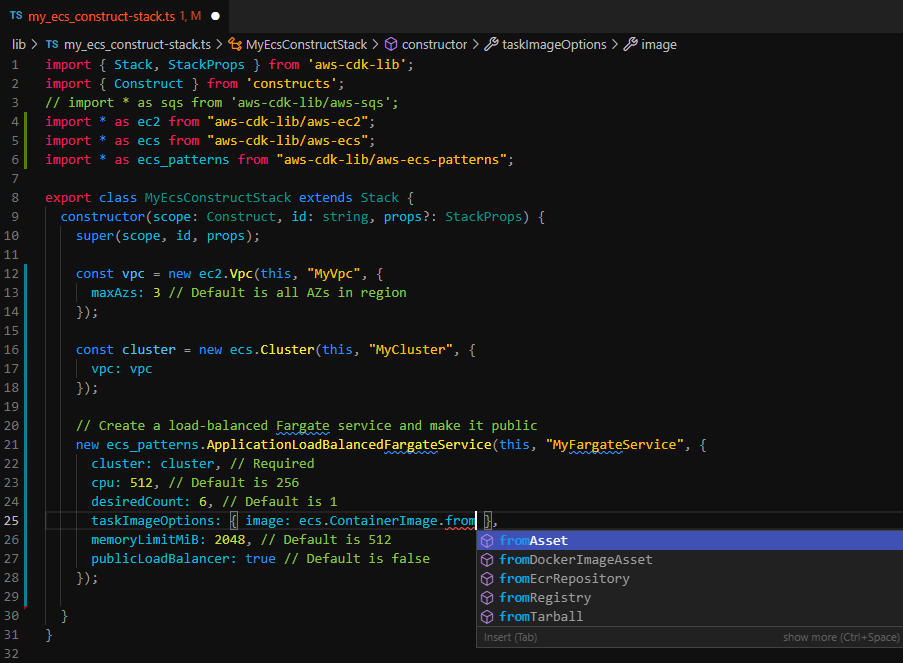
In terms of implementation, serverless architecture relies on cloud providers, such as Amazon Web Services (AWS) Lambda or Microsoft Azure Functions, to manage the underlying infrastructure and handle the scaling and execution of your code. These platforms handle tasks such as load balancing, resource management, and orchestration, allowing you to focus on writing code and delivering value to your users.

Cloud-native apps with Red Hat

Red Hat logo

With cloud-native apps, developers can take advantage of the scalability and flexibility of a computer cluster or network. These apps are designed to be modular, making it easier to update and maintain them. They also utilize APIs for seamless integration with other applications and services.

One of the key benefits of cloud-native apps is load balancing. This ensures that resources are distributed evenly across the cluster, improving performance and preventing any single node from becoming overwhelmed. Provisioning is also simplified, allowing developers to quickly and easily allocate resources as needed.

Cloud-native apps are designed to take advantage of cloud computing architecture, utilizing the internet and self-service interfaces for easy access and management. They are built using application software and programming languages that are compatible with the cloud environment.

Red Hat’s cloud-native apps also leverage OS-level virtualization, allowing for efficient resource allocation and utilization. This ensures that applications run smoothly and are not affected by the underlying hardware.

Throughout the product lifecycle, Red Hat provides support and updates for their cloud-native apps. This ensures that organizations can continually improve their applications and stay up to date with the latest technology.

By using Red Hat for cloud-native app development, organizations can benefit from robust server capabilities, mobile app development tools, and a wide range of software frameworks. This allows for efficient data storage and seamless integration with other systems.

Cloud-native apps with Red Hat also offer advanced networking capabilities, including IP address management and orchestration. This allows for efficient resource allocation and scheduling, reducing the risk of downtime and improving overall performance.

Ultimately, the goal of cloud-native apps with Red Hat is to provide organizations with a scalable and efficient solution for their application development needs. By embracing this technology, organizations can experience the benefits of improved performance, enhanced feedback and the ability to continually improve their applications.

Stateful vs stateless applications

Stateful and stateless applications are two different approaches to designing and building cloud-native applications. Understanding the differences between the two can help guide your decision-making process when developing applications for the cloud.

A stateful application is one that relies on storing and managing data or state information. This data can include user preferences, session information, or any other type of data that needs to be persisted and accessed across multiple requests. Stateful applications typically require a dedicated server or database to store and manage this data.

On the other hand, a stateless application is one that does not rely on storing and managing data or state information. Instead, each request made to a stateless application contains all the necessary information to process the request. This means that stateless applications can be more easily scaled horizontally by adding more servers to handle increased demand.

When deciding between stateful and stateless applications, there are several factors to consider. Stateful applications can provide more flexibility and complex functionality since they can store and access data across multiple requests. However, they can also be more difficult to scale and require more resources to handle increased traffic.

Stateless applications, on the other hand, are easier to scale and require fewer resources since they do not rely on storing and managing data. However, they may be limited in terms of functionality and may require additional mechanisms, such as session tokens or cookies, to maintain user sessions.

Understanding serverless technology

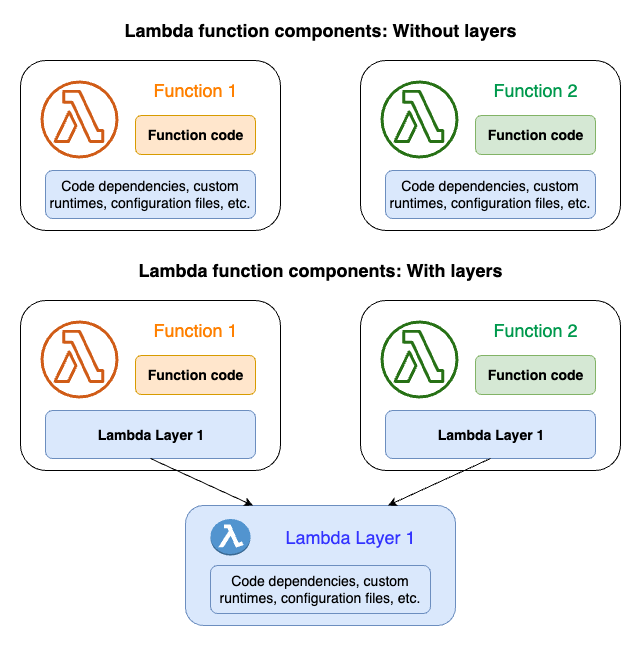
Serverless technology is a key component of cloud-native applications. It allows developers to focus on writing code without worrying about managing servers. With serverless technology, developers can simply upload their code and let the cloud provider handle the rest.

One of the main benefits of serverless technology is its scalability. It allows applications to automatically scale up or down based on demand, ensuring that resources are efficiently used and costs are minimized. This is particularly useful for applications with unpredictable traffic patterns or those that experience sudden spikes in usage.

Another advantage of serverless technology is its cost-effectiveness. Since developers only pay for the actual usage of their code, there is no need to provision and maintain servers that may remain underutilized. This makes serverless technology an attractive option for startups and small businesses with limited resources.

Serverless technology also promotes faster development cycles. Developers can focus solely on writing code and delivering value to users, without the need to worry about infrastructure management. This enables teams to iterate and release new features more quickly, resulting in faster time-to-market.

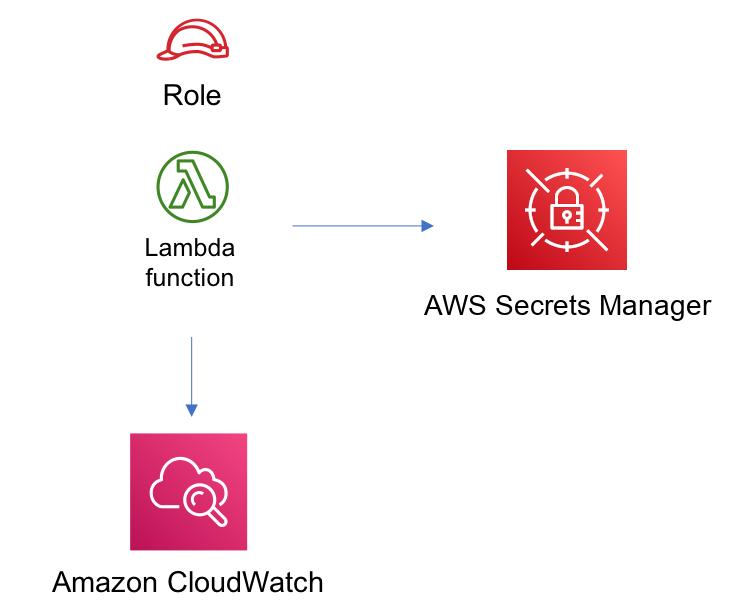
In addition, serverless technology offers built-in fault tolerance and high availability. Cloud providers automatically replicate and distribute code across multiple data centers, ensuring that applications remain accessible even in the event of a failure. This eliminates the need for developers to implement complex redundancy mechanisms themselves.

To leverage serverless technology effectively, developers should have a solid understanding of Linux. Linux is the operating system of choice for many cloud providers and is often used in the development and deployment of serverless applications. Taking Linux training can provide developers with the necessary skills to navigate and utilize Linux-based environments.

By mastering Linux, developers can confidently work with serverless technology and fully harness its benefits. They will be able to efficiently deploy and manage their applications, optimize resource usage, and troubleshoot any issues that may arise. Linux training can also equip developers with the knowledge to integrate serverless applications with other technologies, such as APIs or cloud storage.

More insights on cloud-native applications

In this article, we will delve deeper into the world of cloud-native applications and provide more insights to help you understand this concept better. We will explore the various aspects of cloud-native applications without getting into unnecessary details or fluff.

Firstly, let’s talk about the importance of cloud-native applications in today’s digital landscape. With the increasing reliance on cloud computing and the need for scalable and flexible solutions, cloud-native applications have become a necessity for businesses. These applications are specifically designed to run on cloud infrastructure, taking advantage of its capabilities such as scalability, resilience, and high availability.

One key aspect of cloud-native applications is their architecture. They are built using microservices, which are small, independent components that work together to perform specific tasks. This modular approach allows for easy maintenance, scalability, and continuous delivery.

Another important aspect is the use of containers. Containers provide a lightweight and portable environment for running applications. They encapsulate all the necessary dependencies, making it easier to deploy applications across different environments. Container orchestration tools like Kubernetes help manage and scale containerized applications efficiently.

Cloud-native applications also rely heavily on APIs (Application Programming Interfaces) for communication between different components. APIs allow different services to interact with each other and share data, enabling seamless integration and collaboration.

One of the key benefits of cloud-native applications is their ability to leverage cloud infrastructure for load balancing and auto-scaling. This ensures that applications can handle increased traffic and demand without any downtime or performance issues.

Additionally, cloud-native applications emphasize automation and self-service capabilities. Through provisioning and orchestration tools, developers can easily deploy and manage applications, reducing manual effort and improving efficiency.

As you can see, cloud-native applications offer numerous advantages for businesses, including improved scalability, resilience, and faster time-to-market. By adopting cloud-native practices and technologies, organizations can accelerate their digital transformation and stay ahead of the competition.

Basics of cloud-native application architecture

Cloud-native application architecture is a fundamental concept in modern software development. It involves designing and building applications specifically for the cloud computing environment. This approach allows for greater scalability, flexibility, and resilience compared to traditional application architectures.

At its core, cloud-native architecture relies on the use of APIs, which are sets of rules and protocols that allow different software applications to communicate with each other. APIs enable seamless integration between different components of the application, such as the frontend and the backend.

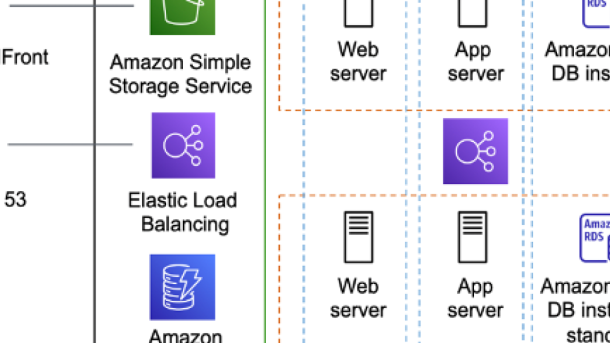
Another important aspect of cloud-native architecture is load balancing. This technique distributes incoming network traffic across multiple servers, ensuring that no single server is overwhelmed with requests. Load balancing improves performance and prevents server downtime by distributing the workload evenly.

Provisioning is another key concept in cloud-native architecture. It involves automatically allocating and configuring resources, such as servers, storage, and networking, based on the application’s needs. This allows for the efficient utilization of resources and enables rapid scalability.

Cloud-native applications are designed to be highly available and fault-tolerant. This is achieved through the use of redundancy, which involves duplicating critical components and data across multiple servers. If one server fails, the workload is automatically shifted to another server, ensuring continuous service availability.

Orchestration plays a crucial role in cloud-native architecture. It involves automating the deployment, management, and scaling of application components. Orchestration tools enable developers to define the desired state of the application and automatically handle the necessary changes to achieve that state.

Cloud-native architecture also emphasizes the use of containerization. Containers are lightweight, isolated environments that encapsulate an application and its dependencies. They provide consistent and reproducible environments across different platforms, making it easier to deploy and manage applications.

Cloud-native vs cloud-based apps comparison

Comparison chart of a cloud-native app and a cloud-based app.

Features Cloud-Native Apps Cloud-Based Apps
Elastic Scalability Highly scalable and can automatically adjust resources based on demand Scalability depends on the cloud infrastructure provider
Microservices Architecture Designed to be composed of smaller, independent services that can be deployed and updated individually Usually monolithic in nature, with all components tightly coupled
Containerization Applications are packaged into containers, providing consistency and portability across different environments Apps can be hosted on virtual machines or physical servers
DevOps Integration Emphasizes collaboration and automation between development and operations teams Traditional development and operations workflows
Resilience Designed to handle failures gracefully and recover quickly Reliability depends on the cloud infrastructure provider
Cloud Dependency Can run on any cloud platform or on-premises infrastructure Dependent on the cloud infrastructure provider

The future of cloud-native applications and its impact

The future of cloud-native applications is set to have a significant impact on the technology landscape. As more businesses and organizations migrate their operations to the cloud, the demand for cloud-native applications is rapidly increasing. These applications are specifically designed and built to take full advantage of the cloud computing model, enabling greater scalability, flexibility, and efficiency.

One of the key benefits of cloud-native applications is their ability to leverage the power of computer networks and APIs. By using APIs, these applications can seamlessly integrate with other systems and services, creating a more cohesive and interconnected ecosystem. This allows for easier data sharing, streamlined workflows, and enhanced collaboration across different platforms and devices.

Additionally, cloud-native applications employ load balancing and provisioning techniques to optimize resource allocation and ensure high availability. By distributing workloads across multiple servers, these applications can handle increased traffic and maintain consistent performance even during peak usage periods. This scalability is especially crucial for internet-facing and mobile applications, which often experience fluctuating demand.

Moreover, cloud-native applications rely on communication protocols such as the Internet Protocol (IP) to facilitate data transfer and enable efficient client-server interactions. This ensures that users can access and interact with the application seamlessly, regardless of their location or device.

Another important aspect of cloud-native applications is their ability to adapt and evolve throughout their lifecycle. These applications are designed with modularity and flexibility in mind, making it easier to update and enhance different components without disrupting the entire system. This enables businesses to respond quickly to changing market demands and deliver new features to users more efficiently.

To build and deploy cloud-native applications, developers rely on various tools, frameworks, and services provided by cloud providers. These tools enable efficient code development, testing, and deployment, while also providing monitoring and management capabilities.

However, it is important to note that transitioning to cloud-native applications also comes with risks. Network planning and design, as well as ensuring appropriate levels of security and redundancy, are essential to mitigate potential vulnerabilities and ensure business continuity.

Free Cloud Computing Courses with Certificate

Welcome to the world of free cloud computing courses! If you’re looking to enhance your skills and knowledge in this rapidly growing field, you’re in luck. In this article, we’ll explore some fantastic online courses that not only provide valuable insights but also offer certificates upon completion. So, get ready to upskill and unlock a world of opportunities in cloud computing, all without spending a dime!

Learn from AWS experts and advance your skills

Learn from AWS experts and advance your skills by taking free cloud computing courses with a certificate. These courses provide valuable training in Linux, helping you gain the knowledge and expertise needed to excel in the field of cloud computing. Whether you’re a beginner or an experienced professional, these courses offer a comprehensive curriculum that covers topics such as infrastructure as a service, scalability, database management, computer security, and more. With the growing demand for cloud computing skills in today’s digital landscape, it’s essential to stay updated and enhance your skill set. By learning from AWS experts, you’ll gain a deep understanding of cloud technologies and how they can be applied to various industries and sectors.

Additionally, obtaining a certificate showcases your proficiency and dedication, making you stand out to potential employers. Don’t miss out on this opportunity to expand your knowledge and boost your career prospects. Enroll in these free cloud computing courses and take your skills to the next level.

Build your future with cloud computing training

Whether you are a beginner or an experienced professional, these courses offer a comprehensive understanding of cloud computing technologies and their applications. You will learn about Microsoft Azure, Amazon Web Services (AWS), Google Cloud Platform, and other leading cloud computing platforms.

The courses cover various topics, including infrastructure as a service, scalability, database management, computer security, and data analytics. You will also gain knowledge in areas such as artificial intelligence, machine learning, and encryption.

With hands-on training and practical exercises, you will develop the skills needed to design, deploy, and manage cloud-based solutions. These courses provide you with the expertise to work with virtual machines, cloud storage, web services, and more.

Upon completion, you will receive a certificate that validates your skills and knowledge in cloud computing. This certification can boost your resume and demonstrate your commitment to professional development.

Don’t miss out on this opportunity to learn from industry experts and gain valuable experience in cloud computing. Enroll in these free courses today and take the first step towards a successful career in the field.

Prepare for AWS certification exams

The courses cover various topics including Amazon’s cloud platform, Microsoft Azure, and Google Cloud Platform. You will learn about different cloud computing technologies, application software, and data security measures. Additionally, you will gain insights into artificial intelligence, machine learning, and deep learning.

These courses utilize educational technology to provide an interactive and engaging learning experience. You can expect to learn through a combination of video lectures, interactive quizzes, and hands-on exercises. By completing these courses, you will not only gain knowledge but also practical experience in the field.

Obtaining a certificate through these free courses can significantly boost your career prospects. It demonstrates your expertise and proficiency in cloud computing, making you a valuable asset to potential employers. With the increasing demand for cloud computing professionals, having an AWS certification can open doors to exciting job opportunities.

Investing your time in these free cloud computing courses is a risk-free way to enhance your skills and knowledge in the field. Whether you are a beginner or an experienced professional, these courses cater to individuals of all levels. So, start your journey towards AWS certification today and unlock a world of possibilities in the cloud computing industry.

Access free cloud computing training events

Cloud icon

During the training, you will learn about various aspects of cloud computing, including application software, computer networks, and web services. The sessions will also cover topics such as data security, encryption, and computer data storage. Expert instructors will guide you through the training, ensuring that you gain a deep understanding of the concepts and techniques involved.

By attending these free training events, you can also explore other areas of cloud computing, such as virtual machines, shared resources, and deep learning. Additionally, you will learn about authentication, collaboration, and vendor lock-in. These skills can enhance your productivity and career prospects in the field of cloud computing.

Participating in these training events also offers an opportunity to network with professionals in the industry and gain insights into the latest trends and technologies. Moreover, you may have the chance to take an exam and earn a certificate to showcase your expertise in cloud computing.

Investing your time in free cloud computing training is a risk-free way to enhance your skills and stay updated with the advancements in technology. Take advantage of these training events to improve your fluency in cloud computing and accelerate your career growth.

Frequently asked questions about cloud computing

1. What is cloud computing?
Cloud computing is the delivery of computing services, including storage, databases, software, and analytics, over the internet. It allows users to access and manage their data and applications remotely, without the need for on-site servers or infrastructure.

2. How does cloud computing work?
Cloud computing relies on a network of remote servers to store and process data, rather than a local server or personal computer. Users can access their data and applications through the internet, using any device with an internet connection.

3. What are the benefits of cloud computing?
Cloud computing offers numerous benefits, including scalability, cost-effectiveness, and flexibility. It allows businesses to easily scale their resources up or down as needed, pay for only the resources they use, and access their data and applications from anywhere at any time.

4. Are there any free cloud computing courses with certificates available?
Yes, there are free cloud computing courses available that offer certificates upon completion. These courses provide valuable knowledge and skills in cloud computing, which can help individuals enhance their career prospects in the IT industry.

5. How can I find free cloud computing courses with certificates?
You can find free cloud computing courses with certificates through online platforms and educational websites. Some popular platforms include Coursera, edX, and Google Cloud Training. These courses cover various topics related to cloud computing, such as AWS, Microsoft Azure, and Google Cloud Platform.

6. Do I need any prior knowledge or experience in cloud computing to take these courses?
Most free cloud computing courses with certificates are designed for beginners and do not require any prior knowledge or experience. However, having a basic understanding of computer networks and the internet can be helpful.

7. How can cloud computing skills benefit my career?
Cloud computing skills are in high demand in today’s job market. By acquiring these skills, you can open up opportunities in various industries, such as IT, software development, data analysis, and cybersecurity. Cloud computing expertise can also lead to higher-paying job roles and career advancement.

What is a Cloud Developer

In today’s digital landscape, where technology reigns supreme, the role of a cloud developer has become increasingly significant. This article delves into the world of cloud development, unraveling its intricacies and shedding light on the skills and expertise required to thrive in this dynamic field. Whether you’re a tech enthusiast or simply curious about the realm of cloud computing, join us on this enlightening journey to discover what it truly means to be a cloud developer.

Factors Affecting Salary in Cloud Development

Cloud icon

When it comes to the salary of a cloud developer, several factors come into play. Education and training play a significant role in determining a cloud developer’s salary. Those with advanced degrees, such as a Doctor of Philosophy in Computer Science or a postgraduate education in Information Technology, tend to earn higher salaries.

Experience is another important factor. Cloud developers with several years of experience and a strong track record of successful projects are often able to command higher salaries. Additionally, technical skills in relevant areas such as Linux, MySQL, Kubernetes, API, OpenStack, DevOps, PHP, and Docker can also contribute to higher salary prospects.

The type of cloud computing work a developer specializes in can also impact their salary. For example, developers who focus on big data technologies like Apache Hadoop or NoSQL databases may have higher earning potential due to the growing demand for these skills.

The industry in which a cloud developer works can also affect their salary. Cloud developers in industries such as finance, healthcare, and technology tend to earn higher salaries compared to those in other sectors.

Lastly, the location in which a cloud developer works can influence their salary. Major tech hubs like Silicon Valley or Seattle often offer higher salaries due to the high demand for cloud development skills in these areas.

Cloud Developer Roles and Responsibilities

A cloud developer is responsible for designing, developing, and maintaining cloud-based applications and services. They work with various technologies such as AWS, Azure, and Google Cloud to build scalable and secure solutions. Cloud developers collaborate with other developers, architects, and engineers to ensure smooth integration and efficient deployment.

Some key responsibilities of a cloud developer include:

1. Developing and implementing cloud-based applications and microservices using programming languages like Python, Java, or Ruby.

2. Designing and building cloud infrastructure using technologies like Docker, Kubernetes, or OpenStack.

3. Integrating cloud applications with databases like MySQL or NoSQL for efficient data storage and retrieval.

4. Implementing and managing web services discovery and communication through APIs.

5. Ensuring the security and scalability of cloud applications by following best practices and implementing proper authentication and authorization mechanisms.

6. Collaborating with DevOps teams to automate deployment, monitoring, and scaling of cloud applications.

7. Troubleshooting and resolving issues related to cloud infrastructure, networking, and performance.

8. Staying updated with the latest cloud technologies and trends to continuously improve development processes and deliver high-quality solutions.

By acquiring skills and knowledge in cloud development, individuals can open up a wide range of employment opportunities in the IT industry. Cloud developers are sought after by companies of all sizes that rely on cloud computing to power their applications and services.

To pursue a career as a cloud developer, it is recommended to gain expertise in Linux, as it is a widely used operating system in cloud environments. Taking Linux training courses can provide a solid foundation for understanding cloud computing concepts and technologies. Additionally, obtaining certifications from cloud service providers like AWS, Azure, or Google Cloud can enhance credibility and demonstrate proficiency in cloud development.

By becoming a skilled cloud developer, individuals can contribute to the growing field of cloud computing and play a crucial role in building innovative and efficient cloud-based solutions.

Cloud Developer Salary and Career Outlook

Salary Range Experience Level Job Outlook
$80,000 – $120,000 Entry-Level High demand with strong growth potential
$120,000 – $150,000 Mid-Level Increased demand with opportunities for career advancement
$150,000+ Senior-Level Highly sought-after skills with excellent career prospects

Cloud developers with proficiency in popular cloud platforms such as Amazon Web Services (AWS), Microsoft Azure, and Google Cloud Platform (GCP) often command higher salaries. As organizations continue to migrate their infrastructure and applications to the cloud, the need for skilled cloud developers is expected to rise.

Cloud Engineer Roles and Responsibilities

A cloud engineer is responsible for the design, implementation, and maintenance of cloud-based infrastructure and services. They play a crucial role in ensuring the smooth operation of cloud environments and optimizing their performance.

Key responsibilities of a cloud engineer include:
– Designing and deploying cloud infrastructure solutions using technologies such as virtualization, containerization, and automation.
– Managing and monitoring cloud resources to ensure availability, scalability, and security.
– Collaborating with cross-functional teams to understand business requirements and translate them into technical solutions.
– Troubleshooting and resolving issues related to cloud infrastructure and services.
– Implementing and maintaining cloud security measures to protect sensitive data and comply with regulatory standards.
– Automating cloud processes to improve efficiency and reduce manual intervention.
– Staying updated with the latest cloud technologies and trends to provide innovative solutions.

To excel in this role, it is essential to have a strong understanding of cloud computing principles and technologies. Proficiency in programming languages like Python or Java is valuable, as it enables cloud engineers to develop scripts and automate tasks.

In addition, a cloud engineer should possess excellent communication and problem-solving skills to effectively collaborate with teams and resolve complex issues.

By pursuing Linux training, individuals can gain the necessary skills and knowledge to become successful cloud engineers. Linux is widely used in cloud environments and is foundational to many cloud technologies. It provides a solid understanding of operating systems, networking, and scripting, which are crucial for cloud engineering roles.

Cloud Engineer Salary and Career Outlook

Job Role Salary Range Career Outlook
Cloud Engineer $80,000 – $150,000 Excellent
Cloud Architect $120,000 – $200,000 Strong
Cloud Consultant $90,000 – $160,000 Promising

Related Job Profiles in Cloud Development

In the field of cloud development, there are various job profiles that professionals can pursue. These job profiles require different skills and expertise, but all revolve around working with cloud technologies and platforms.

One such job profile is a Cloud Architect. Cloud Architects are responsible for designing and implementing cloud-based solutions for organizations. They develop the overall architecture of the cloud environment, taking into consideration factors such as security, scalability, and cost-efficiency. Cloud Architects often work closely with other IT professionals to ensure the smooth integration of cloud services into existing systems.

Another job profile in cloud development is a Cloud Engineer. Cloud Engineers focus on the technical aspects of cloud computing, such as building and maintaining cloud infrastructure. They are skilled in virtualization technologies, such as Docker and OS-level virtualization, and have a strong understanding of programming languages like Python and Java. Cloud Engineers also work on optimizing cloud performance and ensuring high availability and reliability of cloud services.

Cloud Developers are another important job profile in this field. These professionals specialize in developing applications specifically for cloud environments. They have expertise in programming languages like Java, Python, and Ruby, as well as knowledge of web services, APIs, and databases. Cloud Developers work on creating scalable and secure applications that can run efficiently in the cloud.

Apart from these job profiles, there are also roles like Cloud Security Specialist, Cloud Consultant, and Cloud Operations Manager. Each of these roles requires a unique set of skills and knowledge in cloud technologies and platforms.

If you are interested in pursuing a career in cloud development, it is essential to acquire the necessary skills and knowledge. Taking Linux training can be a great starting point, as Linux is widely used in cloud environments. Linux training will help you gain expertise in Linux operating systems, scripting languages, and server administration, which are essential skills for cloud development.

Best Linux Distro for Chromebook Potential

Are you a Chromebook user looking to explore the vast possibilities of Linux? Look no further! In this article, we will delve into the realm of Linux distributions and uncover the best options that can transform your Chromebook into a powerful, versatile machine. Whether you’re a student, professional, or an avid tinkerer, get ready to unlock the full potential of your Chromebook with the perfect Linux distro.

Optimizing Linux Performance on Chromebooks

To get started, you’ll need to install Linux on your Chromebook by enabling Developer Mode. Once installed, you can take advantage of the powerful features and customization options offered by this Linux distro.

One key aspect to consider is the central processing unit (CPU) of your Chromebook. Opt for a Linux distro that is optimized for your specific CPU architecture to ensure maximum performance.

Additionally, pay attention to the document object model (DOM) and HTML elements in your web applications. Make sure your Linux distro supports the latest web technologies, such as Unicode and HTTPS, to ensure smooth browsing and secure connections.

Another important factor is the length and height of your Chromebook’s screen. Choose a Linux distro that offers efficient scaling and resolution options for a seamless user experience.

Lastly, don’t forget to regularly update your Linux distro to benefit from the latest bug fixes and performance enhancements.

By selecting the right Linux distribution and optimizing key aspects, you can unlock the full potential of your Chromebook for a productive and efficient Linux experience.

Installing and Configuring GalliumOS on Chromebooks

Installing and configuring GalliumOS on Chromebooks is a straightforward process that brings the power of Linux to your device. To begin, download the latest version of GalliumOS from their official website. Ensure your Chromebook is in developer mode, then use the “Ctrl+Alt+T” keyboard shortcut to open the Crosh shell. Enter “shell” to access the Linux command-line interface. Use the “lsblk” command to identify your Chromebook’s storage device, usually labeled “mmcblk0. ” With this information, use the “sudo galliumos-install -d /dev/mmcblk0” command to install GalliumOS.

Follow the prompts to complete the installation. Once finished, reboot your Chromebook and enjoy the benefits of a Linux-based operating system.

Utilizing Linux Features on Chromebooks

When it comes to utilizing Linux features on Chromebooks, choosing the right Linux distribution is crucial. Chromebooks are designed to run Chrome OS, but with the ability to install Linux, you can unlock a whole new world of possibilities. Whether you’re a developer looking to code or a power user wanting more flexibility, finding the best Linux distro for your Chromebook is essential. Consider factors such as hardware compatibility, available software, and community support. Popular options like Ubuntu, Debian, and Fedora are known for their stability and user-friendliness.

Don’t be afraid to experiment and find the distro that suits your needs.

Lenovo’s Linux-Compatible Devices and Workstations

Lenovo laptop running Linux

Device Model Processor RAM Storage
Laptop Lenovo ThinkPad X1 Carbon Intel Core i5/i7 8GB/16GB 256GB/512GB/1TB SSD
Laptop Lenovo ThinkPad T14s AMD Ryzen 5/7/9 8GB/16GB/32GB 256GB/512GB/1TB SSD
Laptop Lenovo ThinkPad X1 Yoga Intel Core i5/i7 8GB/16GB/32GB 256GB/512GB/1TB SSD
Laptop Lenovo ThinkPad P1 Intel Core i7/i9 16GB/32GB/64GB 512GB/1TB/2TB SSD
Desktop Lenovo ThinkStation P340 Intel Core i5/i7/i9 8GB/16GB/32GB/64GB 256GB/512GB/1TB SSD
Desktop Lenovo ThinkStation P520 Intel Xeon W 8GB/16GB/32GB/64GB/128GB 1TB/2TB/4TB SSD

AWS CDK Secrets Manager

Unlocking the potential of AWS CDK, Secrets Manager offers a game-changing solution for managing sensitive information securely in the cloud.

Initializing AWS CDK Secrets Manager

AWS CDK Secrets Manager logo

Once the initialization is complete, you can define and manage your secrets within your CDK stack using AWS CDK constructs and resources. Remember to adhere to best practices for secure password management, such as enforcing strong passwords and rotating them regularly.

By leveraging AWS CDK Secrets Manager, you can securely store and retrieve sensitive information, such as database credentials or API keys, within your applications. This ensures that your secrets are encrypted and accessible only to authorized users or services.

With the initial setup complete, you can now proceed to define the necessary resources and permissions for your secrets within your CDK stack. Be sure to properly manage access keys and permissions to minimize security risks.

Configuring AWS CDK Secrets Manager

To get started, you’ll need to have the AWS Cloud Development Kit (CDK) installed on your system. The CDK provides a convenient way to define your infrastructure as code and automate the deployment process.

Once you have the CDK set up, you can use the command-line interface to configure the Secrets Manager. This powerful tool allows you to create and manage passwords, keys, and other sensitive data in a secure manner.

To configure the Secrets Manager, you’ll need to define a secret in your CDK template. This can be done using the JSON or C++ syntax, depending on your preference. You can specify the secret’s name, description, and other attributes to suit your needs.

When configuring the secret, it’s important to consider access control and encryption. You can define an Identity and Access Management (IAM) policy to control who can access the secret and what actions they can perform. Additionally, you can encrypt the secret using AWS Key Management Service (KMS) for an extra layer of protection.

Once the secret is configured, you can use it in your applications or databases by retrieving its value from the Secrets Manager. This allows you to keep sensitive information separate from your code and easily manage it across different environments.

Managing Secrets in AWS CDK

AWS CDK console interface

To work with Secrets Manager in AWS CDK, you can utilize the AWS SDKs or the command-line interface (CLI). You can create a secret using the Secrets Manager API and specify the secret’s name, description, and the secret value.

Once you have created a secret, you can retrieve its value using the AWS SDKs or CLI. The secret value is encrypted and stored securely by Secrets Manager. You can also rotate the secret value periodically to enhance security.

In your AWS CDK application, you can reference the secret by its ARN (Amazon Resource Name) and use it in your code or templates. This allows you to securely access sensitive information without exposing it directly in your code.

By leveraging Secrets Manager in AWS CDK, you can ensure the secure management of secrets in your cloud infrastructure, enhancing the overall security and integrity of your applications.

Customizing Secrets with Lambda Functions

Lambda function customization

Lambda functions in AWS CDK Secrets Manager provide a powerful way to customize and enhance the management of secrets in your applications. With Lambda functions, you can automate the process of generating and rotating passwords, encrypting sensitive information, and managing access to secrets.

By leveraging the AWS CDK, you can easily create and deploy Lambda functions that interact with Secrets Manager. This allows you to define custom logic and workflows for your secrets, ensuring they meet your unique requirements.

For example, you can use Lambda functions to automatically generate strong passwords for your applications and rotate them periodically. You can also encrypt sensitive information before storing it in Secrets Manager, adding an extra layer of security to your data.

Furthermore, Lambda functions enable you to manage access to secrets by implementing custom identity management and user authentication mechanisms. This ensures that only authorized users or applications can access the secrets stored in Secrets Manager.

In addition, Lambda functions can be used to integrate with other AWS services, such as databases, to securely retrieve and store secret information. This allows you to seamlessly incorporate secrets into your application workflows without compromising security.

With AWS CDK Secrets Manager, you can easily customize your secrets management using Lambda functions, providing a flexible and secure solution for your applications.

(Note: CDK stands for Cloud Development Kit. It is a software development framework that allows you to define cloud infrastructure in code using familiar programming languages like C++ and JSON.)

Rotating Database Credentials with AWS CDK

Rotating database credentials is an essential security practice for any organization. With AWS CDK and Secrets Manager, managing and updating credentials becomes a breeze.

By leveraging the AWS Cloud Development Kit (CDK), developers can automate the rotation of database credentials and eliminate the need for manual intervention. This not only ensures better security but also saves time and effort.

Using Secrets Manager, credentials can be stored securely and accessed programmatically. The CDK allows you to define and deploy the necessary resources, such as secrets, users, and permissions.

With a simple C++ template, you can define the rotation schedule, password complexity requirements, and encryption settings. Secrets Manager takes care of generating and storing the passwords securely.

By rotating credentials regularly, you reduce the risk of unauthorized access and potential data breaches. With AWS CDK and Secrets Manager, you can easily implement a robust and automated credential rotation process.

Don’t compromise on security; leverage the power of AWS CDK and Secrets Manager to protect your database credentials effectively.

Importing and Replicating Secrets

Key and lock

Replicating secrets is also simple with AWS CDK Secrets Manager. You can create a new secret using the `Secret.fromSecretAttributes` method and provide the secret attributes such as name, description, and encryption key. This allows you to replicate secrets across different AWS accounts or regions.

By utilizing these methods, you can easily import and replicate secrets in AWS CDK Secrets Manager, enhancing the security and management of your applications. Take advantage of the powerful features provided by AWS CDK Secrets Manager and simplify your secret management process.

Creating JSON Secrets with AWS CDK

To create JSON secrets, you’ll need to define a Secret in your AWS CDK code. This Secret object will contain the secret value, which can be a plaintext string or a JSON object. You can also specify the secret name, description, and other optional parameters.

Once you’ve defined the Secret, you can deploy it using the AWS CDK. The secret value will be encrypted and securely stored in the AWS Secrets Manager service.

When your application needs to access the secret, you can retrieve it using the AWS SDK or AWS CLI. This allows you to securely access and use the secret within your application without exposing the sensitive information.

By utilizing the AWS CDK Secrets Manager, you can easily manage and securely store JSON secrets, ensuring the confidentiality of your application’s sensitive data.

Updating Lambda Function Code in AWS CDK

To update the code of a Lambda function in AWS CDK, follow these steps:

1. Open the AWS CDK project that contains the Lambda function.
2. Locate the specific Lambda function you want to update in the code.
3. Make the necessary changes to the code using the programming language of your choice (e.g., C++).
4. Save the updated code file.
5. Run the CDK deploy command to deploy the changes to AWS.
6. AWS CDK will automatically detect the changes in the code and update the Lambda function.
7. Verify the changes by testing the Lambda function with sample inputs.
8. If any errors occur during the update, review the error message and make the necessary corrections.

Best Practices and Limitations for AWS CDK Secrets Manager

AWS CDK Secrets Manager interface.

Best Practices Limitations
1. Use separate secrets for different environments (dev, prod, etc.) 1. Secrets can only be created in the same AWS region where CDK is running
2. Store sensitive data in Secrets Manager instead of hardcoding in the code 2. Secrets Manager has a maximum limit of 64 KB per secret value
3. Implement fine-grained access control for secrets using IAM policies 3. Secrets Manager has a limit of 300 concurrent requests per account
4. Rotate secrets regularly to enhance security 4. Secrets Manager is not available in all AWS regions
5. Use encryption at rest and in transit for secrets 5. Secrets Manager cannot be used with all AWS services

Cloud Foundry vs Kubernetes Comparison

Welcome to the ultimate clash of the cloud titans: Cloud Foundry and Kubernetes. In this article, we dive deep into the realm of cloud infrastructure to unravel the differences and similarities between these two powerhouses. So fasten your seatbelts, as we embark on a riveting journey to discover which platform reigns supreme in the battle of Cloud Foundry vs Kubernetes.

Comparison of Cloud Foundry and Kubernetes

Cloud Foundry and Kubernetes are both popular container orchestration platforms that offer different features and functionalities.

Cloud Foundry is a Platform as a Service (PaaS) that provides a high level of abstraction and simplifies the process of deploying and managing applications. It supports multiple programming languages such as Node.js, PHP, Java, Ruby, and Python. It also provides built-in services like databases, caching, and identity management, making it easier for developers to focus on application development rather than infrastructure management.

Kubernetes, on the other hand, is an open-source container orchestration platform that focuses on scalability and flexibility. It is designed to manage and orchestrate containerized applications across a cluster of machines. Kubernetes offers a command-line interface (CLI) and an extensive set of APIs for automation and management of containers. It supports both stateless and stateful applications and provides features like logging, authentication, and routing.

When comparing Cloud Foundry and Kubernetes, it’s important to consider your specific needs and requirements. Cloud Foundry is a great choice if you want a fully managed platform that abstracts away the complexities of infrastructure management. It is well-suited for teams with limited experience in managing infrastructure or for organizations looking to increase productivity by automating the deployment process.

On the other hand, Kubernetes is a more flexible and customizable platform that provides a higher level of control over your infrastructure. It allows you to define and manage your own infrastructure and provides features like scaling, load balancing, and orchestration. Kubernetes is a good choice if you have specific requirements or if you want to leverage the benefits of containerization without being tied to a specific cloud provider.

Exploring Similarities and Differences

Cloud Foundry and Kubernetes are both popular technologies used for managing and deploying applications in the cloud. While they have similar goals, there are some key differences between the two.

One major difference is the level of abstraction they provide. Cloud Foundry is a platform as a service (PaaS) that abstracts away many of the complexities of infrastructure management. It allows developers to focus on writing code and deploying applications without worrying about the underlying infrastructure. Kubernetes, on the other hand, is more of an infrastructure as a service (IaaS) platform that provides a framework for managing containers. It gives developers more control over the underlying infrastructure and allows for greater flexibility.

Another difference is the programming languages they support. Cloud Foundry has broad language support, including popular languages like Java, Node.js, Python, and Ruby. Kubernetes, on the other hand, is language-agnostic and can run applications written in any programming language.

When it comes to scalability and performance, both Cloud Foundry and Kubernetes have robust capabilities. They both support horizontal scaling, allowing applications to handle increased traffic by adding more instances. They also both provide mechanisms for load balancing and automatic scaling.

In terms of ecosystem and community support, Kubernetes has a larger and more active community. It is an open-source project backed by Google and has a wide range of tools and integrations available. Cloud Foundry also has a strong community, but it may have a smaller selection of tools and integrations compared to Kubernetes.

Ultimately, the choice between Cloud Foundry and Kubernetes depends on the specific needs and preferences of your organization. Cloud Foundry provides a higher level of abstraction and simplifies the deployment process, while Kubernetes offers more control and flexibility. Consider factors such as programming language support, scalability requirements, and community support when making your decision.

Migrating from PCF to EKS: Benefits and Considerations

Migrating from PCF to EKS offers several benefits and considerations for businesses.

One major benefit is the flexibility and scalability that EKS provides. With EKS, businesses can easily provision and manage their resources, whether it’s on-premises software or applications in the cloud. EKS also supports a wide range of programming languages, including PHP, Java, Ruby, and Python, making it compatible with various software development needs.

Another advantage of migrating to EKS is the integration with other services and platforms. EKS seamlessly integrates with Amazon Web Services (AWS), allowing businesses to leverage the full potential of AWS’s infrastructure as a service offerings. This integration also provides access to a vast array of tools and services, such as identity management, database solutions, and logging capabilities.

When considering a migration from PCF to EKS, businesses should also take into account the complexity and learning curve associated with the transition. While EKS offers powerful orchestration and automation capabilities, it requires a certain level of experience and familiarity with command-line interfaces and container technologies.

In terms of business value, migrating to EKS can improve productivity and streamline software development processes. The use of containers and container orchestration simplifies deployment and management, allowing developers to focus on coding and innovation. This increased productivity can lead to faster time-to-market and improved customer satisfaction.

Streamlining Development with DevOps Automation

Feature Cloud Foundry Kubernetes
Container Orchestration No Yes
Deployment Flexibility High High
Scalability High High
Community Support Large Large
Ease of Use High Medium
Integration with CI/CD Pipeline Yes Yes
Managed Services Yes No

Istio Beginner’s Tutorial

Welcome to the world of Istio, where we unravel the mysteries of service mesh technology. In this beginner’s tutorial, we embark on a journey to understand the fundamental concepts and functionalities of Istio, empowering you to seamlessly manage and secure your microservices. So, fasten your seatbelts and get ready to dive into the fascinating realm of Istio!

Download and Install Istio

1. Open your command-line interface (CLI) on your Linux machine.

2. Ensure that you have the necessary package manager installed. For example, on Ubuntu, you can use the apt package manager. If you don’t have it, you can install it by running the command `sudo apt install apt`.

3. Add the Istio repository to your package manager. Run the command `curl -L https://istio.io/downloadIstio | sh -` to download the Istio package.

4. Navigate to the Istio directory using the `cd` command. For example, if you are using Istio version 1.11.2, you would run `cd istio-1.11.2`.

5. Add the Istio binaries to your PATH variable by running the command `export PATH=$PWD/bin:$PATH`. This will allow you to access the Istio commands from anywhere in your CLI.

6. Install Istio by running the command `istioctl install` in the Istio directory. This will set up Istio in your Kubernetes cluster and configure the necessary components for traffic management.

7. Verify that Istio is installed correctly by running the command `istioctl analyze`. This will check for any configuration errors or issues with your Istio installation.

8. If everything is successful, you can now start using Istio to manage your microservices and enhance your network communication. You can find more information on how to use Istio in the Istio documentation.

Deploying a Sample Application with Istio

To deploy a sample application with Istio, you need to follow a few simple steps. First, make sure you have Istio installed in your Kubernetes cluster. Istio is a service mesh that helps with managing and securing microservices in a computer network.

Once Istio is installed, you can deploy your sample application. Start by creating a Kubernetes deployment file for your application. This file defines the desired state of your application, such as the number of replicas and the container image to use.

Next, apply the deployment file using the `kubectl apply` command. This will create the necessary resources in your Kubernetes cluster to run your application.

After the deployment is successful, you can expose your application to the outside world using an Istio gateway. A gateway acts as a proxy server that routes traffic to your application. Create a gateway configuration file and apply it using `kubectl apply`.

To test your deployed application, you can use tools like `curl` or a web browser. Make a request to your application’s URL and see if you get a response.

Istio also provides powerful traffic management capabilities. You can use Istio’s virtual services and destination rules to control how traffic is routed to different versions of your application or to implement load balancing.

In addition to traffic management, Istio also offers features like security, observability, and fault tolerance. You can configure Istio to encrypt traffic using HTTPS, monitor your application’s performance using metrics and tracing, and handle failures gracefully.

Configuring External Access for the Application

Network connection diagram

To configure external access, you need to consider factors such as the network environment, the operating system, and the specific requirements of the application.

One common method is to use a reverse proxy, which acts as an intermediary between the application and clients. This allows you to control access to the application and provide additional security features like authentication and load balancing.

Another option is to use a tunneling protocol like SSH or VPN to establish a secure connection between the application and external clients. This ensures that data transmitted between the two parties is encrypted and protected from unauthorized access.

To configure external access, you may need to modify configuration files or environment variables in the application. This is often done through the command-line interface or a configuration management tool.

Additionally, you may need to configure firewall rules or network settings to allow incoming connections to the application. This involves setting up port forwarding and ensuring that the necessary ports are open.

Overall, configuring external access for the application requires a good understanding of networking concepts and the specific technologies involved. It’s important to carefully follow the documentation and guidelines provided by the application or framework you are working with.

By properly configuring external access, you can ensure that your application is accessible to users or systems outside of your local network, while also maintaining the necessary security measures to protect your data.

Viewing the Istio Dashboard

To view the Istio Dashboard, follow these simple steps:

1. Ensure that you have Istio installed and running on your Linux machine. If not, refer to the installation guide for assistance.

2. Open a web browser and enter the URL for the Istio Dashboard. This URL typically follows the format http:///dashboard.

3. If prompted, enter your login credentials. The default username and password are usually provided during the installation process.

4. Once logged in, you will see the Istio Dashboard interface. This interface provides an overview of your Istio service mesh, including information on traffic, health, and performance.

5. Explore the various tabs and sections within the dashboard to gain insights into your service mesh. You can view details about individual services, check traffic routing and load balancing configurations, and monitor the health of your applications.

6. Use the search and filtering options to quickly find specific services or information within the dashboard.

7. Take advantage of the Istio Dashboard’s visualization capabilities to better understand the communication between your services and identify any potential bottlenecks or issues.

Remember to refer to the Istio documentation or consult with an expert if you encounter any difficulties or have specific questions about the dashboard.

By utilizing the Istio Dashboard, you can effectively manage and monitor your Istio service mesh, ensuring optimal performance and reliability for your applications.

Setting up a Kubernetes Cluster for Istio

Once your cluster is up and running, you’ll need to install Istio. Istio is an open-source software framework that provides a service mesh for managing and securing microservices. To install Istio, you can use the Istio control plane, which consists of several components like Pilot, Citadel, and Mixer.

After installing Istio, you’ll need to create a namespace for your application. Namespaces are a way to organize and isolate resources within a Kubernetes cluster. You can create a namespace using the kubectl command-line tool, specifying the namespace name and any additional labels or annotations.

Next, you’ll need to deploy your application to the Kubernetes cluster. This involves creating a Kubernetes deployment file, which describes the desired state of your application, including the number of replicas, the container image to use, and any environment variables or configuration files. Once you have your deployment file ready, you can use the kubectl apply command to deploy your application to the cluster.

Once your application is deployed, you can enable Istio’s sidecar injection feature. Sidecars are proxy containers that run alongside your application containers and provide advanced networking features like traffic routing, load balancing, and security. To enable sidecar injection, you’ll need to label your namespace with the istio-injection=enabled label. This will instruct Istio to inject the sidecar proxy into any new pods created in that namespace.

Finally, you’ll need to configure Istio to handle incoming and outgoing traffic for your application. This involves creating Istio ingress and egress gateways, which act as the entry and exit points for traffic into and out of your application. You can configure these gateways using Istio’s Gateway and VirtualService resources, which allow you to define routing rules, load balancing policies, and other advanced networking features.

With these steps, you should now have a Kubernetes cluster set up for Istio. You can now start exploring Istio’s features and capabilities, such as traffic management, security, and observability. If you encounter any issues or have any questions, refer to the Istio documentation or consult the Istio community for help.

Next Steps and Joining the Istio Community

Istio community logo

Once you have completed the Istio Beginner’s Tutorial, you may be interested in taking your knowledge and skills to the next level. Joining the Istio community is a great way to continue learning and contributing to this open-source software.

To get started, you can visit the Istio website and explore the various resources available. This includes documentation, tutorials, and a community forum where you can ask questions and interact with other users.

If you are interested in contributing to the development of Istio, you can join the Istio GitHub repository. Here, you will find the source code and can contribute by submitting bug reports, suggesting enhancements, or even submitting your own code contributions.

Additionally, you may want to consider joining the Istio Slack channel. This is a great platform for real-time communication with other Istio users and developers. The Slack channel is a place where you can ask questions, share ideas, and collaborate on projects.

By joining the Istio community, you will have the opportunity to learn from experts in the field, collaborate with like-minded individuals, and contribute to the advancement of this powerful technology.

So, take the next step and join the Istio community today!

Online Cloud Computing Courses

Welcome to the world of online cloud computing courses! In this article, we will delve into the exciting realm of cloud computing education, exploring the benefits and opportunities offered by virtual learning platforms. Discover how these courses can equip you with the skills and knowledge needed to thrive in the ever-evolving tech industry. So, fasten your seatbelts and get ready to embark on a cloud computing learning adventure like no other!

Earn Your Degree in Cloud Computing

If you’re interested in pursuing a career in cloud computing, earning your degree in this field is a great way to gain the necessary knowledge and skills to succeed. Online cloud computing courses offer a convenient and flexible option for individuals who want to learn at their own pace and on their own time.

By taking Linux training, you’ll gain a solid foundation in operating systems and computer programming, which are essential skills in the cloud computing industry. Linux is an open-source operating system that is widely used in cloud computing environments, making it a valuable skill to have.

In addition to Linux training, online cloud computing courses often cover other important topics such as Amazon Web Services (AWS), Microsoft Azure, and Cisco certifications. These platforms and certifications are highly sought after by employers in the cloud computing field.

You’ll also learn about other key concepts in cloud computing such as platform as a service (PaaS), cloud storage, and artificial intelligence (AI). Understanding these concepts will give you a competitive edge in the job market and allow you to work on complex cloud computing projects.

Online cloud computing courses typically offer a mix of theoretical knowledge and hands-on experience. This combination allows you to apply what you’ve learned in a practical setting, giving you valuable real-world experience.

By earning your degree in cloud computing, you’ll become an expert in this field and be well-equipped to tackle the challenges and opportunities in the cloud computing industry. With the demand for cloud computing professionals on the rise, having a degree in this field will open up a world of career opportunities.

Whether you’re just starting your career or looking to advance in your current role, earning your degree in cloud computing is a smart choice. Online courses offer the flexibility and convenience you need to balance your studies with your other commitments.

Don’t wait any longer – take the first step towards earning your degree in cloud computing today. Enroll in an online course and start your journey towards a rewarding career in this rapidly growing field.

Finish a Cloud Computing Course in Under 12 Hours

If you’re looking to quickly gain knowledge and skills in cloud computing, online courses are a great option. With the right resources and dedication, you can complete a cloud computing course in under 12 hours.

There are many platforms that offer online cloud computing courses, such as Coursera, Microsoft Azure, and Amazon Web Services. These courses cover various topics, including cloud storage, server management, and application development.

To make the most of your time, it’s important to choose a course that aligns with your goals and interests. Consider your current knowledge in cloud computing and choose a course that suits your skill level.

When starting the course, familiarize yourself with the course syllabus and timeline. Create a study schedule and set aside dedicated time each day to work on the course material. It’s important to stay focused and motivated throughout the process.

Utilize different learning resources such as videos, articles, and practice exercises to enhance your understanding. Take advantage of any live webinars or Q&A sessions offered by the course instructors to clarify any doubts.

To optimize your learning experience, engage with the online community. Participate in discussion forums and connect with fellow learners. This can provide valuable insights and different perspectives on the course material.

As you progress through the course, don’t be afraid to ask for help when needed. Reach out to the course instructors or utilize online resources such as forums or support centers.

To reinforce your learning, practice what you’ve learned through hands-on exercises and projects. This will help solidify your understanding and prepare you for real-world applications.

Upon completion of the course, consider pursuing professional certifications such as Cisco certifications or VMware certifications. These certifications can validate your cloud computing skills and enhance your career prospects.

Launch Your Career in Cloud Computing

Cloud with a rocket launching

Some of the top online platforms, like Coursera and Udacity, offer a wide range of cloud computing courses that cover various topics such as platform as a service (PaaS), artificial intelligence (AI), machine learning, and more. Whether you’re a beginner or an experienced professional, there are courses available to suit your needs.

One of the key benefits of online courses is the ability to learn at your own pace. You can access course materials and lectures whenever it’s convenient for you, allowing you to fit your studies around your existing commitments. Additionally, many courses offer interactive elements like quizzes and assignments, which help reinforce your understanding of the material.

When choosing an online cloud computing course, it’s important to consider the expertise of the instructors. Look for courses taught by industry experts who have real-world experience in cloud computing. This ensures that you’re learning from professionals who understand the latest trends and best practices in the field.

Another factor to consider is the availability of certifications. Many online courses offer the opportunity to earn a professional certification upon successful completion. These certifications can enhance your resume and demonstrate your expertise to potential employers.

In addition to the theoretical knowledge gained through online courses, it’s also important to gain hands-on experience. Look for courses that offer practical exercises or access to cloud platforms where you can practice your skills. This practical experience will make you more marketable to employers and give you a deeper understanding of how cloud computing works in real-world scenarios.

Explore MasterTrack® Certificates for Cloud Computing

Cloud computing server

By enrolling in these courses, you will gain a deep understanding of the principles and practices of cloud computing, including virtualization, networking, and storage. You will learn how to design, deploy, and manage cloud-based solutions using industry-leading technologies such as Amazon Web Services (AWS) and VMware.

The courses also cover important topics like cloud security, data management, and scalability. You will learn best practices for ensuring the security and privacy of cloud-based systems, as well as how to effectively manage and analyze big data in the cloud.

With the guidance of expert instructors, you will develop practical skills through hands-on exercises, real-world case studies, and interactive discussions. These courses are designed to be engaging and interactive, allowing you to apply your knowledge in a practical and meaningful way.

Upon completion of the MasterTrack® Certificates, you will receive a professional certification that is recognized and valued in the industry. This certification will validate your expertise in cloud computing and open up new opportunities for career advancement.

Whether you are a software engineer, system administrator, or IT professional, these online cloud computing courses will equip you with the skills and knowledge needed to thrive in the fast-paced world of cloud computing. Take the next step in your career and explore the MasterTrack® Certificates for Cloud Computing today.

Grow Skills with Google Cloud Training and Certification

Google Cloud logo

Grow your skills in cloud computing with Google Cloud Training and Certification. Whether you’re new to the field or looking to advance your career, these online courses provide valuable knowledge and expertise.

By taking Linux training, you’ll gain a solid foundation in operating systems and learn how to navigate and manage Linux environments. This is essential for anyone interested in a career in cloud computing.

In these courses, you’ll learn about different aspects of cloud computing, including virtual machines, web services, and database management. You’ll also explore topics like cloud computing security, backup and recovery, and best practices for managing cloud environments.

Google’s training and certification programs are designed to be accessible and flexible, allowing you to learn at your own pace and on your own schedule. Whether you prefer online or offline learning, Google offers options to suit your needs.

By earning a certification from Google, you’ll validate your skills and knowledge in cloud computing, making you a valuable asset to employers. Google certifications are recognized and respected in the industry, giving you a competitive edge in the job market.

Don’t miss out on the opportunity to grow your skills and advance your career in cloud computing. Enroll in Google Cloud Training and Certification today and take your expertise to the next level.