Welcome to the world of Istio, where we unravel the mysteries of service mesh technology. In this beginner’s tutorial, we embark on a journey to understand the fundamental concepts and functionalities of Istio, empowering you to seamlessly manage and secure your microservices. So, fasten your seatbelts and get ready to dive into the fascinating realm of Istio!
Download and Install Istio
1. Open your command-line interface (CLI) on your Linux machine.
2. Ensure that you have the necessary package manager installed. For example, on Ubuntu, you can use the apt package manager. If you don’t have it, you can install it by running the command `sudo apt install apt`.
3. Add the Istio repository to your package manager. Run the command `curl -L https://istio.io/downloadIstio | sh -` to download the Istio package.
4. Navigate to the Istio directory using the `cd` command. For example, if you are using Istio version 1.11.2, you would run `cd istio-1.11.2`.
5. Add the Istio binaries to your PATH variable by running the command `export PATH=$PWD/bin:$PATH`. This will allow you to access the Istio commands from anywhere in your CLI.
6. Install Istio by running the command `istioctl install` in the Istio directory. This will set up Istio in your Kubernetes cluster and configure the necessary components for traffic management.
7. Verify that Istio is installed correctly by running the command `istioctl analyze`. This will check for any configuration errors or issues with your Istio installation.
8. If everything is successful, you can now start using Istio to manage your microservices and enhance your network communication. You can find more information on how to use Istio in the Istio documentation.
Deploying a Sample Application with Istio
To deploy a sample application with Istio, you need to follow a few simple steps. First, make sure you have Istio installed in your Kubernetes cluster. Istio is a service mesh that helps with managing and securing microservices in a computer network.
Once Istio is installed, you can deploy your sample application. Start by creating a Kubernetes deployment file for your application. This file defines the desired state of your application, such as the number of replicas and the container image to use.
Next, apply the deployment file using the `kubectl apply` command. This will create the necessary resources in your Kubernetes cluster to run your application.
After the deployment is successful, you can expose your application to the outside world using an Istio gateway. A gateway acts as a proxy server that routes traffic to your application. Create a gateway configuration file and apply it using `kubectl apply`.
To test your deployed application, you can use tools like `curl` or a web browser. Make a request to your application’s URL and see if you get a response.
Istio also provides powerful traffic management capabilities. You can use Istio’s virtual services and destination rules to control how traffic is routed to different versions of your application or to implement load balancing.
In addition to traffic management, Istio also offers features like security, observability, and fault tolerance. You can configure Istio to encrypt traffic using HTTPS, monitor your application’s performance using metrics and tracing, and handle failures gracefully.
Configuring External Access for the Application
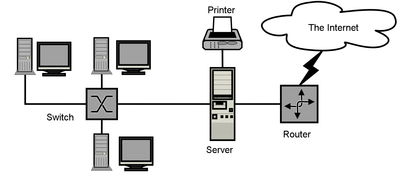
To configure external access, you need to consider factors such as the network environment, the operating system, and the specific requirements of the application.
One common method is to use a reverse proxy, which acts as an intermediary between the application and clients. This allows you to control access to the application and provide additional security features like authentication and load balancing.
Another option is to use a tunneling protocol like SSH or VPN to establish a secure connection between the application and external clients. This ensures that data transmitted between the two parties is encrypted and protected from unauthorized access.
To configure external access, you may need to modify configuration files or environment variables in the application. This is often done through the command-line interface or a configuration management tool.
Additionally, you may need to configure firewall rules or network settings to allow incoming connections to the application. This involves setting up port forwarding and ensuring that the necessary ports are open.
Overall, configuring external access for the application requires a good understanding of networking concepts and the specific technologies involved. It’s important to carefully follow the documentation and guidelines provided by the application or framework you are working with.
By properly configuring external access, you can ensure that your application is accessible to users or systems outside of your local network, while also maintaining the necessary security measures to protect your data.
Viewing the Istio Dashboard
To view the Istio Dashboard, follow these simple steps:
1. Ensure that you have Istio installed and running on your Linux machine. If not, refer to the installation guide for assistance.
2. Open a web browser and enter the URL for the Istio Dashboard. This URL typically follows the format http://
3. If prompted, enter your login credentials. The default username and password are usually provided during the installation process.
4. Once logged in, you will see the Istio Dashboard interface. This interface provides an overview of your Istio service mesh, including information on traffic, health, and performance.
5. Explore the various tabs and sections within the dashboard to gain insights into your service mesh. You can view details about individual services, check traffic routing and load balancing configurations, and monitor the health of your applications.
6. Use the search and filtering options to quickly find specific services or information within the dashboard.
7. Take advantage of the Istio Dashboard’s visualization capabilities to better understand the communication between your services and identify any potential bottlenecks or issues.
Remember to refer to the Istio documentation or consult with an expert if you encounter any difficulties or have specific questions about the dashboard.
By utilizing the Istio Dashboard, you can effectively manage and monitor your Istio service mesh, ensuring optimal performance and reliability for your applications.
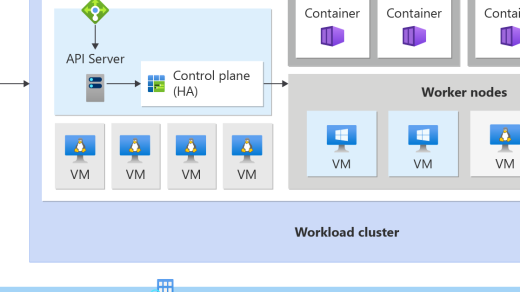
Setting up a Kubernetes Cluster for Istio
Once your cluster is up and running, you’ll need to install Istio. Istio is an open-source software framework that provides a service mesh for managing and securing microservices. To install Istio, you can use the Istio control plane, which consists of several components like Pilot, Citadel, and Mixer.
After installing Istio, you’ll need to create a namespace for your application. Namespaces are a way to organize and isolate resources within a Kubernetes cluster. You can create a namespace using the kubectl command-line tool, specifying the namespace name and any additional labels or annotations.
Next, you’ll need to deploy your application to the Kubernetes cluster. This involves creating a Kubernetes deployment file, which describes the desired state of your application, including the number of replicas, the container image to use, and any environment variables or configuration files. Once you have your deployment file ready, you can use the kubectl apply command to deploy your application to the cluster.
Once your application is deployed, you can enable Istio’s sidecar injection feature. Sidecars are proxy containers that run alongside your application containers and provide advanced networking features like traffic routing, load balancing, and security. To enable sidecar injection, you’ll need to label your namespace with the istio-injection=enabled label. This will instruct Istio to inject the sidecar proxy into any new pods created in that namespace.
Finally, you’ll need to configure Istio to handle incoming and outgoing traffic for your application. This involves creating Istio ingress and egress gateways, which act as the entry and exit points for traffic into and out of your application. You can configure these gateways using Istio’s Gateway and VirtualService resources, which allow you to define routing rules, load balancing policies, and other advanced networking features.
With these steps, you should now have a Kubernetes cluster set up for Istio. You can now start exploring Istio’s features and capabilities, such as traffic management, security, and observability. If you encounter any issues or have any questions, refer to the Istio documentation or consult the Istio community for help.
Next Steps and Joining the Istio Community
![]()
Once you have completed the Istio Beginner’s Tutorial, you may be interested in taking your knowledge and skills to the next level. Joining the Istio community is a great way to continue learning and contributing to this open-source software.
To get started, you can visit the Istio website and explore the various resources available. This includes documentation, tutorials, and a community forum where you can ask questions and interact with other users.
If you are interested in contributing to the development of Istio, you can join the Istio GitHub repository. Here, you will find the source code and can contribute by submitting bug reports, suggesting enhancements, or even submitting your own code contributions.
Additionally, you may want to consider joining the Istio Slack channel. This is a great platform for real-time communication with other Istio users and developers. The Slack channel is a place where you can ask questions, share ideas, and collaborate on projects.
By joining the Istio community, you will have the opportunity to learn from experts in the field, collaborate with like-minded individuals, and contribute to the advancement of this powerful technology.
So, take the next step and join the Istio community today!