Welcome to the Helm Chart Tutorial, your comprehensive guide to mastering the art of managing and deploying containerized applications effortlessly. In this article, we will demystify the world of Helm charts and equip you with the knowledge and skills to efficiently manage your Kubernetes deployments. So, fasten your seatbelts and get ready for an exciting journey into the realm of Helm charts!
Introduction to Helm
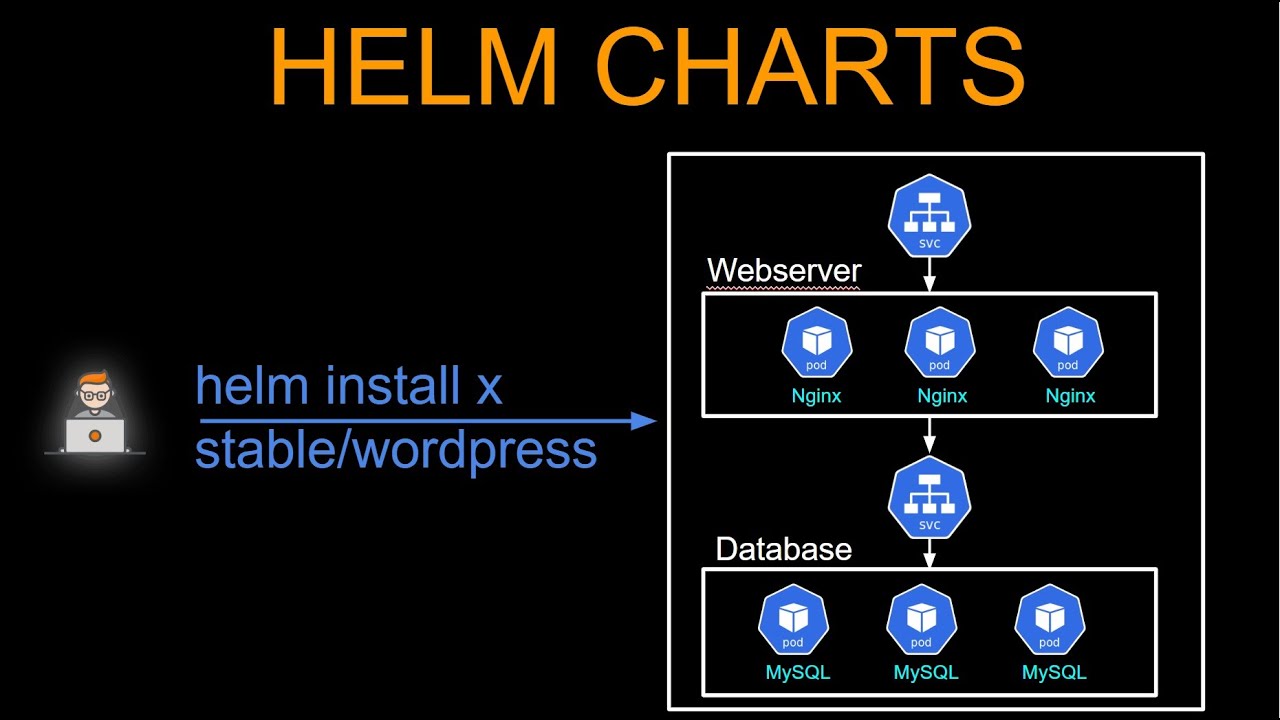
Helm is a package manager for Kubernetes that helps simplify the deployment and management of applications. It allows you to define, install, and upgrade applications in a cloud-native environment using YAML files.
With Helm, you can easily create charts, which are packages that contain all the necessary files and information to deploy and manage an application on a Kubernetes cluster. These charts include a description of the application, its dependencies, and the desired configuration.
To create a Helm chart, you need to define a chart.yaml file that specifies the metadata and dependencies of the chart. You also need a values.yaml file to define the configuration options and their default values.
Once you have created your chart, you can use the Helm command-line tool to install it on your Kubernetes cluster. Helm will handle the deployment, including creating the necessary manifest files and deploying the application.
Helm also provides templating capabilities, allowing you to define variables in your chart that can be substituted with different values during deployment. This makes it easy to create reusable charts that can be customized for different environments or deployments.
With Helm, you can also easily upgrade and rollback applications, making it a powerful tool for managing the lifecycle of your applications in a Kubernetes environment.
Whether you are a beginner or an experienced developer, Helm is a valuable tool for managing your Kubernetes applications. By simplifying the deployment and management process, it allows you to focus on developing and delivering your applications more efficiently. So, dive into Helm and take your Kubernetes skills to the next level!
Benefits of Using Helm
1. Simplified Package Management: Helm acts as a package manager for Kubernetes, allowing you to easily manage and deploy applications. With Helm, you can package your application along with its dependencies, making it easier to distribute and install.
2. Streamlined Deployment Process: Helm simplifies the deployment process by providing a templating engine. You can use templates to define your application’s configuration, making it easier to manage and maintain complex deployments.
3. Reproducible Environments: Helm allows you to define and version your application’s configuration as code. This means that you can easily reproduce your application’s environment, ensuring consistency across different deployments.
4. Easy Collaboration: Helm facilitates collaboration among team members by providing a centralized repository for charts. You can share and reuse charts, making it easier to work together on applications.
5. Flexibility and Customization: Helm provides a flexible and customizable approach to deploying applications. You can use Helm’s values files to override default configuration settings, allowing you to tailor deployments to your specific needs.
6. Community Support: Helm is an open-source project supported by the Cloud Native Computing Foundation (CNCF). This means that there is a vibrant community of developers contributing to its development and providing support.
7. Continuous Integration and Deployment (CI/CD) Integration: Helm integrates seamlessly with CI/CD pipelines, allowing you to automate the deployment process. You can easily incorporate Helm commands into your CI/CD scripts to deploy applications consistently and reliably.
By utilizing Helm, you can simplify your application deployments, increase collaboration, and ensure consistency across different environments. Its flexibility and integration with existing tools make it a powerful tool for managing and deploying applications in a Kubernetes environment.
Creating a Helm Chart
To create a Helm Chart, you will need to follow a few steps:
1. Start by creating a directory structure for your chart. This structure will include files such as `Chart.yaml`, `values.yaml`, and a `templates` directory.
2. The `Chart.yaml` file is where you define the metadata for your chart, such as its name, version, and description.
3. The `values.yaml` file contains the default values for the configuration options of your chart. These values can be overridden when the chart is installed.
4. Inside the `templates` directory, you can create the Kubernetes manifest files for your application. These files define the resources that need to be deployed, such as deployments, services, and ingresses.
5. Use Helm’s templating language to define dynamic values in your manifest files. This allows you to use variables and conditionals to customize the deployment based on the user’s input.
6. Once you have defined your chart, you can use the `helm template` command to generate the Kubernetes manifest files. This allows you to review the files before installing the chart.
7. To install the chart, use the `helm install` command. This will deploy your application to the Kubernetes cluster, using the values specified in the `values.yaml` file.
Hosting a Helm Chart
First, make sure you have a **Linux training** or understanding of Linux commands and navigation. This will help you work with the command line interface efficiently.
Next, ensure you have **Git** installed on your workstation. Git is an essential tool for version control and collaboration.
Once you have the necessary knowledge and tools, you can proceed with hosting the Helm Chart.
Start by creating a **namespace** in your Kubernetes cluster where you want to host the chart. Namespaces provide a logical separation for your applications and resources.
Next, you need to create a **values.yaml** file. This file allows you to customize the deployment by setting various parameters such as image versions, environment variables, and resource limits.
After creating the values file, you can package your application into a Helm Chart using the **helm package** command. This will create a **.tgz** file containing the necessary artifacts for your application.
To host the Helm Chart, you can use a variety of platforms such as **AWS EKS** or **OpenShift**. These platforms provide a robust infrastructure for deploying and managing your applications.
Once you have chosen your hosting platform, you can use the **helm install** command to deploy your Helm Chart. This command will create all the necessary Kubernetes resources based on the chart and values file.
Finally, you can verify the successful deployment of your application by checking the resources created in your hosting platform. This may include pods, services, and ingress resources.
Hosting a Helm Chart is a powerful way to deploy applications in a cloud-native environment. By following these steps, you can easily package and deploy your applications with Helm.
Helm Chart Tutorial GitHub Repo
By following the tutorial, users can gain a deep understanding of Helm charts and how to use them effectively. The tutorial covers essential topics such as creating and managing charts, deploying applications, and managing releases.
The tutorial also includes practical examples and step-by-step instructions to help users grasp the concepts easily. It covers important concepts such as chart templates, values files, and Helm commands.
Additionally, the tutorial explores advanced topics such as using Helm with different cloud providers like AWS and OpenShift, integrating Helm with CI/CD pipelines, and deploying applications using Helm charts.
With this comprehensive tutorial, users can confidently dive into the world of Helm charts and leverage them to manage and deploy their Kubernetes applications efficiently.
Whether you are a beginner or an experienced developer, the Helm Chart Tutorial GitHub Repo is a valuable resource to enhance your knowledge and skills in Helm chart development.
Customizing Helm Chart Templates
To customize a Helm Chart template, you need to navigate to the chart’s directory structure and locate the specific template file you want to modify. These template files are written in a templating language called Go templates, which allows you to dynamically generate YAML manifests based on the values provided in the values.yaml file.
In the template file, you can use the {{ .Values }} object to access the values defined in the values.yaml file. This object allows you to set values for different parameters, such as the image repository, tag, and ports. You can also use conditional statements and loops to create dynamic configurations based on specific conditions.
Once you have made the necessary modifications, you can use the Helm template command to render the template files and generate the corresponding YAML manifests. This command allows you to preview the changes before deploying them to your Kubernetes cluster.
After customizing the templates, you can install or upgrade your application using the Helm install or Helm upgrade command, respectively. Helm will apply the modifications defined in the templates and deploy the updated resources to your cluster.
By customizing Helm Chart templates, you have full control over the configuration of your applications, allowing you to adapt them to your specific needs. This flexibility is especially useful in a cloud-native environment where applications often require different configurations based on the target environment or deployment strategy.
Remember to consistently test your customized templates to ensure that they generate valid and functional YAML manifests. This will help avoid any issues when deploying your application.
Validating the Helm Chart
To validate the Helm Chart, you can use the `helm lint` command, which checks the syntax and structure of the chart files. This command will catch any syntax errors, missing files, or incorrect values in your Chart.yaml, values.yaml, and deployment.yaml files.
In addition to the `helm lint` command, you can also use tools such as the OpenTelemetry Operator or the OpenTelemetry Collector to validate your Helm Chart. These tools enable you to monitor and collect telemetry data from your application, ensuring its performance and reliability.
When validating the Helm Chart, it is important to consider the specific requirements of your infrastructure. For example, if you are deploying your application to an AWS EKS cluster, you may need to include additional configuration in your values.yaml file to ensure compatibility with the cluster.
By validating the Helm Chart, you can identify any issues early in the deployment process, allowing you to make necessary adjustments and avoid potential problems in your production environment. This validation process is crucial for maintaining the stability and scalability of your application.
Remember to regularly update and validate your Helm Chart as your application evolves. This will help you keep your deployment process up to date and ensure that your application continues to run smoothly.
Taking Linux training can further enhance your understanding of Helm Charts and other essential concepts in the world of cloud-native computing. With Linux training, you can gain the skills and knowledge needed to effectively manage and deploy applications in a Linux environment.
By investing in Linux training, you can become proficient in using tools like Helm Charts and gain a deeper understanding of the underlying technologies and principles. This knowledge will not only benefit your career but also enable you to build robust and scalable applications in a cloud-native environment.
Deploying the Helm Chart
To deploy the Helm Chart, you’ll need to follow a few steps. First, make sure you have the necessary tools installed, such as Docker and the Helm CLI. Next, create the necessary deployment YAML files for your application, including the chart YAML and values YAML files. These files will define the configuration and behavior of your application when it’s deployed.
Once you have your deployment files ready, you can start the deployment process. Use the Helm CLI to install the chart by running the appropriate helm install command, specifying the chart and any necessary values or overrides. Helm will then create the necessary Kubernetes resources based on the chart and values provided.
During the deployment, Helm will pull any required Docker images and deploy them to your Kubernetes cluster. It will also apply any necessary configurations, such as setting environment variables or creating Kubernetes secrets. This ensures that your application has all the necessary resources and configurations to run successfully.
After the deployment, you can use various commands to manage and monitor the deployed Helm release. You can check the status of the release, upgrade or rollback to a different version, and even uninstall the release if needed. Helm provides a convenient way to manage and orchestrate your application deployments in a repeatable and scalable manner.
Upgrading and Rolling Back Helm Releases
When working with Helm, you may need to upgrade or roll back your releases. Upgrading allows you to update your application to a new version, while rolling back allows you to revert to a previous version.
To upgrade a Helm release, you can use the `helm upgrade` command followed by the release name and the new chart version. This will apply any changes in the new chart version to your existing release. You can also specify any additional configuration values using a values file or inline flags.
If you encounter any issues after upgrading, you can easily roll back to the previous version using the `helm rollback` command. This will revert your release to the previous version and undo any changes made during the upgrade process.
It’s important to note that when upgrading or rolling back Helm releases, you should always follow best practices and test the changes in a non-production environment first. This will help ensure that your application continues to function as expected and avoid any potential issues.
Uninstalling and Debugging Helm Charts
Uninstalling and debugging Helm charts is an essential skill for managing your deployments effectively. Whether you need to remove a chart or troubleshoot issues, understanding these processes is crucial. Here’s a step-by-step guide to help you navigate through uninstalling and debugging Helm charts.
1. Uninstalling Helm Charts:
– To uninstall a Helm chart, use the command: helm uninstall [RELEASE_NAME].
– Replace [RELEASE_NAME] with the name of the chart you want to uninstall.
– This command will remove the chart and all its associated resources from your cluster.
2. Debugging Helm Charts:
– If you encounter issues with your Helm charts, debugging can help identify and resolve them.
– Start by checking the chart’s logs using the command: helm status [RELEASE_NAME].
– This will display the status of the chart and any related error messages.
3. Troubleshooting Common Issues:
– If the logs don’t provide enough information, you can dive deeper into the troubleshooting process.
– Examine the chart’s template files, located in the templates/ directory, to ensure they’re properly configured.
– Verify that all required environment variables and parameters are set correctly in the values.yaml file.
– Check the chart’s manifest file, usually named Chart.yaml, for any errors or missing information.
4. Utilizing Helm’s Debugging Tools:
– Helm provides several useful debugging tools to diagnose and resolve issues.
– Use the helm lint command to check your chart for common errors and best practices.
– The helm template command allows you to render and view the chart’s templates without installing it, helping you identify any rendering issues.
– Helm also offers the helm install –debug –dry-run command, which simulates the installation process and shows the rendered templates without actually deploying them.