Kubernetes Education

Install Kubernetes on Linux

In this article, we will explore the process of installing Kubernetes on a Linux operating system.

Before you begin

To install Kubernetes on Linux, ensure that your system meets the necessary requirements, such as having a 64-bit architecture and an Ubuntu or Debian-based operating system. Make sure to update your package manager and repository before proceeding with the installation process. Use the appropriate commands to download the necessary files and verify their integrity with SHA checksums.

When installing Kubernetes, it is important to follow best practices and use sudo or superuser permissions to avoid any complications. Take note of the directory paths where the files are being stored and make any necessary adjustments to your PATH variable for easier access. Keep in mind the security implications of running Kubernetes on your system and take necessary precautions to protect your data center.

Install kubectl on Linux

Terminal window with Linux command prompt

To install **kubectl** on Linux, you can follow these simple steps. First, you need to download the **kubectl** binary file. You can do this by using the **curl** command to retrieve the file from the Kubernetes GitHub repository.

Next, you’ll need to make the downloaded binary executable by running the **chmod** command. This will allow you to execute the **kubectl** binary on your system.

After that, you can move the **kubectl** binary to a directory in your **PATH** variable. This will allow you to run **kubectl** from any directory on your system without specifying the full path to the binary.

Once you’ve completed these steps, you can verify that **kubectl** is installed correctly by running the **kubectl version** command in your terminal. This will display the version of **kubectl** that is currently installed on your system.

Install kubectl binary with curl on Linux

To install the **kubectl** binary with **curl** on Linux, follow these steps:

1. Open a terminal window on your Linux machine.
2. Use the following command to download the latest version of **kubectl**:
“`bash
curl -LO https://dl.k8s.io/release/$(curl -L -s https://dl.k8s.io/release/stable.txt)/bin/linux/amd64/kubectl
“`
3. Verify the integrity of the downloaded binary by comparing its checksum with the official SHA-256 hash provided by Kubernetes.
4. Change the permissions of the **kubectl** binary to make it executable:
“`bash
chmod +x kubectl
“`
5. Move the **kubectl** binary to a directory included in your **PATH** variable, such as **/usr/local/bin**, to make it accessible from anywhere in the terminal.

Install using native package management

To install Kubernetes on Linux, it is recommended to use the native package management system of your distribution. This simplifies the installation process and ensures that Kubernetes is properly integrated into your system.

For Ubuntu and Debian-based systems, you can use the package manager **apt** to install Kubernetes. Start by updating your package list with `sudo apt-get update`, then install the Kubernetes components with `sudo apt-get install kubelet kubeadm kubectl`.

On Red Hat-based systems like CentOS or Fedora, you can use **yum** to install Kubernetes. First, enable the Kubernetes repository with `sudo yum-config-manager –add-repo https://packages.cloud.google.com/yum/repos/kubernetes-el7-x86_64`, then install the components with `sudo yum install kubelet kubeadm kubectl`.

By using the native package management system, you can easily manage and update your Kubernetes installation. This is considered a best practice in Linux training as it ensures a smooth and efficient deployment of Kubernetes on your system.

Install using other package management

Terminal window with package management commands

To install **Kubernetes** using other package management tools like **Yum** or **Apt**, first, ensure that your system meets the necessary requirements. Then, add the Kubernetes repository to your system’s package sources. Import the repository’s GPG key to ensure the authenticity of the packages being installed.

Next, update your package list and install the necessary Kubernetes components using the package management tool of your choice. Verify the installation by checking the version of Kubernetes that was installed on your system.

Verify kubectl configuration

To verify your **kubectl** configuration after installing Kubernetes on Linux, you can use the command **kubectl version**. This will display the version of the **kubectl** client and the Kubernetes cluster it is connected to. Make sure that the client version matches the server version for compatibility.

Another important step is to check the **kubectl** configuration file located at **~/.kube/config**. This file contains information about the Kubernetes cluster, including the server, authentication details, and context. Verify that the information is correct and up to date.

You can also use the command **kubectl cluster-info** to get details about the Kubernetes cluster you are connected to, such as the server address and cluster version. This can help ensure that your **kubectl** configuration is pointing to the correct cluster.

By verifying your **kubectl** configuration, you can ensure that you are properly connected to your Kubernetes cluster and ready to start managing your containerized applications effectively.

Troubleshooting the ‘No Auth Provider Found’ error message

If you encounter the ‘No Auth Provider Found’ error message while trying to install Kubernetes on Linux, there are a few troubleshooting steps you can take to resolve the issue.

First, ensure that you have properly configured your authentication settings and credentials. Check that your authentication provider is correctly set up and that your credentials are valid.

Next, verify that your kubeconfig file is correctly configured with the necessary authentication information. Make sure that the file has the correct permissions set and that it is located in the appropriate directory.

If you are using a cloud provider or a specific authentication method, double-check the documentation to ensure that you have followed all the necessary steps for authentication setup.

Optional kubectl configurations and plugins

Optional **kubectl configurations** and **plugins** can enhance the functionality of your Kubernetes installation on Linux. These configurations allow you to customize your environment to better suit your needs, while plugins provide additional features and tools to improve your workflow.

To install these optional configurations and plugins, you can refer to the official Kubernetes documentation or community resources. Many of these resources provide step-by-step guides on how to set up and configure these add-ons successfully.

Before installing any additional configurations or plugins, make sure to verify their authenticity and compatibility with your Kubernetes setup. It’s essential to follow best practices and security measures to protect your system from any vulnerabilities that may arise from installing third-party software.

By leveraging optional **kubectl configurations** and **plugins**, you can maximize the potential of your Kubernetes deployment on Linux and streamline your workflow for managing containers and clusters effectively.

Enable shell autocompletion

To set up autocompletion, you first need to locate the completion script for **kubectl** on your system. This script is typically found in the /etc/bash_completion.d/ directory or can be downloaded from the Kubernetes GitHub repository.

Once you have the script, you can source it in your shell configuration file, such as .bashrc or .zshrc, to enable autocompletion whenever you use **kubectl** commands. Simply add a line to the file that sources the completion script.

After sourcing the script, restart your shell or run the command to reload the configuration file. You should now be able to benefit from shell autocompletion when interacting with Kubernetes resources and commands.

By enabling shell autocompletion for Kubernetes, you can streamline your workflow and reduce the likelihood of errors when working with the Kubernetes CLI. This simple setup can greatly enhance your experience with managing Kubernetes clusters on Linux.

Install bash-completion

To install **bash-completion** on your Linux system for better command line auto-completion, you can use package managers like **apt-get** for Ubuntu or **yum** for CentOS.
For Ubuntu, simply run **sudo apt-get install bash-completion** in the terminal.
For CentOS, use **sudo yum install bash-completion**.
After installation, you may need to restart your terminal or run **source /etc/bash_completion** to activate the completion.

This feature will greatly improve your efficiency when working with **Kubernetes** or any other command line tools on Linux.

What’s next

To install **Kubernetes** on **Linux**, you’ll need to first ensure that your Linux system meets the necessary requirements. This includes having a compatible version of Linux running on an **X86-64** or **AArch64** machine.

Next, you’ll need to set up a **software repository** that contains the necessary **Kubernetes** packages. This can typically be done using package managers like **Yum** or **Deb**.

After setting up the repository, you can proceed to install **Kubernetes** by running the necessary commands in your terminal. It’s important to follow best practices and ensure that all dependencies are properly installed.

Once **Kubernetes** is installed, you can start setting up your **cluster** and deploying applications. Make sure to familiarize yourself with the **Kubernetes ecosystem** and utilize tools like **kubectl** to manage your **cluster** effectively.

CNCF Kubernetes Certification Training

Explore the world of CNCF Kubernetes Certification Training and unlock new opportunities in the field of cloud computing.

Certification Overview

The CNCF Kubernetes Certification Training offers a comprehensive overview of Kubernetes, focusing on key concepts and best practices. The exam tests your knowledge of Kubernetes architecture, troubleshooting, security, and more. The certification is valuable for professionals seeking to enhance their skills in cloud-native computing and DevOps.

With a mix of multiple-choice questions and hands-on scenarios, the exam assesses your understanding of Kubernetes and its ecosystem. The training curriculum covers essential topics such as microservices, Prometheus, and service mesh. Upon successful completion, you will receive a credential from the Cloud Native Computing Foundation.

Benefits of Certification

Upon completing the CNCF Kubernetes Certification Training, individuals gain professional certification that validates their expertise in cloud-native computing and DevOps. This credential not only enhances their career prospects, but also demonstrates their proficiency in using open-source software like Kubernetes and Prometheus for cloud computing security. The comprehensive curriculum covers best practices, troubleshooting techniques, and architecture considerations, equipping candidates with the knowledge and skills needed to excel in the field. Additionally, the Linux Foundation certification is highly regarded in the industry, providing a competitive edge in the job market.

Recognized Products

Product Description
Kubernetes Open-source container orchestration platform for automating deployment, scaling, and management of containerized applications.
CKA Certification Certified Kubernetes Administrator certification offered by the Cloud Native Computing Foundation (CNCF) for professionals.
CKAD Certification Certified Kubernetes Application Developer certification offered by the Cloud Native Computing Foundation (CNCF) for developers.
Kubernetes Training Training courses and workshops offered by various providers to help individuals prepare for Kubernetes certifications.

Cloud Native Computing Foundation (CNCF) Training Courses

Welcome to a comprehensive guide to the Cloud Native Computing Foundation (CNCF) Training Courses. Dive into the world of cloud native technologies and enhance your skills with CNCF’s top-notch training programs.

Certification Options

Taking these courses can help individuals improve their ***technical communication*** skills and gain a deeper understanding of ***cloud-native computing***. By learning about ***procedural knowledge*** and ***computer programming***, participants can become more proficient in their roles as ***software developers*** and ***engineers***.

Upon completing the training courses, individuals have the opportunity to earn a valuable ***certification*** from the ***Cloud Native Computing Foundation***. This certification can demonstrate to employers that they have the necessary skills and knowledge to excel in the field of ***cloud-native computing***.

Training Courses

Designed to cater to both beginners and **experts**, CNCF training courses cover various topics including **software development workflows**, **collaboration**, and **web service architecture**. Participants will also gain **procedural knowledge** on **DevOps practices**, **Linux Foundation tools**, and **event-driven architectures**.

By enrolling in CNCF training courses, individuals can upskill in **open source technologies**, **machine learning**, and **data science**. The curriculum is structured to provide a comprehensive understanding of **software engineering** principles and **architecture management**.

Participants can also benefit from hands-on experience with tools like **Kubeflow**, **Dapr**, and **WebAssembly**. Upon completion of the courses, individuals may choose to take **certification exams** to validate their **skills** in **cloud native computing**.

Recorded Programs

By enrolling in these courses, individuals can gain valuable insights from industry experts and enhance their technical communication skills. The recorded programs provide the flexibility to learn at one’s own pace, making it easier to fit training into a busy schedule.

Whether you are a seasoned engineer looking to expand your knowledge or a beginner interested in learning about cloud computing, these training courses offer something for everyone. The content is designed to be informative, engaging, and practical, ensuring that learners can apply their new skills in real-world scenarios.

With topics ranging from DevOps to machine learning, the CNCF recorded programs are a valuable resource for anyone looking to advance their career in the field of cloud native computing. Gain the knowledge and skills needed to thrive in today’s fast-paced technology landscape by enrolling in these training courses.

Testing Helm Charts

In the world of Kubernetes deployment, testing Helm charts is a crucial step to ensure smooth sailing in production environments.

Chart Testing Overview

Chart testing is a crucial aspect of ensuring the reliability and functionality of Helm charts in Kubernetes environments. It involves validating the behavior of the charts against different scenarios to catch any potential issues before deployment.

Unit testing is a key component of chart testing, focusing on testing individual components or functions of the chart in isolation. This helps identify any bugs or errors at an early stage, leading to a more robust and stable chart overall.

Test automation plays a significant role in chart testing, allowing for the creation of automated tests that can be run consistently and efficiently. This reduces manual effort and ensures that tests are performed consistently across different environments.

By following best practices and utilizing tools like GitHub and Docker, engineers can streamline the chart testing process and improve the overall quality of their charts. This includes regularly updating documentation, leveraging version control, and utilizing integration testing to validate the entire chart as a whole.

Running Helm Chart Tests

Running test scripts or code snippets

To run tests on your Helm charts, you can use the Helm test command. This command will create a new **pod** in your Kubernetes cluster and run a series of tests against your chart. Make sure your tests are defined in the templates/test folder within your Helm chart directory.

When writing tests for your Helm charts, it’s important to consider both **unit testing** and **integration testing**. Unit testing focuses on testing individual components of your chart in isolation, while integration testing verifies that these components work together as expected.

One best practice is to automate your tests using a continuous integration (CI) tool like **GitHub Actions** or **GitLab CI/CD**. This will ensure that your tests are run automatically whenever you push changes to your chart’s repository.

Another important aspect of testing Helm charts is ensuring that your tests are **reproducible**. Make sure to document your test cases and provide clear instructions for running them in your chart’s README file.

When writing tests, consider using a **Helm testing library** like **helm-crd-testing** or **helm-unittest**. These libraries provide utilities for writing tests in **YAML** format and running them against your Helm charts.

Helm Chart Presentation and Context

When presenting a Helm Chart, it is important to provide context for its purpose and functionality. This includes explaining how the chart is structured, the components it contains, and how it can be used within a Kubernetes environment.

One key aspect of a Helm Chart presentation is to highlight the usability and experience it offers to users. This involves showcasing how the chart simplifies the deployment and management of applications, making it easier for users to work with Kubernetes resources.

Testing Helm Charts is essential to ensure their reliability and effectiveness. This can be done through test automation, where various scenarios are simulated to verify the chart’s behavior under different conditions. By testing Helm Charts, users can identify and address any issues or bugs before deploying them in a production environment.

It is also important to consider the library of Helm Charts available, which provide pre-configured templates for different applications and services. Leveraging these charts can save time and effort, as users do not have to create configurations from scratch.

When working with Helm Charts, users interact with them using the **command-line interface** or through an integrated development environment. Understanding how to navigate and manipulate Helm Charts using these tools is key to effectively working with them.

Documentation plays a crucial role in understanding Helm Charts and how to use them correctly. By following best practices and referencing official documentation, users can ensure they are using Helm Charts in the right way.

What is Istio Service Mesh

In the world of microservices architecture, Istio Service Mesh is a powerful tool that can revolutionize the way applications are deployed and managed.

What is Istio Service Mesh?

Istio Service Mesh is a popular open-source **service mesh** platform designed to manage and secure microservices running in a **Kubernetes** environment. It acts as a layer of infrastructure between services, handling communication, authentication, and traffic management.

One of the key features of Istio is its use of a **sidecar proxy** alongside each microservice, which intercepts all inbound and outbound traffic. This allows Istio to provide advanced features like load balancing, encryption, rate limiting, and more without requiring changes to the actual application code.

By centralizing these functions in a dedicated service mesh, Istio simplifies the management of complex **cloud-native** applications, improving reliability, scalability, and security. It also provides powerful tools for monitoring and controlling traffic flow, enabling developers to implement sophisticated patterns like **A/B testing** and **circuit breakers**.

How Istio Works

Istio works by creating a service mesh that helps manage communication between microservices within a Kubernetes cluster. It uses a **proxy server** called Envoy to handle all inbound and outbound traffic. This allows Istio to provide features such as load balancing, **encryption**, and traffic management.

The control plane in Istio is responsible for configuring and managing the behavior of the data plane proxies. It utilizes **telemetry** to collect data on traffic flow and behavior, providing insights into the network’s performance. Istio also offers features like fault injection, **rate limiting**, and A/B testing to improve reliability and scalability.

By implementing Istio, organizations can enhance the security, reliability, and observability of their microservices architecture. Istio’s extensibility and support for various protocols like HTTP, **WebSocket**, and **TCP** make it a powerful tool for managing complex communication patterns in a distributed system.

Getting Started with Istio

Istio is an open-source service mesh that helps manage microservices in a cloud-native environment.

It provides capabilities such as traffic management, security, and observability for your applications running on a computer network.

One of the key components of Istio is the proxy server, which acts as a sidecar alongside your microservices to handle communication between them.

By using Istio, you can easily implement features like load balancing, fault injection, and end-to-end encryption to enhance the reliability and security of your applications.

With Istio, you can also gain insights into your application’s performance through telemetry data and easily implement policies for access control and authentication.

Start exploring Istio to streamline your microservices architecture and improve the overall reliability and security of your cloud-native applications.

Core Features of Istio

Feature Description
Traffic Management Control the flow of traffic between services, enabling canary deployments, A/B testing, and more.
Security Provides secure communication between services with mTLS encryption, role-based access control, and more.
Observability Collects telemetry data from services, allowing for monitoring, logging, and tracing of requests.
Policy Enforcement Enforce policies for access control, rate limiting, and more across services.
Service Resilience Automatically retries failed requests, provides circuit breaking, and more to improve service reliability.
Multi-Cloud Support Run Istio across multiple cloud environments and on-premises infrastructure.

Integration and Customization Options

Istio Service Mesh offers **extensive integration** and **customization options** to suit various needs. Users can seamlessly integrate Istio with existing systems and applications, thanks to its **flexible architecture**.

With Istio, you can **customize policies** for traffic management, **load balancing**, and **security** to meet specific requirements. This level of customization ensures that your services are running efficiently and securely.

The **observability** features in Istio allow you to monitor and track the performance of your services in real-time. This visibility is crucial for **troubleshooting**, **scaling**, and **optimizing** your applications.

For those looking to extend Istio’s capabilities, the **extensibility** of the platform allows for adding new functionalities and features easily. This ensures that Istio can evolve with your organization’s needs.

Install Kubernetes on RedHat Linux

In this tutorial, we will explore the steps to install Kubernetes on RedHat Linux, enabling you to efficiently manage containerized applications on your system.

Understanding Kubernetes Architecture

Kubernetes architecture consists of two main components: the **control plane** and the **nodes**. The control plane manages the cluster, while nodes are the worker machines where applications run. It’s crucial to understand how these components interact to effectively deploy and manage applications on Kubernetes.

The control plane includes components like the **kube-apiserver**, **kube-controller-manager**, and **kube-scheduler**. These components work together to maintain the desired state of the cluster and make decisions about where and how applications should run. On the other hand, nodes run the applications and are managed by the control plane.

When installing Kubernetes on RedHat Linux, you will need to set up both the control plane and the nodes. This involves installing container runtime like Docker, configuring the control plane components, and joining nodes to the cluster. Additionally, using tools like **kubectl** and **kubeconfig** files will help you interact with the cluster and deploy applications.

Understanding Kubernetes architecture is essential for effectively managing containerized applications. By grasping the roles of the control plane and nodes, you can optimize your deployment strategies and ensure the scalability and reliability of your applications on Kubernetes.

Starting and Launching Kubernetes Pods

To start and launch Kubernetes Pods on RedHat Linux, you first need to have Kubernetes installed on your system. Once installed, you can create a Pod by defining a YAML configuration file with the necessary specifications. Use the kubectl command to apply this configuration file and start the Pod.

Ensure that the Pod is successfully launched by checking its status using the kubectl command. You can also view logs and details of the Pod to troubleshoot any issues that may arise during the launch process.

To manage multiple Pods or deploy applications on a larger scale, consider using tools like OpenShift or Ansible for automation. These tools can help streamline the process of starting and launching Pods in a computer cluster environment.

Exploring Kubernetes Persistent Volumes

To explore **Kubernetes Persistent Volumes** on RedHat Linux, first, you need to understand the concept of persistent storage in a Kubernetes cluster. Persistent Volumes allow data to persist beyond the life-cycle of a pod, ensuring that data is not lost when a pod is destroyed.

Installing Kubernetes on RedHat Linux involves setting up **Persistent Volumes** to store data for your applications. This can be done by defining Persistent Volume Claims in your Kubernetes YAML configuration files, specifying the storage class and access mode.

You can use various storage solutions like NFS, iSCSI, or cloud storage providers to create Persistent Volumes in Kubernetes. By properly configuring Persistent Volumes, you can ensure data replication, backup, and access control for your applications.

Managing Kubernetes SELinux Permissions

When managing **Kubernetes SELinux permissions** on **RedHat Linux**, it is crucial to understand how SELinux works and how it can impact your Kubernetes installation.

To properly manage SELinux permissions, you will need to configure the necessary **security contexts** for Kubernetes components such as **pods**, **services**, and **persistent volumes**. This involves setting appropriate SELinux labels on files and directories.

It is important to regularly audit and troubleshoot SELinux denials to ensure that your Kubernetes cluster is running smoothly and securely. Tools such as **audit2allow** can help generate SELinux policies to allow specific actions.

Configuring Networking for Kubernetes

To configure networking for **Kubernetes** on **RedHat Linux**, you need to start by ensuring that the host machine has the necessary network settings. This includes setting up a **static IP address** and configuring the **DNS resolver** to point to the correct servers.

Next, you will need to configure the **network plugin** for Kubernetes, such as **Calico** or **Flannel**, to enable communication between pods and nodes. These plugins help manage network policies and provide connectivity within the cluster.

You may also need to adjust the **firewall settings** to allow traffic to flow smoothly between nodes and pods. Additionally, setting up **ingress controllers** can help manage external access to your Kubernetes cluster.

Installing CRI-O Container Runtime

Terminal window with CRI-O installation command

To install CRI-O Container Runtime on RedHat Linux, begin by updating the system using the package manager, such as DNF. Next, enable the necessary repository for CRI-O installation. Install the cri-o package using the package manager, ensuring all dependencies are met.

After installation, start the CRI-O service using Systemd and enable it to run on system boot. Verify the installation by checking the CRI-O version using the command-line interface. You can now proceed with setting up Kubernetes on your RedHat Linux system with CRI-O as the container runtime.

Keep in mind that CRI-O is a lightweight alternative to Docker for running containers in a Kubernetes environment. It is designed specifically for Kubernetes and offers better security and performance.

Creating a Kubernetes Cluster

To create a Kubernetes cluster on RedHat Linux, start by installing Docker and Kubernetes using the RPM Package Manager. Next, configure the Kubernetes master node by initializing it with the ‘kubeadm init’ command. Join worker nodes to the cluster using the ‘kubeadm join’ command with the token generated during the master node setup.

Ensure that the necessary ports are open on all nodes for communication within the cluster. Use Ansible for automation and to manage the cluster configuration. Verify the cluster status using the ‘kubectl get nodes’ command and deploy applications using YAML files.

Monitor the cluster using the Kubernetes dashboard or command-line interface. Utilize features like replication controllers, pods, and services for managing applications. Regularly update the cluster components and apply security patches to keep the cluster secure.

Setting up Calico Pod Network Add-on

To set up the Calico Pod Network Add-on on Kubernetes running on Redhat Linux, start by ensuring that the Calico node image is available on your system. Next, edit the configuration file on your master node to include the necessary settings for Calico.

After configuring the master node, proceed to configure the worker nodes by running the necessary commands to join them to the Calico network. Once all nodes are connected, verify that the Calico pods are running correctly on each node.

Finally, test the connectivity between pods on different nodes to confirm that the Calico network is functioning as expected. With these steps completed, your Kubernetes cluster on RedHat Linux should now be utilizing the Calico Pod Network Add-on for efficient communication between pods.

Joining Worker Node to the Cluster

To join a Worker Node to the Cluster in RedHat Linux, you first need to have Kubernetes installed. Once Kubernetes is up and running on your Master System, you can start adding Worker Nodes to the cluster.

To join a Worker Node, you will need to use the kubeadm tool. This tool will help you configure and manage your Worker Nodes efficiently.

Make sure your Worker Node meets the minimum requirements, such as having at least 2GB of RAM and a compatible operating system.

Follow the step-by-step instructions provided by Kubernetes documentation to successfully add your Worker Node to the cluster.

Troubleshooting Kubernetes Installation

To troubleshoot Kubernetes installation on RedHat Linux, first, check if all the necessary dependencies are installed and properly configured. Ensure that the Docker software is correctly set up and running. Verify that the Kubernetes software repository is added to the system and the correct versions are being used.

Check the status of the Kubernetes master and worker nodes using the “kubectl get nodes” command. Make sure that the nodes are in the “Ready” state and all services are running properly. If there are any issues, look for error messages in the logs and troubleshoot accordingly.

If the installation is still not working, try restarting the kubelet and docker services using the “systemctl restart kubelet” and “systemctl restart docker” commands. Additionally, check the firewall settings to ensure that the necessary ports are open for Kubernetes communication.

If you encounter any errors during the installation process, refer to the official Kubernetes documentation or seek help from the community forums. Troubleshooting Kubernetes installation on RedHat Linux may require some technical knowledge, so don’t hesitate to ask for assistance if needed.

Preparing Containerized Applications for Kubernetes

To prepare containerized applications for Kubernetes on RedHat Linux, start by ensuring that your system meets the necessary requirements. Install and configure Docker for running containers, as Kubernetes relies on it for container runtime. Next, set up a Kubernetes cluster using tools like Ansible or OpenShift to automate the process.

Familiarize yourself with systemd for managing services in RedHat Linux, as Kubernetes components are typically run as system services. Utilize the RPM Package Manager to install Kubernetes components from the official software repository. Make sure your server has access to the Internet to download necessary packages and updates.

Configure your RedHat Linux server to act as a Kubernetes master node by installing the required components. Set up worker nodes to join the cluster, allowing for distributed computing across multiple machines. Follow best practices for securing your Kubernetes cluster, such as restricting access to the API server and enabling replication for high availability.

Regularly monitor the health and performance of your Kubernetes cluster using tools like Prometheus and Grafana. Stay updated on the latest Kubernetes releases and apply updates as needed to ensure optimal performance. With proper setup and maintenance, your containerized applications will run smoothly on Kubernetes in a RedHat Linux environment.

Debugging and Inspecting Kubernetes

To properly debug and inspect **Kubernetes** on **RedHat Linux**, you first need to ensure that you have the necessary tools and access levels. Make sure you have **sudo** privileges to make system-level changes.

Use **kubectl** to interact with the Kubernetes cluster and inspect resources. Check the status of pods, services, and deployments using **kubectl get** commands.

For debugging, utilize **kubectl logs** to view container logs and troubleshoot any issues. You can also use **kubectl exec** to access a running container and run commands for further investigation.

Additionally, you can enable **debugging** on the **Kubernetes master node** by setting the appropriate flags in the kube-apiserver configuration. This will provide more detailed logs for troubleshooting purposes.

Troubleshooting Kubernetes systemd Services

Terminal window with Kubernetes logo

When troubleshooting **Kubernetes systemd services** on RedHat Linux, start by checking the status of the systemd services using the `systemctl status` command. This will provide information on whether the services are active, inactive, or have encountered any errors.

If the services are not running as expected, you can try restarting them using the `systemctl restart` command. This can help resolve issues related to the services not starting properly.

Another troubleshooting step is to review the logs for the systemd services. You can view the logs using the `journalctl` command, which will provide detailed information on any errors or warnings encountered by the services.

If you are still experiencing issues with the systemd services, you may need to dive deeper into the configuration files for Kubernetes on RedHat Linux. Make sure all configurations are set up correctly and are in line with the requirements for running Kubernetes.

Troubleshooting Techniques for Kubernetes

Kubernetes troubleshooting flowchart

– When troubleshooting Kubernetes on RedHat Linux, one common issue to check is the status of the kubelet service using the systemctl command. Make sure it is running and active to ensure proper functioning of the Kubernetes cluster.

– Another useful technique is to inspect the logs of the Kubernetes components such as kube-scheduler, kube-controller-manager, and kube-apiserver. This can provide valuable insights into any errors or issues that may be affecting the cluster.

– If you encounter networking problems, check the status of the kube-proxy service and ensure that the networking plugin is properly configured. Issues with network connectivity can often cause problems in Kubernetes clusters.

– Utilizing the kubectl command-line tool can also be helpful in troubleshooting Kubernetes on RedHat Linux. Use commands such as kubectl get pods, kubectl describe pod, and kubectl logs to gather information about the state of the cluster and troubleshoot any issues.

Checking Firewall and yaml/json Files for Kubernetes

When installing Kubernetes on RedHat Linux, it is crucial to check the firewall settings to ensure proper communication between nodes. Make sure to open the necessary ports for Kubernetes to function correctly. This can be done using firewall-cmd commands to allow traffic.

Additionally, it is important to review the yaml and json files used for Kubernetes configuration. These files dictate the behavior of your Kubernetes cluster, so it is essential to verify their accuracy and completeness. Look for any errors or misconfigurations that may cause issues during deployment.

Regularly auditing both firewall settings and configuration files is a good practice to ensure the smooth operation of your Kubernetes cluster. By maintaining a secure and properly configured environment, you can optimize the performance of your applications and services running on Kubernetes.

Additional Information and Conclusion

In conclusion, installing Kubernetes on RedHat Linux is a valuable skill that can enhance your understanding of container orchestration and management. By following the steps outlined in this guide, you can set up a powerful platform for deploying and managing your applications in a clustered environment.

Additional information on **Ansible** and **Docker** can further streamline the process of managing your Kubernetes installation. These tools can automate tasks and simplify the deployment of your web applications on your RedHat Linux server.

By gaining hands-on experience with Kubernetes, you will also develop a deeper understanding of how to scale your applications, manage resources efficiently, and ensure high availability for your services. This knowledge will be invaluable as you work with computer networks, databases, and other components of modern IT infrastructure.

Top resources to learn kubernetes

Embark on your journey to mastering Kubernetes with the top resources available at your fingertips.

Understanding Kubernetes Basics

When it comes to understanding **Kubernetes basics**, there are several top resources available to help you get started.

One great resource is the official Kubernetes website, which offers comprehensive documentation and tutorials for beginners. Another useful tool is the Kubernetes YouTube channel, where you can find video tutorials and webinars on various topics related to Kubernetes.

Additionally, online platforms like Stack Overflow and Reddit have active communities where you can ask questions and get help from experienced Kubernetes users. Taking online courses or attending workshops on platforms like Coursera or Udemy can also provide a structured learning experience.

By utilizing these resources, you can gain a solid foundation in Kubernetes and kickstart your journey into the world of **container orchestration**.

Kubernetes Architecture Overview

Kubernetes is a popular container orchestration tool that helps manage containerized applications across a cluster of nodes. It consists of several components like the Master Node, Worker Node, and etcd for storing cluster data.

The Master Node controls the cluster and schedules workloads, while Worker Nodes run the containers. **Pods** are the smallest deployable units in Kubernetes, consisting of one or more containers.

Understanding these components and how they interact is crucial for mastering Kubernetes. Check out the official Kubernetes documentation and online tutorials for in-depth resources on Kubernetes architecture.

Exploring Kubernetes Objects and Resources

When exploring **Kubernetes objects** and **resources**, it’s important to understand the various components that make up a Kubernetes cluster.

**Pods** are the smallest unit of deployment in Kubernetes, while **Services** allow for communication between different parts of an application. **Deployments** help manage the lifecycle of applications, ensuring they are always running as desired.

Understanding these key concepts will allow you to effectively manage and scale your applications within a Kubernetes environment. Experimenting with these resources hands-on will solidify your understanding and prepare you for more advanced topics in Kubernetes.

Learning about Pod and Associated Resources

To learn about **Pods and Associated Resources** in Kubernetes, it’s essential to explore resources like the Kubernetes official documentation and online tutorials. These resources provide in-depth explanations and examples to help you understand the concepts better. Hands-on practice using platforms like Katacoda or **Kubernetes Playgrounds** is also crucial to solidify your knowledge. Additionally, joining online communities such as the Kubernetes subreddit or attending webinars hosted by experts can offer valuable insights and tips.

Don’t forget to check out YouTube channels dedicated to Kubernetes for visual explanations and demonstrations.

Deploying Microservices Applications on Kubernetes

Kubernetes cluster with microservices applications deployed

To deploy *Microservices Applications* on **Kubernetes**, you will need to have a solid understanding of how Kubernetes works. This involves learning about pods, deployments, services, and ingresses.

There are several online resources available that can help you in mastering Kubernetes, including official documentation, online courses, and tutorials.

You can also join forums like Reddit or Stack Overflow to ask questions and get advice from experienced Kubernetes users.

Hands-on experience is crucial, so make sure to practice deploying applications on Kubernetes regularly to solidify your knowledge and skills.

Securing Your Kubernetes Cluster

Lock and key

When it comes to securing your Kubernetes cluster, it is essential to follow best practices to protect your data and infrastructure. Utilize resources such as the Cloud Native Computing Foundation’s security guidelines and documentation to enhance your knowledge on securing Kubernetes clusters. Consider enrolling in Linux training courses that focus on Kubernetes security to deepen your understanding of the subject. Additionally, explore tools like OpenShift and Docker for **container** security and DevOps automation in Kubernetes environments. By staying informed and proactive, you can effectively safeguard your Kubernetes cluster from potential threats and vulnerabilities.

Configuring and Managing Kubernetes

Kubernetes cluster configuration screen

**Kubernetes documentation** on the official website is another valuable resource that offers detailed guides, tutorials, and best practices for setting up and managing Kubernetes clusters.

Additionally, books such as “Kubernetes Up & Running” by Kelsey Hightower, Brendan Burns, and Joe Beda provide comprehensive insights into Kubernetes architecture, deployment, and operations.

Taking advantage of these resources will equip you with the knowledge and skills needed to become proficient in Kubernetes management.

Mastering Kubernetes Best Practices

Looking to master Kubernetes Best Practices? Here are the top resources to help you do just that:

1. The official Kubernetes website is a great starting point for learning the ins and outs of this popular container orchestration tool. They offer comprehensive documentation and tutorials to get you up to speed quickly.

2. Online platforms like Udemy and Coursera offer courses on Kubernetes taught by industry experts. These courses cover everything from the basics to advanced topics, making them ideal for beginners and experienced users alike.

3. Books like “Kubernetes Up & Running” by Kelsey Hightower and “The Kubernetes Book” by Nigel Poulton are also valuable resources for deepening your understanding of Kubernetes best practices.

4. Joining online communities like Reddit’s r/kubernetes or attending conferences like KubeCon can connect you with other professionals and provide valuable insights into best practices and emerging trends in the Kubernetes ecosystem.

Free Online Resources for Learning Kubernetes

Kubernetes logo

Looking to learn Kubernetes? Here are some top **free online resources** to get you started:

– The official **Kubernetes documentation** is a great place to begin, offering in-depth guides and tutorials.
– **Kubernetes Academy** by VMware provides free training courses for beginners and advanced users alike.
– The **Kubernetes Basics** course on Coursera, created by Google Cloud, offers a comprehensive introduction to the platform.

Real-World Kubernetes Case Studies

Explore real-world **Kubernetes case studies** to gain valuable insights and best practices from industry experts. These case studies provide practical examples of how Kubernetes is being implemented in various organizations, highlighting the benefits and challenges faced along the way.

By studying these real-world scenarios, you can learn from the experiences of others and apply their strategies to your own Kubernetes projects. This hands-on approach will help you develop a deeper understanding of Kubernetes and its applications in different environments.

Whether you are new to Kubernetes or looking to expand your knowledge, real-world case studies are a valuable resource for gaining practical insights and enhancing your skills in **container orchestration**.

Latest Updates in Kubernetes

Kubernetes dashboard or Kubernetes logo.

Looking for the latest updates in **Kubernetes**? Check out these top resources to learn more about this popular container orchestration system. From beginner tutorials to advanced training courses, there are plenty of options available to help you master **Kubernetes**. Whether you’re interested in **DevOps**, **automation**, or **cloud computing**, learning **Kubernetes** can open up new opportunities in the tech industry. Don’t miss out on the chance to enhance your skills and stay ahead of the curve. Explore these resources today and take your knowledge of **Kubernetes** to the next level.

Building a Cloud Native Career with Kubernetes

Kubernetes logo

For those looking to build a Cloud Native career with Kubernetes, there are several top resources available to help you learn this powerful technology. Online platforms like **Google** Cloud Platform offer a range of courses and certifications specifically focused on Kubernetes. Additionally, educational technology websites like **Red Hat** and **Linux** Academy provide in-depth training on Kubernetes and related technologies. Books such as “Kubernetes Up & Running” and “The Kubernetes Book” are also great resources for self-paced learning. Don’t forget to join online communities and forums to connect with other professionals in the field and exchange knowledge and tips.

Getting Certified in Kubernetes

To get certified in Kubernetes, check out resources like the official Kubernetes documentation and online courses from platforms like Udemy and Coursera. These courses cover everything from basic concepts to advanced topics like container orchestration and deployment strategies.

Additionally, consider enrolling in a training program offered by Red Hat or Google Cloud Platform for hands-on experience. Joining community forums and attending conferences can also help you stay updated on the latest trends and best practices in Kubernetes.

Training Partners for Kubernetes Certification

Kubernetes logo

When preparing for a Kubernetes certification, having training partners can greatly enhance your learning experience. Look for **reputable** online platforms that offer dedicated courses and study materials specifically tailored for Kubernetes certification. These platforms often provide **hands-on labs** and practice exams to help you solidify your understanding of Kubernetes concepts. Additionally, consider joining study groups or online forums where you can collaborate with other learners and share resources.

This collaborative approach can offer valuable insights and support as you work towards achieving your certification goals.

Check Kubernetes Cluster Version

Unveiling the Key to Ensuring Optimal Performance: A Guide to Checking Kubernetes Cluster Version

Checking Kubernetes Cluster Version with kubectl

To check the version of your Kubernetes cluster using kubectl, you can use the following command:

kubectl version.

This command will display the client and server versions of Kubernetes. You can also specify the output format using the –output flag.

For example, if you only want to see the server version, you can use:

kubectl version –short | grep ‘Server Version’.

If you’re troubleshooting an issue or need more detailed information about your cluster, you can use the describe command.

For example, to get information about a specific node in the cluster, you can use:

kubectl describe node .

This will provide you with detailed information about the node, including the version of Kubernetes it’s running.

By knowing the version of your Kubernetes cluster, you can ensure compatibility with the applications and tools you’re using. It’s also important to keep your cluster up to date by regularly applying patches and updates.

Understanding the Client-Only Version in Kubernetes

Kubernetes client-only dashboard.

The client-only version in Kubernetes is a lightweight option that allows users to interact with the Kubernetes cluster without the need for a full installation. It is a command-line interface (CLI) tool that provides access to the cluster’s API, allowing users to perform various tasks and operations.

To use the client-only version, you need to have access to a computer terminal with the Kubernetes CLI installed. This version does not require a server or any additional application software. It is a convenient option for troubleshooting, patching, and managing Kubernetes clusters.

One advantage of the client-only version is that it allows you to work with Kubernetes resources using YAML files. This means you can define and manage your cluster’s configuration and workflows using a simple text-based format.

Additionally, the client-only version is open-source software, meaning it is freely available for use and can be customized to fit your specific needs. It can be used to interact with both local and remote Kubernetes clusters, making it a versatile tool for managing your infrastructure.

Exploring Kubernetes Node Version

When managing a Kubernetes cluster, it’s important to know the version of the nodes in the cluster. This information can be useful for troubleshooting issues, planning upgrades, and ensuring compatibility with the applications running on the cluster.

To check the Kubernetes cluster version, you can use the command-line interface (CLI) tool called kubectl. First, open a computer terminal and connect to the server where your cluster is running. Then, run the following command:

kubectl get nodes

This will display a list of all the nodes in the cluster, along with their version information. Each node will have a “VERSION” column that shows the Kubernetes version it is running.

You can also use the kubectl API to retrieve the version information programmatically. This can be useful if you want to integrate the version check into your own application or workflow.

By knowing the Kubernetes node version, you can ensure that your cluster is running the desired software framework and that all the nodes are on the same version. If there are any discrepancies, you may need to apply patches or perform upgrades to maintain a stable and secure cluster.

Being familiar with checking the Kubernetes cluster version is an essential skill for anyone working with Kubernetes, whether you are a developer, system administrator, or in a DevOps role. It can help you troubleshoot issues, plan upgrades, and ensure the compatibility of your applications. So, if you’re interested in Kubernetes and Linux training, be sure to explore resources like blogs, online courses, and documentation to enhance your knowledge and skills in this area.

Understanding Flux CD

Unlocking the Potential of Flux CD: A Guide to Streamlining Your DevOps Workflow

Introduction to Flux CD

A diagram illustrating the flow of Flux CD

Flux CD is a powerful tool for continuous delivery and configuration management in Kubernetes. It helps automate the deployment and management of applications, ensuring a smooth and efficient workflow. With Flux CD, you can leverage version control systems like Git, GitLab, and GitHub to track changes and maintain traceability throughout the product lifecycle.

Using Flux CD, you can easily define and manage your application’s infrastructure using YAML files. It provides a dashboard and API for monitoring and controlling your deployments, allowing for easy collaboration and workflow management. Role-based access control ensures that only authorized users can make changes.

Flux CD also supports integration with popular tools like Slack, Bitbucket, and image scanners to enhance security and streamline processes. Its declarative programming approach and adherence to best practices minimize the risk of human error and ensure the principle of least privilege.

With Flux CD, you can take advantage of microservices and cloud-native architecture to drive innovation and speed up your development cycle. It provides an audit trail and an ecosystem of plugins and integrations, making it a versatile and reliable tool for managing your Kubernetes applications.

Whether you’re a beginner or an experienced developer, Flux CD is a valuable addition to your toolkit, enabling you to automate and streamline your application lifecycle with ease.

Understanding Flux CD’s Functionality

Flux CD is a powerful tool that enables continuous delivery and configuration management in a cloud-native environment. It leverages version control systems such as Git and integrates seamlessly with platforms like GitLab and GitHub. By using distributed version control, Flux CD ensures traceability and enables collaboration among teams.

With its declarative programming approach, Flux CD automates the deployment of application software, reducing the risk of human error and adhering to best practices. It provides a dashboard and API for easy management and monitoring of the entire application lifecycle.

Flux CD also offers role-based access control, allowing different team members to have specific permissions and ensuring security. It supports microservices architecture and can be integrated with other tools like image scanners to enhance security and compliance.

Whether you are in Germany, the United States, or anywhere else in the world, Flux CD’s functionality is designed to speed up innovation and provide an audit trail for changes made to your infrastructure. It is a valuable addition to any cloud computing ecosystem, making it easier to manage deployments and maintain a stable and secure environment.

Installing Flux CD

To begin, ensure that you have the necessary prerequisites installed, such as kubectl, a working Kubernetes cluster, and a supported version of Helm.

Next, download the Flux CD binaries for your operating system and architecture from the official GitHub repository.

Once downloaded, extract the binaries and add the extracted directory to your system’s PATH variable.

With the binaries in place, you can now deploy Flux CD to your Kubernetes cluster using a YAML manifest file.

The manifest file contains all the necessary configuration options for Flux CD, including the repository URL, branch, and deployment namespace.

Apply the manifest file using the kubectl apply command, and Flux CD will be installed and ready to use.

Verify the installation by checking the Flux CD pods and services using kubectl.

Now you can begin using Flux CD to automate your deployment and release processes, ensuring that your applications are always up to date.

Building a GitOps Pipeline with Flux CD

Git logo

Flux CD is a powerful tool for building a GitOps pipeline. With Flux CD, you can automate the deployment and management of your applications using a Git repository as the single source of truth. This eliminates the need for manual intervention and ensures that your applications are always in sync with the desired state.

One of the key benefits of using Flux CD is its integration with distributed version control systems like Git. This allows you to easily track changes to your application’s configuration and roll back to a previous version if needed. Additionally, Flux CD is an open-source software maintained by the Cloud Native Computing Foundation, which means it is constantly being improved and updated by a large community of developers.

By implementing a GitOps pipeline with Flux CD, you can streamline your application lifecycle management and reduce the risk of human error. The pipeline can be configured to automatically build and deploy your applications, run tests, perform image scanning for security vulnerabilities, and even carry out A/B testing. With a dashboard and integration with tools like Slack, you can easily monitor the status of your applications and receive notifications about any issues.

To get started with Flux CD, you’ll need to install it in your Kubernetes cluster and configure it to watch your Git repository for changes. Once set up, you can define your desired state in the Git repository using Kubernetes manifests, and Flux CD will continuously reconcile the actual state of your cluster with the desired state.

When it comes to best practices, it’s important to follow the principle of least privilege and grant only the necessary permissions to Flux CD. You can use webhooks to trigger deployments automatically whenever there is a new commit to the repository. It’s also recommended to use a version control system like Bitbucket to store your Git repository securely and have a backup of your configuration.

Flux CD is a versatile tool that can be used in various environments, including air gap networks. It has an adhesive design that allows you to integrate it with other tools and services seamlessly. Whether you’re a small startup or a large enterprise, Flux CD can help you achieve efficient and reliable application deployment.

Scaling Flux CD with Weave GitOps

Flux CD also offers advanced features like image scanning for enhanced security and application lifecycle management. Its pipeline capabilities enable the creation of automated workflows and webhook integrations for seamless integration with other tools and processes.

To ensure smooth operations, it is important to follow best practices when scaling Flux CD, such as setting up an air gap network for secure communication and using adhesive to connect different components. Weave GitOps, developed by Weaveworks in Germany, has been widely adopted and trusted by organizations across the globe, including the United States.

By implementing Flux CD with Weave GitOps, businesses can effectively manage their applications, automate processes, and scale their operations with ease.

Benefits of Flux CD

Diagram showing benefits of Flux CD

Flux CD offers several benefits for managing and automating the deployment of applications in a cloud-native environment. As an open-source software developed by the Cloud Native Computing Foundation, Flux CD enables seamless integration and continuous delivery of application updates.

One of the key advantages of Flux CD is its ability to automate the entire product lifecycle, from building and testing to deploying and monitoring applications. By automating these processes, developers can save time and effort, ensuring faster and more efficient releases. Additionally, Flux CD supports A/B testing, allowing teams to test new features or changes before rolling them out to the entire user base.

Another benefit of Flux CD is its user-friendly dashboard, which provides a centralized view of application deployments and their status. This allows for easy monitoring and troubleshooting, ensuring that any issues can be quickly addressed. Moreover, Flux CD integrates with popular collaboration tools like Slack, enabling seamless communication and collaboration among team members.

By leveraging Flux CD, businesses can streamline their application deployment process, reduce errors, and improve overall efficiency. Whether you’re a developer, DevOps engineer, or IT professional, understanding and implementing Flux CD can greatly enhance your skills and contribute to your success in the cloud computing industry.

Getting Started with Flux CD

Flux CD installation steps

Flux CD is a powerful tool for automating the deployment of applications in a Kubernetes cluster. Once you have a basic understanding of Flux CD, you can start using it to streamline your application deployment process.

To get started with Flux CD, you’ll need to install it on your Kubernetes cluster and set up a Git repository to store your application manifests. Flux CD uses this repository to monitor changes and automatically deploy your applications based on the configuration defined in the manifests.

Once Flux CD is set up, you can use its dashboard to monitor the status of your deployments and manage any errors or issues that arise. You can also integrate Flux CD with other tools like Slack to receive notifications about deployment events.

When using Flux CD, it’s important to follow best practices for managing your application manifests. This includes using version control, separating your manifests into different directories for easier organization, and using webhooks to trigger deployments automatically.

By using Flux CD, you can automate your application deployment process, reduce manual errors, and improve the overall efficiency of your development workflow. So, start exploring Flux CD and take your Kubernetes deployments to the next level.

Spring Cloud Kubernetes Tutorial

Welcome to the world of Spring Cloud and Kubernetes, where the power of cloud-native applications meets the flexibility of container orchestration. In this tutorial, we will explore the seamless integration of Spring Cloud and Kubernetes, uncovering the secrets to building scalable, resilient, and highly available microservices.

Using a ConfigMap PropertySource

ConfigMap PropertySource is a feature in Spring Cloud Kubernetes that allows you to externalize configuration properties for your applications running in a Kubernetes environment. It allows you to store key-value pairs in a ConfigMap, which can then be accessed by your Spring Boot application.

To use ConfigMap PropertySource, you need to configure your Spring Boot application to read the properties from the ConfigMap. This can be done by adding the `spring-cloud-kubernetes-config` dependency to your project and enabling the ConfigMap PropertySource. Once configured, your application will be able to access the properties just like any other configuration property.

One advantage of using ConfigMap PropertySource is that it allows you to manage your application’s configuration separately from your application code. This makes it easier to manage and update the configuration without having to rebuild and redeploy your application.

To use ConfigMap PropertySource, you need to create a ConfigMap in your Kubernetes cluster. This can be done using the `kubectl` command-line tool or through a YAML configuration file. The ConfigMap should contain the key-value pairs that you want to externalize as configuration properties.

Once the ConfigMap is created, you can mount it as a volume in your application’s pod. This will make the properties available to your application as environment variables. Spring Cloud Kubernetes will automatically detect the presence of the ConfigMap and load the properties into the Spring Environment.

To access the properties in your Spring Boot application, you can use the `@Value` annotation or the `@ConfigurationProperties` annotation. These annotations allow you to inject the properties directly into your beans.

Using ConfigMap PropertySource can greatly simplify the management of configuration properties in a Kubernetes environment. It allows you to externalize your configuration and manage it separately from your application code. This makes it easier to update and manage your application’s configuration without having to redeploy your application.

By using ConfigMap PropertySource, you can take advantage of the powerful features of Spring Cloud Kubernetes while still following best practices for managing configuration in a distributed environment.

Secrets PropertySource

By using Secrets PropertySource, you can store confidential data in Kubernetes Secrets and access them in your Spring Cloud application without exposing them in your source code or configuration files. This ensures that your sensitive information is protected and not visible to unauthorized users.

To use Secrets PropertySource, you need to create a Kubernetes Secret that contains your sensitive data. This can be done using the Kubernetes command-line tool or through YAML configuration files. Once the Secret is created, you can reference it in your Spring Cloud application using the appropriate PropertySource.

By leveraging Secrets PropertySource, you can easily access and manage your secret properties in your Spring Cloud application. This not only enhances the security of your application but also simplifies the management of sensitive information.

To enable Secrets PropertySource in your Spring Cloud application, you need to add the necessary dependencies to your project’s build file, such as Apache Maven or Gradle. Additionally, you need to configure the appropriate PropertySource in your application’s configuration files or by using annotations in your code.

Using Secrets PropertySource in Spring Cloud Kubernetes is considered a best practice for managing sensitive information in your applications. It allows you to securely store and access secrets while following the principles of distributed computing and microservices architecture.

PropertySource Reload

The PropertySource Reload feature in Spring Cloud Kubernetes allows for the dynamic reloading of configuration properties without restarting the application. This is particularly useful in a cloud-native environment where configuration changes may be frequent.

By utilizing the PropertySource Reload feature, developers can make changes to configuration properties without the need to rebuild and redeploy the entire application. This promotes agility and flexibility in managing application configurations.

To enable PropertySource Reload, developers need to add the necessary dependencies to their project’s build file, such as Apache Maven or Gradle. Once the dependencies are added, developers can configure the PropertySource Reload behavior through annotations or configuration files.

One of the key benefits of PropertySource Reload is that it supports different sources of configuration properties, including environment variables, command-line arguments, YAML files, and more. This allows developers to have a centralized and consistent way of managing configuration properties across their applications.

Furthermore, PropertySource Reload integrates seamlessly with other Spring Cloud components such as Spring Boot Actuator, which provides endpoints for monitoring and managing the application’s health, metrics, and other operational aspects.

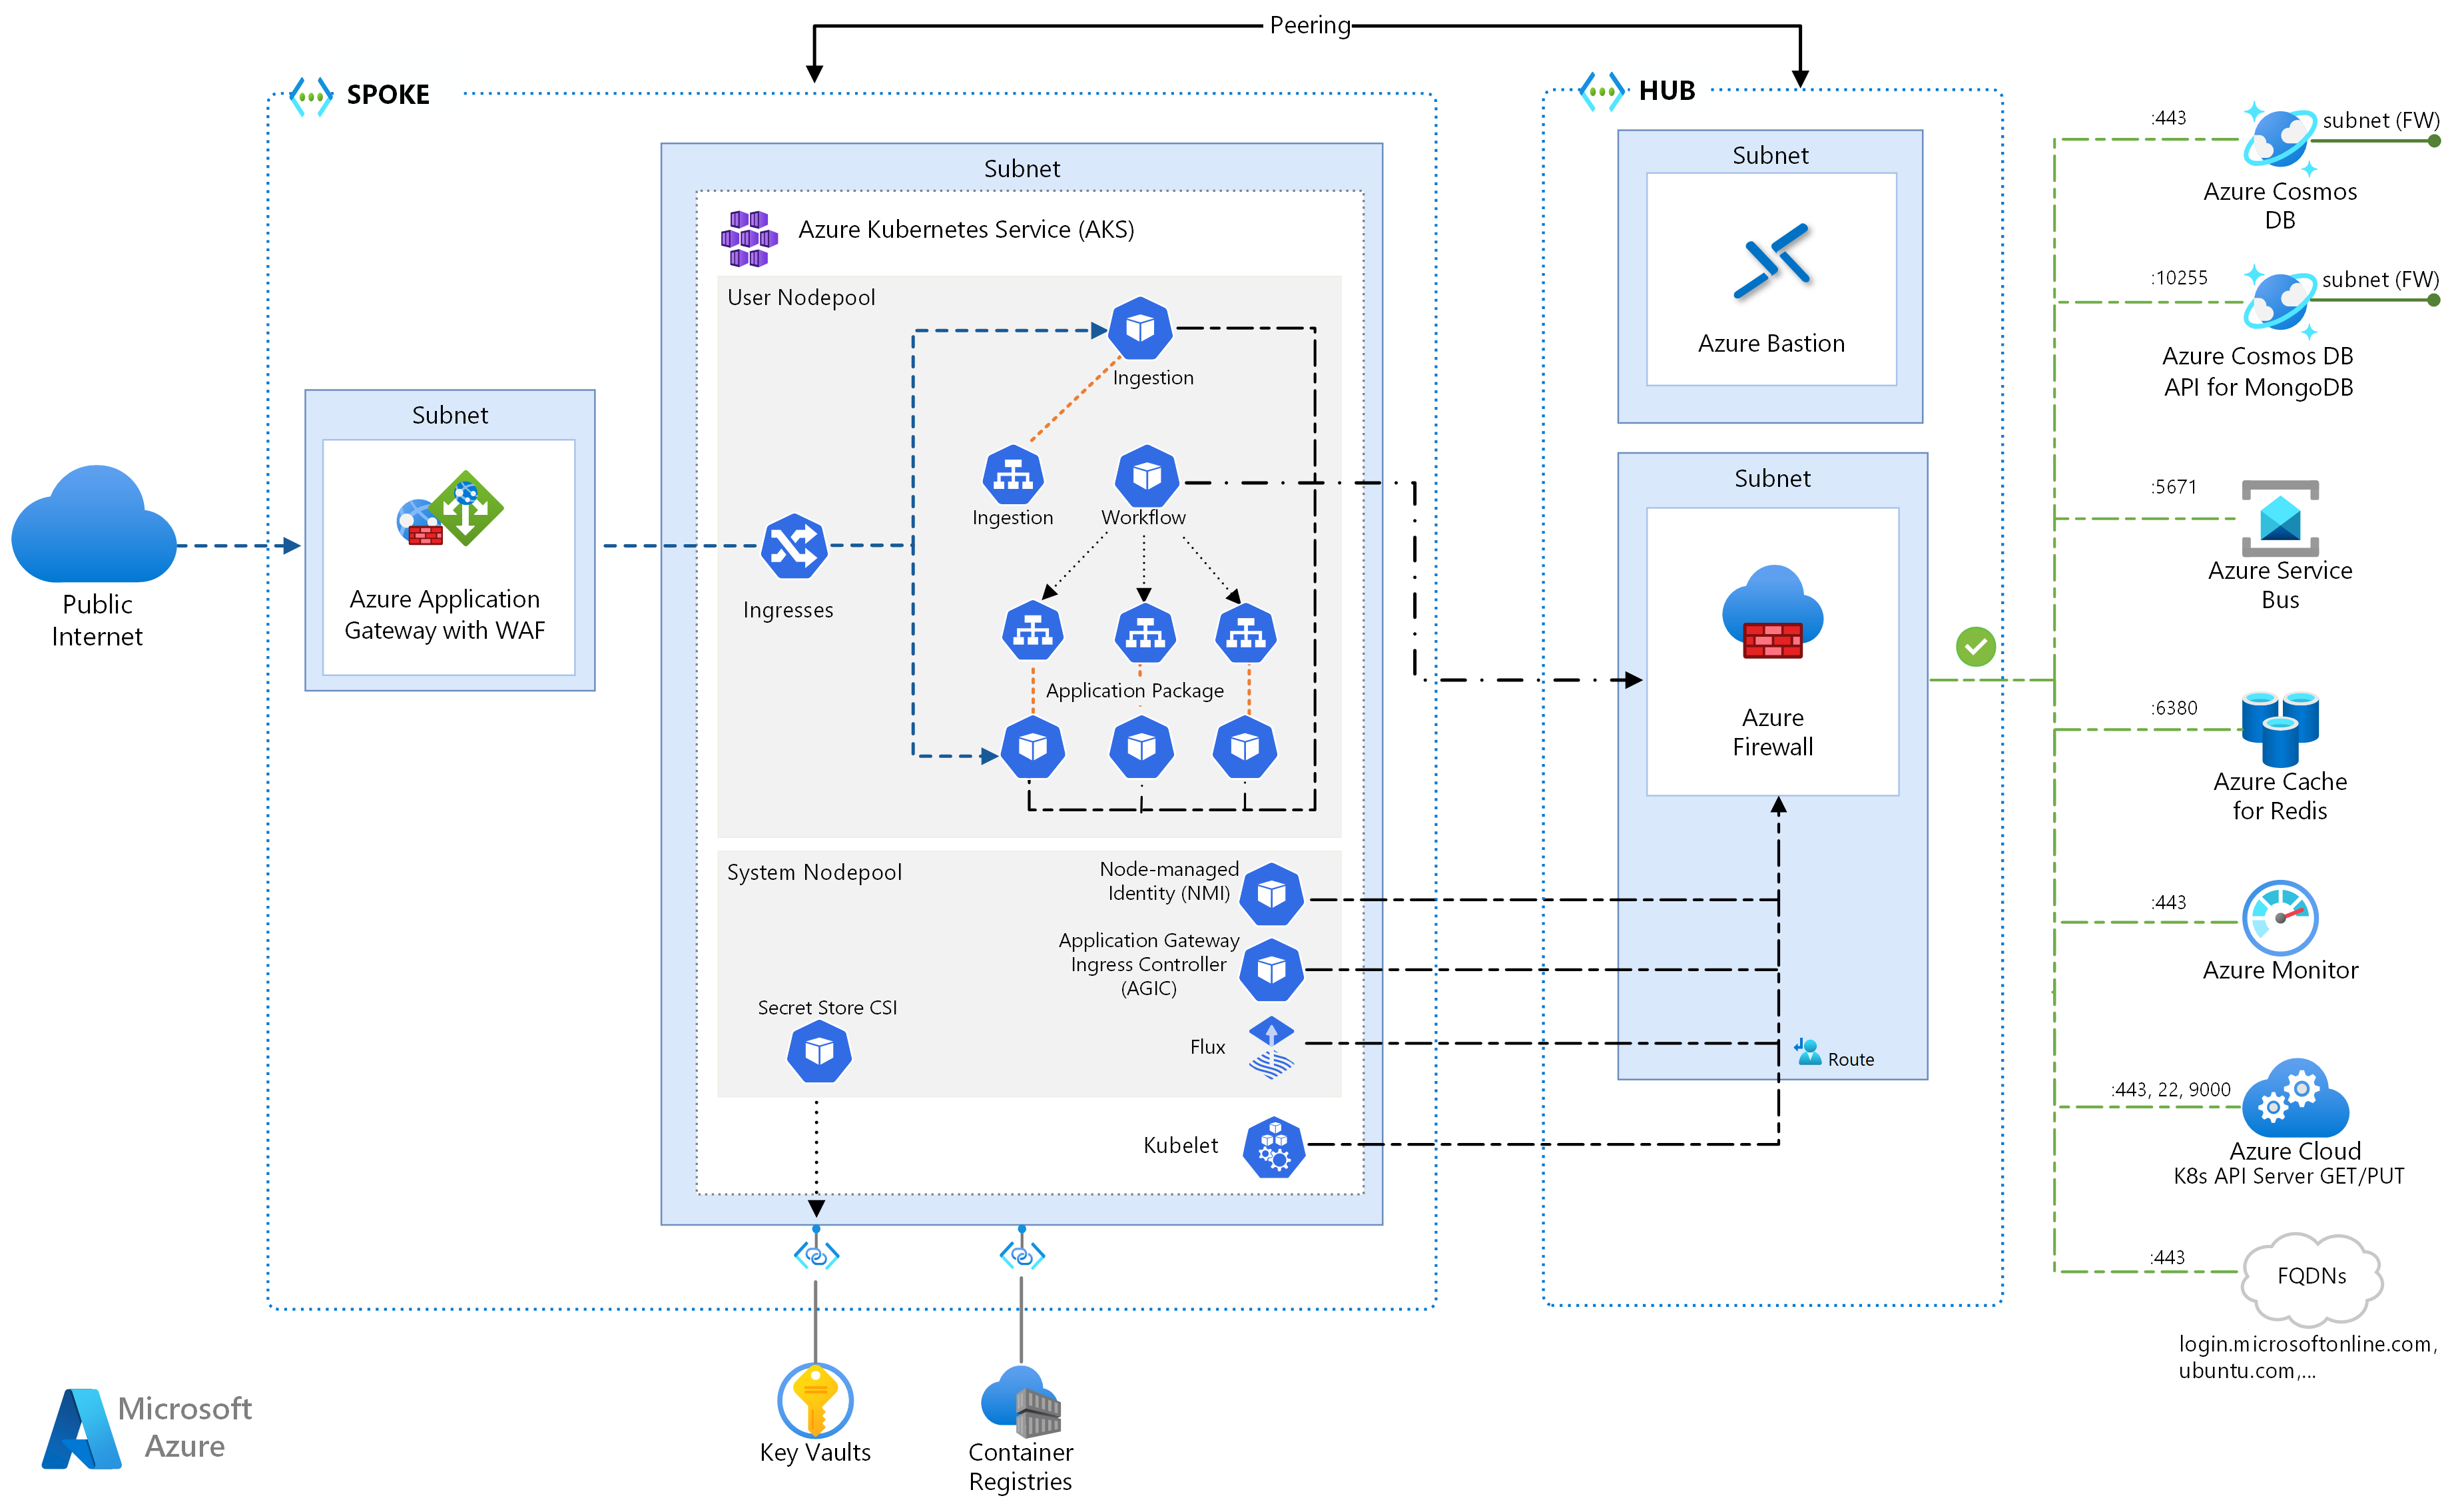
Reference Architecture Environment

Reference architecture diagram

In this environment, you can take advantage of the Spring Framework’s extensive features and capabilities to develop robust and high-performing web applications. With its support for RESTful APIs and its integration with Swagger, you can easily design and document your APIs, making it easier for developers to consume them.

Git integration allows for seamless collaboration and version control, ensuring that your codebase is always up-to-date and easily accessible. Environment variables can be used to configure your application at runtime, allowing for flexibility and easy deployment across different environments.

Load balancing is handled by Ribbon, a client-side load balancer that distributes traffic across multiple instances of your application. This ensures that your application can handle high traffic loads and provides a seamless user experience.

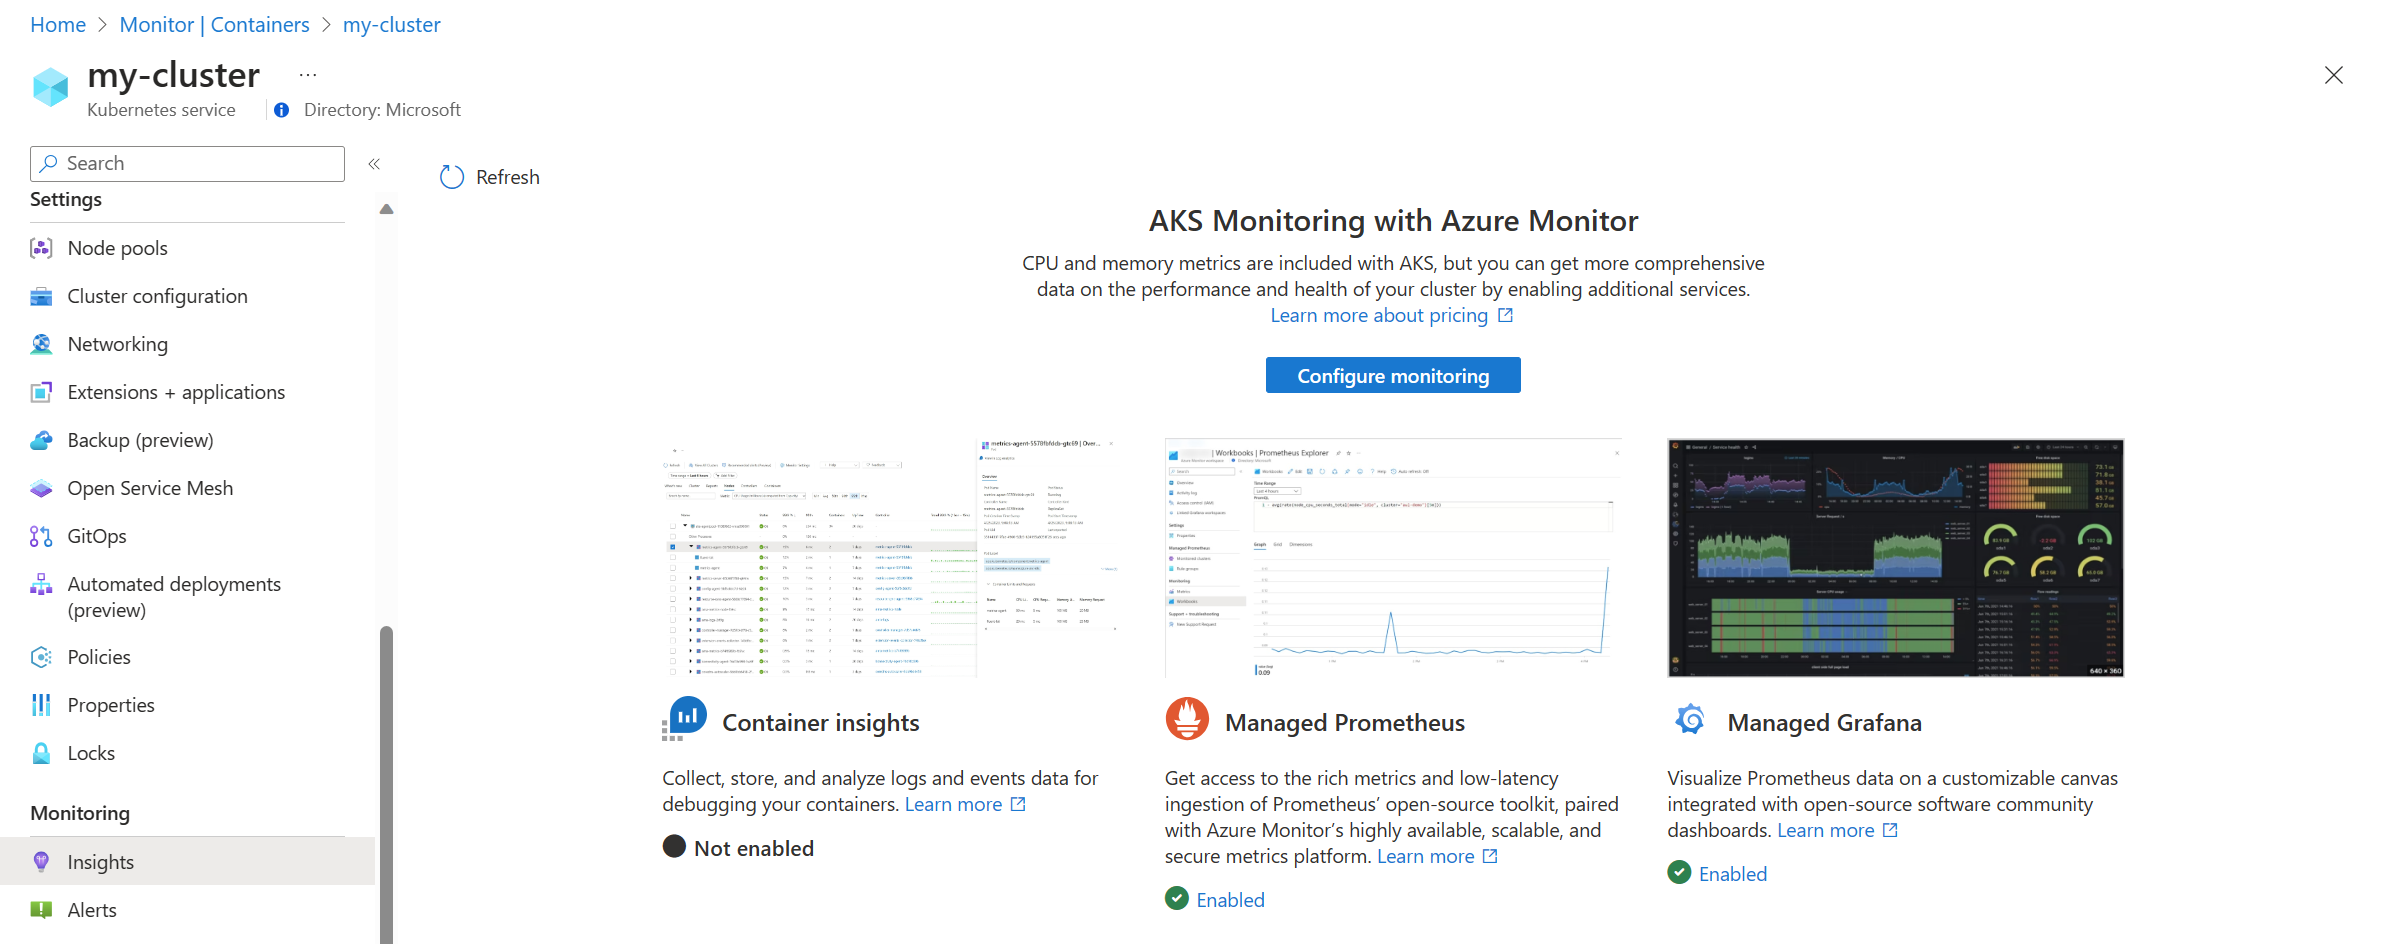
Monitoring and managing your application is made easy with the integration of Prometheus and Actuator. These tools provide insights into the health and performance of your application, allowing you to quickly identify and address any issues that may arise.

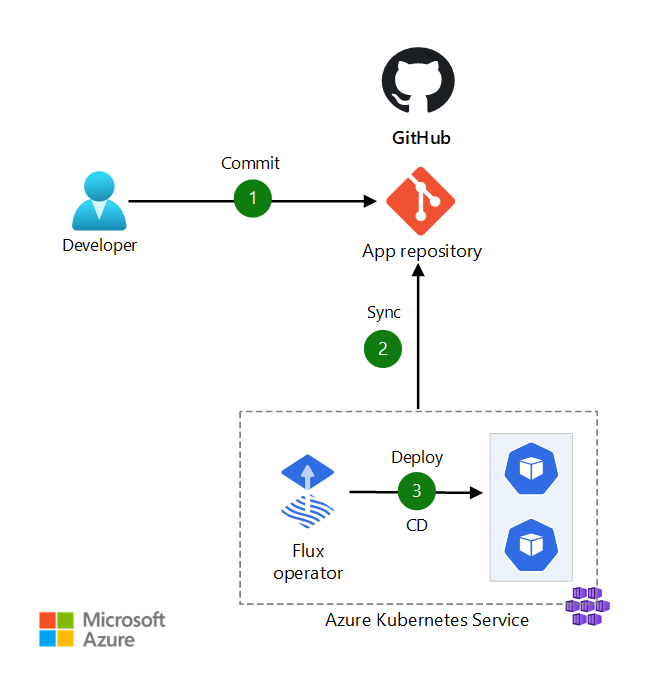
Service discovery is facilitated by Kubernetes, which automatically registers and discovers services within the cluster. This simplifies the communication between different components of your application and enables seamless scaling and deployment.

Get source code

To get the source code for this Spring Cloud Kubernetes tutorial, you can follow these steps:

1. Open your web browser and navigate to the tutorial’s website.
2. Look for a “Download Source Code” button or link on the tutorial page.
3. Click on the button or link to initiate the download.
4. Depending on your browser settings, you may be prompted to choose a location to save the source code file. Select a location on your computer where you want to save the file.
5. Wait for the download to complete. This may take a few moments depending on the size of the source code.
6. Once the download is finished, navigate to the location where you saved the file.
7. Extract the contents of the downloaded file if it is in a compressed format (e.g., zip or tar).
8. Now you have the source code for the tutorial on your computer. You can use it to follow along with the tutorial or explore the code on your own.

Remember, having access to the source code is valuable for understanding how the tutorial’s concepts are implemented. It allows you to analyze the code, make changes, and learn from practical examples. So make sure to get the source code and leverage it in your learning journey.

If you encounter any issues or have questions about the source code, you can refer to the tutorial’s documentation or seek help from the tutorial’s community or support channels. Happy coding!

Source Code Directory Structure

In Spring Cloud Kubernetes, the source code directory structure typically follows best practices and conventions. It includes different directories for specific purposes, such as source code, configuration files, and resources.

The main directory is often named after the project and contains the core source code files, including Java classes, interfaces, and other related files. This is where the application logic resides and is implemented using the Spring Framework.

Additionally, the source code directory structure may include directories for tests, where unit tests and integration tests are placed to ensure the quality and functionality of the application.

Configuration files, such as application.properties or application.yml, are commonly stored in a separate directory. These files contain properties and settings that configure the behavior of the application.

The resources directory is another important part of the structure. It holds non-code files, such as static resources like HTML, CSS, and JavaScript files, as well as any other files required by the application, like images or XML configuration files.

In a Spring Cloud Kubernetes project, it is common to find a directory dedicated to deployment-related files, such as Dockerfiles and Kubernetes YAML files. These files define how the application should be packaged and deployed in a containerized environment.

Enable Service Discovery Across All Namespaces

By leveraging the power of Spring Cloud Kubernetes, you can easily discover and consume services within your Kubernetes cluster. This eliminates the need to hardcode IP addresses and ports, making your applications more flexible and scalable.

To enable service discovery across all namespaces, you need to follow a few simple steps. First, ensure that you have the necessary dependencies added to your project. Spring Cloud Kubernetes provides a set of libraries and annotations that simplify the integration process.

Next, configure your application to interact with the Kubernetes API server. This can be done by setting the appropriate environment variables or using a Kubernetes configuration file. This step is crucial as it allows your application to access the necessary metadata about services and endpoints.

Once your application is configured, you can start leveraging the power of service discovery. Spring Cloud Kubernetes provides a set of annotations and APIs that allow you to discover services dynamically. You can use these annotations to inject service information into your application code, making it easy to communicate with other services within the cluster.

Additionally, Spring Cloud Kubernetes integrates seamlessly with other Spring Cloud components such as Ribbon for load balancing and Feign for declarative REST clients. This enables you to build robust and scalable microservices architectures using familiar Spring Cloud patterns.

Create Kubernetes namespaces

1. Open your command line interface and navigate to your Kubernetes cluster.

2. Use the command `kubectl create namespace ` to create a new namespace. Replace `` with the desired name for your namespace.

3. You can verify the creation of the namespace by running `kubectl get namespaces` and checking for the newly created namespace in the list.

4. Once the namespace is created, you can deploy your applications and services within it. This helps to organize and isolate different components of your application.

5. Namespaces provide a way to logically separate resources and control access within a Kubernetes cluster. They act as virtual clusters within a physical cluster, allowing different teams or projects to have their own isolated environments.

6. By using namespaces, you can manage resources more effectively, improve security, and simplify the overall management of your Kubernetes cluster.

7. It’s important to follow best practices when creating namespaces. Consider naming conventions that are meaningful and easy to understand for your team. Avoid using generic names that may cause confusion.

8. Namespaces can also be used for resource quota management, allowing you to limit the amount of resources that can be consumed within a namespace.

9. Additionally, namespaces can be used for access control and RBAC (Role-Based Access Control), allowing you to grant specific permissions to different teams or individuals.

10.

Configure MongoDB

1. Add the MongoDB dependency to your project’s Maven or Gradle file.

2. Create a configuration class that sets up the MongoDB connection. Use the **@Configuration** annotation to mark the class as a configuration class.

3. In the configuration class, use the **@Value** annotation to inject the necessary properties for connecting to MongoDB. These properties can be stored in an environment variable or a properties file.

4. Use the **MongoClient** class from the MongoDB Java driver to create a connection to your MongoDB server. Pass in the necessary connection parameters, such as the server URL and authentication credentials.

5. Implement the necessary CRUD (create, read, update, delete) operations using the **MongoTemplate** class from the Spring Data MongoDB library. This class provides convenient methods for interacting with MongoDB.

6. Test your MongoDB configuration by running your Spring Cloud Kubernetes application and verifying that the connection to MongoDB is successful. Use tools like Swagger or a web browser to test the API endpoints that interact with MongoDB.

Remember to follow best practices when configuring MongoDB in a Spring Cloud Kubernetes application. This includes properly securing your MongoDB server, using load balancing techniques for high availability, and optimizing your queries for efficient data retrieval.

Configure Gateway service

To configure the Gateway service in Spring Cloud Kubernetes, follow these steps:

1. Begin by setting up the necessary dependencies in your project. Add the Spring Cloud Gateway and Spring Cloud Kubernetes dependencies to your build file or Maven/Gradle configuration.

2. Next, create a new configuration file for your Gateway service. This file will define the routes and filters for your application. You can use Java configuration or YAML syntax, depending on your preference.

3. Define your routes in the configuration file. Routes determine how requests are forwarded from the Gateway to your backend services. You can specify the URL path, target service, and any additional filters or predicates to apply.

4. Configure load balancing for your routes if necessary. Spring Cloud Gateway supports different load balancing strategies, such as Round Robin or Weighted Response Time. You can specify these strategies using Ribbon, an open-source library for client-side load balancing.

5. Customize the behavior of your Gateway service by adding filters. Filters allow you to modify the request or response, add authentication or authorization, or perform other tasks. Spring Cloud Gateway provides a wide range of built-in filters, such as logging, rate limiting, and circuit breaking.

6. Test your Gateway service locally before deploying it to a Kubernetes cluster. You can use tools like Docker and Kubernetes Minikube to set up a local development environment. This will allow you to verify that your routes and filters are working correctly.

7. Once you are satisfied with your Gateway configuration, deploy it to your Kubernetes cluster. You can use the kubectl command-line tool or the Kubernetes Dashboard for this purpose. Make sure to set the necessary environment variables and resource limits for your Gateway service.

8. Monitor and manage your Gateway service using tools like Prometheus and Grafana. These tools provide visualization and alerting capabilities for metrics collected from your application. You can use them to track the performance and health of your Gateway service.

Gateway Swagger UI

To start using the Gateway Swagger UI, you need to have your Spring Cloud Kubernetes application up and running. Make sure you have all the necessary dependencies and configurations in place.

Once your application is ready, you can access the Gateway Swagger UI by navigating to the appropriate URL. This URL is typically provided by the Spring Cloud Kubernetes framework, and it is usually something like `http://localhost:8080/swagger-ui.html`.

Once you access the Gateway Swagger UI, you will see a list of all the available endpoints in your application. You can click on each endpoint to expand it and see more details about the request and response parameters.

One of the great features of the Gateway Swagger UI is the ability to send test requests directly from the interface. You can enter values for the request parameters and click the “Try it out” button to send a request to your application. The response will be displayed right below the request details, allowing you to quickly test and verify the functionality of your endpoints.

The Gateway Swagger UI also provides documentation for each endpoint, including the request and response schemas, as well as any additional information or constraints. This makes it easy to understand the purpose and behavior of each endpoint, even for developers who are not familiar with the codebase.

In addition to testing and documentation, the Gateway Swagger UI also offers various visualization tools. You can view the overall structure of your application, including the different routes and their corresponding services. This can be helpful for understanding the routing and load balancing mechanisms in your Spring Cloud Kubernetes setup.

Configure Ingress

1. Install and configure the Ingress controller on your Kubernetes cluster. This can be done using a variety of tools such as Nginx, Traefik, or Istio. Make sure to choose the one that best suits your needs.

2. Define the Ingress rules for your application. This involves specifying the hostnames and paths that will be used to route incoming requests to your application. You can also configure TLS termination and load balancing options at this stage.

3. Set up the necessary annotations in your application’s deployment configuration. These annotations provide additional instructions to the Ingress controller, such as specifying which service and port to route traffic to.

4. Deploy your application to the Kubernetes cluster. Make sure that the necessary services and pods are up and running before proceeding.

5. Test the Ingress configuration by sending HTTP requests to the defined hostnames and paths. You should see the requests being routed to your application without any issues.

6. Monitor and troubleshoot the Ingress configuration using tools like Prometheus or Swagger. These tools provide insights into the performance and behavior of your application, allowing you to identify and resolve any issues that may arise.

Testing Ingress

Ingress testing involves verifying that your application can correctly handle incoming requests and route them to the appropriate services. By testing Ingress, you can ensure that your application is properly configured to handle different routing rules and load balancing strategies.

To test Ingress, you can use tools such as Swagger or Postman to send HTTP requests and verify the responses. These tools allow you to easily test various endpoints and parameters to ensure that your application behaves as expected.

Additionally, you can use Git to version control your application code and track changes over time. This can be especially useful when testing Ingress, as it allows you to easily revert to a previous version if any issues arise during testing.

During testing, it is important to consider environment variables and their impact on your application. These variables can be used to configure different settings, such as database connections or API keys, and should be thoroughly tested to ensure they are correctly set and utilized.

Java, being a popular programming language, is commonly used in Spring Cloud Kubernetes applications. Therefore, it is important to thoroughly test your Java code to ensure its functionality and compatibility with the Kubernetes environment.

Testing Ingress is particularly important in cloud computing environments, where applications are often distributed across multiple servers. Load balancing, which involves evenly distributing incoming requests across multiple servers, is a key component of Ingress testing.

In Spring Cloud Kubernetes, Ribbon is a popular load balancing library that can be used to distribute requests. By testing Ingress with Ribbon, you can ensure that your application is properly load balanced and able to handle high volumes of traffic.

Metadata, such as labels and annotations, can also impact Ingress testing. These pieces of information provide additional context and configuration options for your application, and should be thoroughly tested to ensure they are correctly applied.

Open-source software, such as Docker and Prometheus, can greatly assist in Ingress testing. Docker allows you to easily create isolated environments for testing, while Prometheus provides powerful monitoring and visualization capabilities.

When testing Ingress, it is important to follow best practices and adhere to established conventions. This includes properly bootstrapping your application, using the correct Internet Protocol (IP) configurations, and ensuring proper communication between different components.

Bootstrapping the app

Terminal window with app installation commands

When bootstrapping your app in a Spring Cloud Kubernetes environment, there are a few key steps to follow. First, ensure that you have the necessary Linux training to navigate through the process effectively.

To start, you’ll need to set up your environment variables. These variables will define the configuration details for your application, such as the server and port it will run on. This can be done using the command line or by editing a configuration file.

Next, you’ll want to configure your application to work with Kubernetes. This involves adding the necessary dependencies and annotations to your code. Spring Cloud Kubernetes provides a set of tools and libraries to simplify this process.

Once your application is properly configured, you can start leveraging the power of Kubernetes. Kubernetes allows for efficient load balancing and scaling of your application. This is done through the use of Kubernetes services, which distribute incoming requests to multiple instances of your application.

To further enhance your application, consider using tools like Ribbon and Prometheus. Ribbon is a load-balancing library that can be integrated with Spring Cloud Kubernetes to provide even more control over your application’s traffic. Prometheus, on the other hand, is a monitoring and alerting tool that can help you track the performance and health of your application.

Another important aspect of bootstrapping your app is the use of Docker. Docker allows you to package your application and its dependencies into a container, making it easier to deploy and manage. By using Docker, you can ensure that your application runs consistently across different environments.

Finally, it’s important to follow best practices when bootstrapping your app. This includes using a version control repository to track changes, documenting your code and configuration, and following a reference architecture if available.