Welcome to the world of GitHub, where coding collaboration becomes effortless! In this article, we will guide beginners through the essential steps and features of GitHub, helping you embark on your coding journey with confidence. So, let’s dive in and discover the wonders of this powerful platform together.
Introduction to Git and GitHub
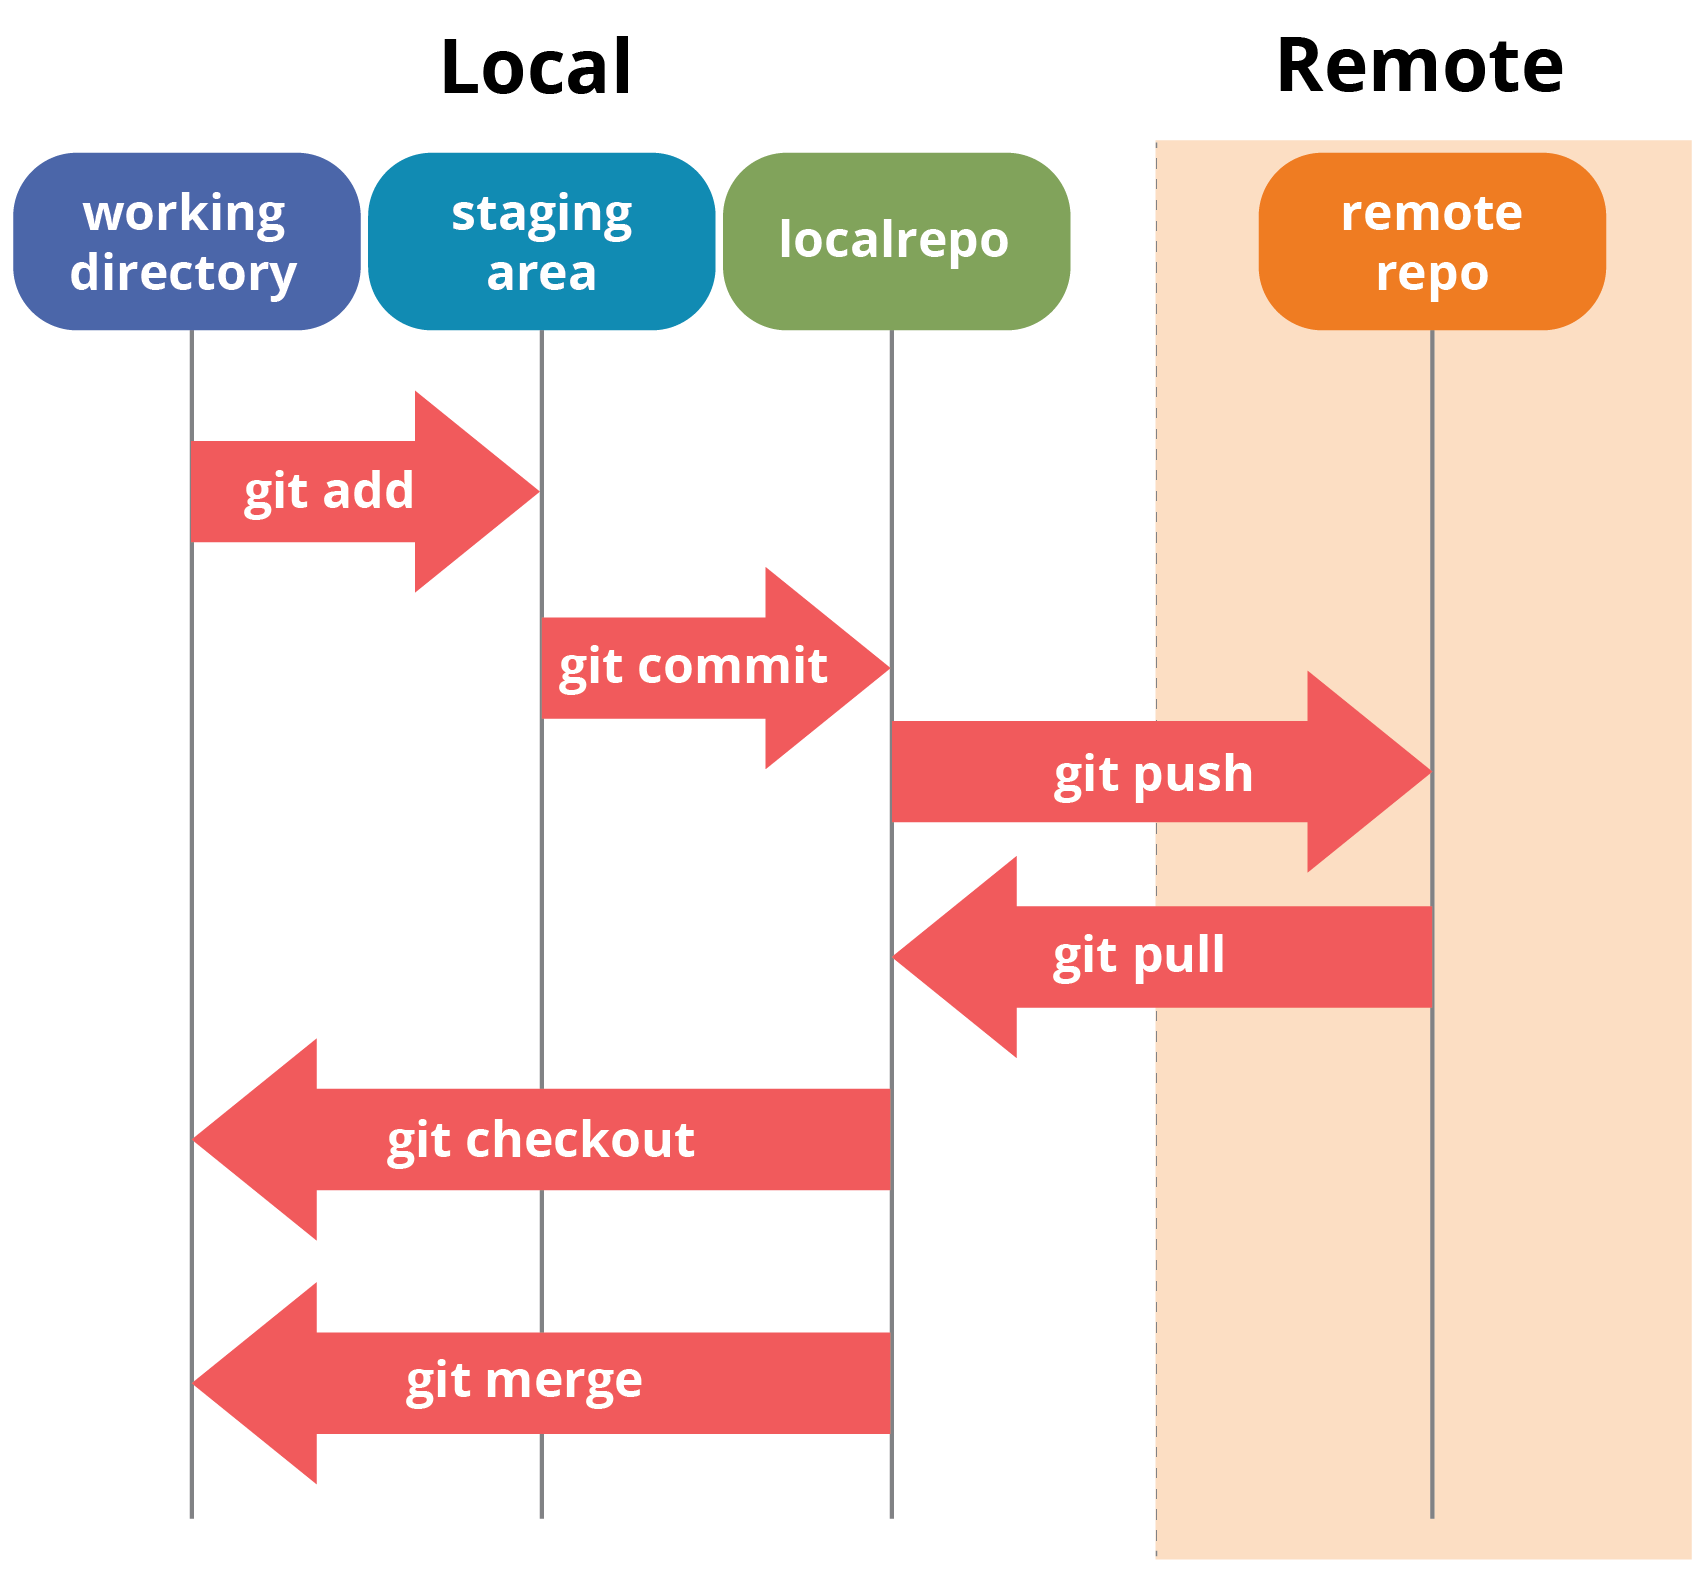
GitHub is a powerful platform for version control and collaboration, especially for Linux training. It allows you to track changes in your codebase and work with others more efficiently. With Git at its core, GitHub provides a user-friendly interface for managing your repositories. You can create branches to work on different features or fixes, commit your changes, and push them to the repository. GitHub also supports collaboration by allowing you to merge branches and resolve conflicts. GitLab is another popular platform that offers similar functionality.
Whether you’re a beginner or experienced, mastering Git and GitHub will greatly enhance your coding workflow.
Installing Git and creating a GitHub account
To get started with GitHub, you’ll need to install Git and create a GitHub account. Git is a distributed version control system that allows you to track changes in your codebase.
First, download and install Git for your operating system from the official website. Once installed, open a command-line interface and navigate to the directory where you want to work on your project. Use the “git init” command to initialize a new Git repository.
Next, create a GitHub account by visiting their website and signing up. After creating your account, you can create a new repository on GitHub by clicking on the “New” button. Give your repository a name, add a description, and choose whether you want it to be public or private.
To connect your local repository to the GitHub repository, use the “git remote add origin
Now you are ready to start working with your Git repository. Use the “git add
Creating a local git repository
To create a local git repository, follow these steps:
1. Open your command-line interface or terminal.
2. Navigate to the directory where you want to create the repository using the “cd” command.
3. Type “git init” to initialize the repository.
4. Create a “README” file using a text editor or the command line.
5. Add the file to the repository using the command “git add
6. Commit the changes with the command “git commit -m ‘Initial commit'”.
7. Connect your local repository to a remote repository like GitHub or GitLab using the command “git remote add origin
8. Push your changes to the remote repository using “git push -u origin
Adding a new file to the repository
Adding a new file to the repository is a fundamental step in using GitHub. It allows you to contribute to a project or create your own. To add a file, navigate to the desired repository and click on the “Add file” button. From there, you have two options: creating a new file or uploading an existing one. If you choose to create a new file, you can use a text editor or Markdown syntax.
Once you’ve made your changes, provide a filename and description, and click on “Commit new file”. Your file will now be added to the repository and visible to others.
Understanding the staging environment and committing changes
In order to effectively use GitHub and commit changes, it is important to understand the concept of a staging environment. This environment allows you to review and test your changes before they are implemented in the main branch.
To start, make sure you have a GitHub repository set up. You can either use the graphical user interface or the command line interface, depending on your preference. Once you have your repository, you can create a branch to work on your changes separately from the main branch.
When you are ready to commit your changes, you can use the “git add” command to stage your changes and the “git commit” command to commit them to your branch. It is important to provide a clear and descriptive commit message explaining the changes you made.
Once you have committed your changes, you can push them to your repository and create a pull request to merge them with the main branch. This allows for collaboration and review of your changes before they are implemented.
Adding a file to the staging environment
To add a file to the staging environment in GitHub, follow these steps:
1. Open your GitHub repository and navigate to the desired branch.
2. Click on the “Add file” button, located near the top right of the repository page.
3. Choose the option “Upload files” to add a file from your computer.
4. Click on the “Choose your files” button and select the file you want to add.
5. Optionally, you can provide a brief description of the changes you made in the “Commit changes” section.
6. Once you’re ready, click on the “Commit changes” button to add the file to the staging environment.
Creating a commit
To create a commit in GitHub, follow these steps:
1. Make sure you have a GitHub repository set up and have it cloned onto your local machine.
2. Open your preferred code editor and make changes to the files in the repository.
3. Save the changes and go to your terminal or command prompt.
4. Navigate to the directory where your repository is located.
5. Use the command “git add
6. Next, use the command “git commit -m ‘commit message'” to create a commit with a descriptive message explaining the changes you made.
7. Once the commit is created, you can push it to the remote repository using the command “git push origin
Creating and naming a new branch
Creating and naming a new branch in GitHub is a crucial step in managing your repository. To create a new branch, navigate to the repository’s main page and click on the “Branch: master” dropdown menu. Enter a name for your new branch and click “Create branch. ” This will create a copy of the master branch that you can work on independently. Naming your branch should follow a consistent and descriptive convention, such as using the feature or bug name.
Once the branch is created, you can switch to it by selecting it from the dropdown menu.
Creating a new repository on GitHub
To create a new repository on GitHub, follow these simple steps:
1. Sign in to your GitHub account.
2. Click on the “+” icon in the top-right corner and select “New repository.”
3. Enter a name for your repository and add an optional description.
4. Choose if you want your repository to be public or private.
5. Initialize the repository with a README file to provide basic information about your project.
6. Select the appropriate license for your project, if applicable.
7. Click on the “Create repository” button.
Remember to regularly commit and push your code to the repository to keep it up to date. You can also explore features like git branching and use different git commands to manage your repository efficiently.
For a more in-depth understanding of GitHub and its features, you can check out tutorials and courses provided by platforms like Edureka. They offer comprehensive training on GitHub and other Linux-related topics to enhance your learning experience and help you become proficient in using this powerful version control system.
Pushing a branch to GitHub
To push a branch to GitHub, you can use the command `git push origin branch-name`. This will upload your branch to the remote repository on GitHub. You can also use a **graphical user interface** like GitHub Desktop, which provides an easier way to perform this task.
Remember to ensure you have an active **internet connection** before pushing your branch. Once pushed, others can access and review your changes, making collaboration seamless.
For more detailed guidance on using GitHub and other **git commands**, consider checking out tutorials like those offered by **edureka** or the official GitHub website.
Creating and merging a pull request
Creating and merging a pull request is an essential part of collaborating on GitHub. To start, navigate to the repository you want to contribute to and click on the “Pull requests” tab. Then, click on the green “New pull request” button. Select the branch you want to merge into the main branch, and write a clear and concise title and description for your pull request.
Review the changes you’ve made and ensure they are correct. Once you’re ready, click on the “Create pull request” button. After reviewing and approving the pull request, it can be merged into the main branch.
Syncing changes between GitHub and local computer
To sync changes between GitHub and your local computer, you’ll need to follow a few simple steps. First, make sure you have Git installed on your operating system. Next, navigate to your GitHub repository and copy the repository’s URL. On your local computer, open a terminal or command prompt and navigate to the directory where you want to clone the repository. Use the command “git clone [repository URL]” to create a local copy of the repository.
Once you have made changes to your files, use the command “git add [file name]” to stage the changes. Then, use the command “git commit -m ‘commit message'” to commit the changes to your local repository. Finally, use the command “git push origin [branch name]” to push the changes to GitHub.
If you encounter any issues, you can refer to Git’s documentation or seek help from the GitHub community.