Unveiling the Power of Efficiency: Streamlining Your Linux Directory with tar
Compressing an Entire Directory or Single File
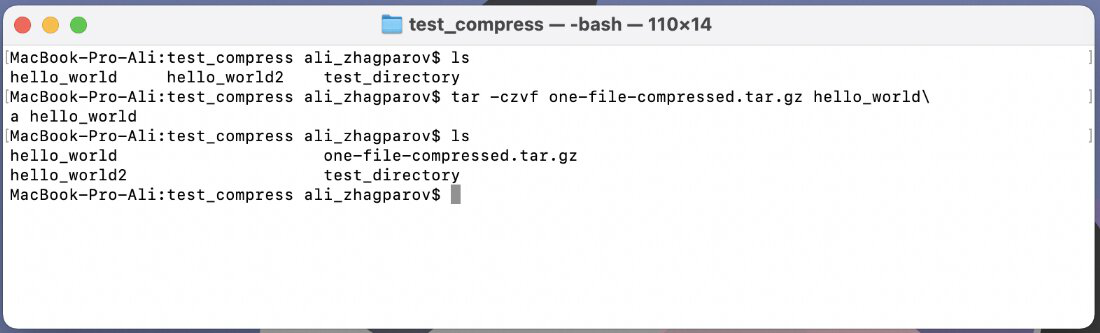
To compress an entire directory or single file in Linux using tar, follow these steps:
1. Open the terminal and navigate to the directory containing the files you want to compress. You can use the “cd” command to change directories.
2. Use the tar command with the appropriate options to create the archive file. For example, to create a tarball named “filename.tar.gz” for a directory, use the command “tar -czvf filename.tar.gz directoryname”.
3. If you want to compress a single file, replace “directoryname” with the name of the file.
4. The compression algorithm used by default is gzip, but you can also use other algorithms like bzip2 or xz. Just change the file extension accordingly.
5. Once the compression is complete, you will find the archive file in your current working directory.
Remember to replace “filename” with the desired name for your archive file and “directoryname” with the actual name of the directory or file you want to compress.
These steps can be easily followed by Linux users to compress their files or directories using the tar command.
Compressing Multiple Directories or Files Simultaneously
Compressing Multiple Directories or Files Simultaneously
Using tar in Linux
| Command | Description |
|---|---|
| tar -cvf archive.tar /path/to/directory1 /path/to/directory2 | Create a tar archive named archive.tar by compressing directory1 and directory2. |
| tar -cvzf archive.tar.gz /path/to/directory1 /path/to/directory2 | Create a gzipped tar archive named archive.tar.gz by compressing directory1 and directory2. |
| tar -cvjf archive.tar.bz2 /path/to/directory1 /path/to/directory2 | Create a bzip2 compressed tar archive named archive.tar.bz2 by compressing directory1 and directory2. |
| tar -cvJf archive.tar.xz /path/to/directory1 /path/to/directory2 | Create a xz compressed tar archive named archive.tar.xz by compressing directory1 and directory2. |
| tar -cvfz archive.tar.gz /path/to/directory1 /path/to/directory2 | Create a gzipped tar archive named archive.tar.gz by compressing directory1 and directory2 (alternative syntax). |
Excluding Directories and Files from Compression
When compressing directories and files using the tar command in Linux, it is important to exclude certain directories and files from the compression process. This can be achieved by specifying the paths of the directories or files that should be excluded using the “–exclude” option followed by the path. For example, to exclude a directory called “example_directory” and a file called “example_file.txt”, the command would be:
tar -czvf archive_name.tar –exclude=example_directory –exclude=example_file.txt working_directory
By excluding directories and files, you can ensure that only the necessary files are compressed, reducing the size of the resulting tarball. This can be useful when archiving large directories or when you want to exclude certain files that are not required for the intended purpose of the compressed archive.
Utilizing bzip2 Compression Method
Utilizing the bzip2 compression method, you can efficiently compress directories in Linux using the tar command. This article will guide you through the process without unnecessary fluff. To compress a folder, use the command “tar cvjf filename.tar.bz2 folder” where “filename” is the desired name for the compressed file and “folder” is the directory you want to compress. To extract the compressed files, use the command “tar xvjf filename.tar.bz2”. This technique is helpful for archiving multiple files or splitting large files into manageable parts. With these commands, you can easily compress and extract tar files in Linux.
Extracting an Archive
To extract an archive in Linux using the tar command, follow these steps:
1. Open the terminal and navigate to the directory where the archive file is located.
2. Use the “tar” command followed by the appropriate options and the name of the archive file to extract it. For example, to extract a “.tar” file, use the command “tar -xf archive_name.tar”.
3. If the archive is compressed with a compression algorithm like “.tar.gz” or “.tar.bz2”, use the appropriate options to uncompress it as well. For example, for a “.tar.gz” file, use the command “tar -xzf filename.tar.gz”.
4. After executing the command, the files will be extracted to the current working directory. You can specify a different directory by providing the path using the “-C” option followed by the desired directory path.
Additional Tips and Conclusion
Here are a few additional tips to keep in mind when compressing directories in Linux using tar:
1. Use the tar command followed by the desired options to create an archive file. For example, you can use “tar cvf archive.tar directory” to create a tarball of a specific directory.
2. To compress the archive file, you can use different compression algorithms such as gzip, bzip2, or xz. For instance, “tar czvf archive.tar.gz directory” will create a gzip-compressed tarball.
3. When working with large files or directories, it may be necessary to split the archive into smaller parts. You can achieve this by using the split command.
4. To extract files from a tarball, use the untar command followed by the desired options. For example, “tar xvf archive.tar” will extract the contents of the tarball.
Remember, practice and experimentation are key to mastering the GNU tar command. For more detailed instructions and examples, refer to the provided resources like GeeksforGeeks and the article itself. Feel free to explore other compression techniques and commands to suit your specific needs.
That concludes our guide on compressing directories in Linux using tar. We hope this article has been helpful in introducing you to this useful tool. If you have any further questions or comments, please feel free to reach out and we will be glad to assist you.