Welcome to the Powerpoint Basics Tutorial, where we will explore the fundamental tools and features of this powerful presentation software.
Choosing a Theme and Style
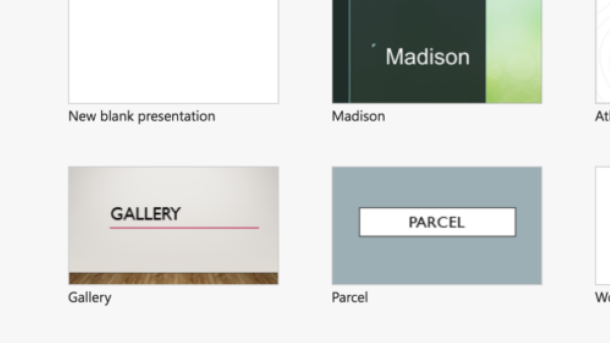
Think about the purpose of the presentation and what emotions or reactions you want to evoke from the viewers. Choose a theme that complements the content and helps to visually reinforce your message.
Consider the color scheme, font styles, and layout options available in PowerPoint to create a cohesive and professional look. Remember to keep it simple and avoid cluttering the slides with unnecessary elements.
Experiment with different themes and styles to see what works best for your presentation. Don’t be afraid to customize and make adjustments as needed to achieve the desired effect.
Remember that consistency is key when it comes to theme and style – make sure that all slides have a cohesive look and feel. Pay attention to details such as alignment, spacing, and visual hierarchy to ensure a polished and professional presentation.
Ultimately, the theme and style you choose should enhance the overall message of your presentation and help to engage and captivate your audience. Experiment with different options and don’t be afraid to get creative with your design choices.
By taking the time to carefully select a theme and style that complements your content, you can create a visually appealing and impactful presentation that effectively communicates your message.
Adding Slides and Content
| Slide Number | Content |
|---|---|
| Slide 1 | Welcome slide with title “Powerpoint Basics Tutorial” |
| Slide 2 | Introduction to Powerpoint and its uses |
| Slide 3 | Steps to create a new presentation |
| Slide 4 | Adding text and formatting options |
| Slide 5 | Inserting images and graphics |
| Slide 6 | Adding charts and graphs for data representation |
| Slide 7 | Using animations and transitions for engaging presentations |
| Slide 8 | Tips for effective presentation delivery |
Customizing Fonts and Colors
To customize fonts and colors in PowerPoint, simply select the text or object you want to modify. Then, go to the “Home” tab and choose from the dropdown menus for fonts and colors. You can also use the “Format” tab for more advanced options.
If you want to highlight specific words or phrases, you can change the font color or apply bold, italic, or underline formatting. Experiment with different combinations to find what works best for your presentation.
For a more polished look, consider adding shadows or reflections to your text. This can help make it stand out and give it a professional touch. You can also adjust the size, spacing, and rotation of your text to further customize its appearance.
When it comes to colors, you can choose from the preset color schemes in PowerPoint or create your own custom palette. This can help ensure consistency throughout your presentation and make it visually appealing.
Don’t forget to save your work regularly to avoid losing any changes. You can set up autosave in PowerPoint to save your presentation at regular intervals. This can be a lifesaver in case of a computer crash or other technical issues.
If you’re working on a team presentation, you can easily share your PowerPoint file via email or a cloud storage service like Dropbox or Google Drive. This allows everyone to collaborate and make edits in real time.
Inserting Multimedia and Bullet Points
To insert multimedia in your PowerPoint presentation, simply click on the “Insert” tab at the top of the screen. From there, you can choose to insert images, videos, audio files, or even online content. Multimedia can help make your presentation more engaging and visually appealing to your audience.
When using multimedia, be sure to keep file sizes in mind to prevent your presentation from becoming too large or slow to load. Compressing images and videos can help with this. Additionally, be mindful of copyright issues when using multimedia that you did not create yourself.
Bullet points are a great way to organize information in your PowerPoint slides. To add bullet points, simply select the text you want to turn into a bulleted list and click the “Bullets” button on the Home tab. You can choose from a variety of bullet styles to suit your presentation’s aesthetic.
Using bullet points can help break up large chunks of text and make your information easier to digest for your audience. Be sure to keep your bullet points concise and to the point, using them to highlight key information rather than overwhelming your audience with too much text.
Incorporating multimedia and bullet points into your PowerPoint presentation can help you create a more dynamic and engaging slideshow. Experiment with different layouts and designs to find what works best for your content and audience. Remember to save your work frequently to avoid losing any changes, and consider practicing your presentation before the actual event to ensure everything runs smoothly.
Using Speaker Notes and Presenter View
When giving a presentation using PowerPoint, Speaker Notes and Presenter View can be extremely useful tools to help keep you organized and on track. Speaker Notes allow you to add additional information, reminders, or talking points for each slide that only you can see. This can help you stay focused and make sure you cover all the necessary points during your presentation.
Presenter View is a feature that allows you to see your Speaker Notes, the current slide, and the next slide all on one screen while your audience sees only the slideshow. This can help you anticipate what’s coming next and smoothly transition between slides without any interruptions.
To access Speaker Notes and Presenter View, go to the “View” tab in the PowerPoint menu and select “Notes Page” to input your Speaker Notes. Then, click on “Slide Show” and check the box next to “Use Presenter View” to enable it during your presentation.
While in Presenter View, you can easily navigate through your slides, view your Speaker Notes, and even jump to a specific slide if needed. This can help you feel more confident and in control during your presentation, as you have all the information you need right in front of you.


